

We will be exploring Caching in .NET Core and its functionality. We will take a step-by-step approach to cover the following aspects:
- Introduction to Caching
- What is Cache
- Types of Cache
- Cache Implementation
Let’s proceed with the discussion on each of these topics:
Introduction
Caching has become immensely popular in the software industry due to its ability to enhance application performance and scalability significantly. We can observe this improvement in the responsiveness and seamless user experience of web applications like Gmail and Facebook. As the internet caters to a vast number of users, applications facing heavy network traffic and high demand must address various challenges to maintain optimal performance and responsiveness. This is where caching serves as a crucial solution, allowing frequently accessed data to be temporarily stored closer to the application, thereby reducing the need for repetitive retrieval from remote sources such as databases or APIs. As a result, caching plays a pivotal role in ensuring smoother application operations and, hence, is an indispensable aspect of modern software development.
What is Caching?
The cache is a memory storage that stores frequently accessed data temporarily. It significantly improves performance by avoiding unnecessary database hits and buffering frequently used data for quick retrieval whenever needed.
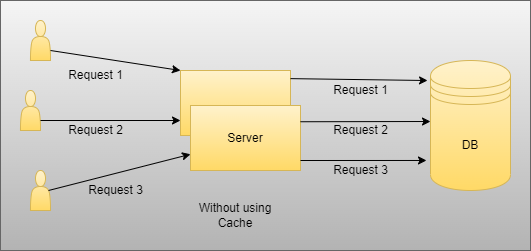
As depicted in the above image, we have two scenarios — one without using cache and the other with cache. In the case where cache is not employed, each time a user requests data, they directly hit the database, leading to increased time complexity and reduced performance. This becomes particularly problematic when there is static data that all users require, as each user will redundantly access the database to fetch the same information.
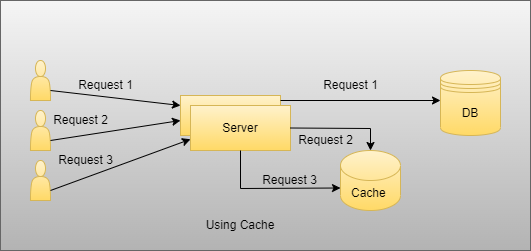
However, in the scenario where we implement cache, if multiple users request the same static data, only the first user will initially hit the database to fetch the data. Subsequently, this data will be stored in the cache memory. As a result, the other users can efficiently retrieve the data from the cache without the need for unnecessary and repetitive database hits. This caching mechanism optimizes performance and minimizes the load on the database, leading to improved overall system responsiveness.
Types of Cache
Essentially, .NET Core supports two types of caching:
- In-Memory Caching
- Distributed Caching
When utilizing In-Memory Caching, data is stored in the memory of the application server. Whenever the data is needed, it is fetched from the in-memory cache and used as required.
On the other hand, Distributed Caching involves various third-party mechanisms like Redis, among others. In this context, we will focus on Redis Cache in detail and explore how it works within the .NET Core framework.
Distributed Caching

In distributed caching, data is stored and shared among multiple servers. This approach offers several advantages, particularly in improving scalability and enhancing application performance, especially when dealing with multi-tenant applications.
When employing multiple servers, the application can effectively manage the load, ensuring a smoother and more responsive user experience. In the event of a server crash and subsequent restart, the application remains unaffected because other servers continue to handle the workload as required.
Redis is widely regarded as one of the most popular caching solutions, extensively used by many companies today to optimize application performance and scalability. In the following discussion, we will explore Redis in detail and delve into its various use cases and benefits.
Redis Cache
Redis is an open-source, in-memory data structure store, functioning as a database. Its primary purpose is to store frequently used and static data within the cache, making it readily available and accessible as per user requirements.
Redis offers a diverse set of data structures that developers can utilize to efficiently store and manage data. Some of these data structures include Lists, Sets, Hashes, Streams, and many others, providing flexibility and versatility in handling various types of data.
Installation of Redis Cache:
Step 1: Begin the installation process by downloading the Redis Server from the provided URL.
Step 2: Extract the zip file and later on open the Redis Server and Redis CLI

Implementation of Redis Cache using .NET Core API
Step 1: Create the .NET Core API Web Application
Step 2: Install the following NuGet Packages which need step by step in our application.
- Microsoft.EntityFrameworkCore
- Microsoft.EntityFrameworkCore.Design
- Microsoft.EntityFrameworkCore.SqlServer
- Microsoft.EntityFrameworkCore.Tools
- Swashbuckle.AspNetCore
- StackExchange.Redis
Step 3: Create the Model folder and create one Product Class inside that with details.
namespace RedisCacheDemo.Model
{
    public class Product
    {
        public int ProductId { get; set; }
        public string ProductName { get; set; }
        public string ProductDescription { get; set; }
        public int Stock { get; set; }
    }
}
Step 4: Next, Create the DbContextClass Class for Database related operations as I showed below.
using Microsoft.EntityFrameworkCore;
using RedisCacheDemo.Model;
namespace RedisCacheDemo.Data {
    public class DbContextClass: DbContext {
        public DbContextClass(DbContextOptions < DbContextClass > options): base(options) {}
        public DbSet < Product > Products {
            get;
            set;
        }
    }
}
Step 5: Now, we are going to create ICacheService Interface and CacheService Class for Redis Cache-related usage.
using System;

namespace RedisCacheDemo.Cache
{
    public interface ICacheService
    {
        /// <summary>
        /// Get Data using key
        /// </summary>
        /// <typeparam name="T"></typeparam>
        /// <param name="key"></param>
        /// <returns></returns>
        T GetData<T>(string key);

        /// <summary>
        /// Set Data with Value and Expiration Time of Key
        /// </summary>
        /// <typeparam name="T"></typeparam>
        /// <param name="key"></param>
        /// <param name="value"></param>
        /// <param name="expirationTime"></param>
        /// <returns></returns>
        bool SetData<T>(string key, T value, DateTimeOffset expirationTime);

        /// <summary>
        /// Remove Data
        /// </summary>
        /// <param name="key"></param>
        /// <returns></returns>
        object RemoveData(string key);
    }
}
using Newtonsoft.Json;
using StackExchange.Redis;
using System;
namespace RedisCacheDemo.Cache {
    public class CacheService: ICacheService {
        private IDatabase _db;
        public CacheService() {
            ConfigureRedis();
        }
        private void ConfigureRedis() {
            _db = ConnectionHelper.Connection.GetDatabase();
        }
        public T GetData < T > (string key) {
            var value = _db.StringGet(key);
            if (!string.IsNullOrEmpty(value)) {
                return JsonConvert.DeserializeObject < T > (value);
            }
            return default;
        }
        public bool SetData < T > (string key, T value, DateTimeOffset expirationTime) {
            TimeSpan expiryTime = expirationTime.DateTime.Subtract(DateTime.Now);
            var isSet = _db.StringSet(key, JsonConvert.SerializeObject(value), expiryTime);
            return isSet;
        }
        public object RemoveData(string key) {
            bool _isKeyExist = _db.KeyExists(key);
            if (_isKeyExist == true) {
                return _db.KeyDelete(key);
            }
            return false;
        }
    }
}
Step 6: Create the ProductController class and create the following method as shown below.
using Microsoft.AspNetCore.Mvc;
using RedisCacheDemo.Cache;
using RedisCacheDemo.Data;
using RedisCacheDemo.Model;
using System;
using System.Collections.Generic;
using System.Linq;
using System.Threading.Tasks;
namespace RedisCacheDemo.Controllers {
    [Route("api/[controller]")]
    [ApiController]
    public class ProductController: ControllerBase {
        private readonly DbContextClass _dbContext;
        private readonly ICacheService _cacheService;
        public ProductController(DbContextClass dbContext, ICacheService cacheService) {
                _dbContext = dbContext;
                _cacheService = cacheService;
            }
            [HttpGet("products")]
        public IEnumerable < Product > Get() {
                var cacheData = _cacheService.GetData < IEnumerable < Product >> ("product");
                if (cacheData != null) {
                    return cacheData;
                }
                var expirationTime = DateTimeOffset.Now.AddMinutes(5.0);
                cacheData = _dbContext.Products.ToList();
                _cacheService.SetData < IEnumerable < Product >> ("product", cacheData, expirationTime);
                return cacheData;
            }
            [HttpGet("product")]
        public Product Get(int id) {
                Product filteredData;
                var cacheData = _cacheService.GetData < IEnumerable < Product >> ("product");
                if (cacheData != null) {
                    filteredData = cacheData.Where(x => x.ProductId == id).FirstOrDefault();
                    return filteredData;
                }
                filteredData = _dbContext.Products.Where(x => x.ProductId == id).FirstOrDefault();
                return filteredData;
            }
            [HttpPost("addproduct")]
        public async Task < Product > Post(Product value) {
                var obj = await _dbContext.Products.AddAsync(value);
                _cacheService.RemoveData("product");
                _dbContext.SaveChanges();
                return obj.Entity;
            }
            [HttpPut("updateproduct")]
        public void Put(Product product) {
                _dbContext.Products.Update(product);
                _cacheService.RemoveData("product");
                _dbContext.SaveChanges();
            }
            [HttpDelete("deleteproduct")]
        public void Delete(int Id) {
            var filteredData = _dbContext.Products.Where(x => x.ProductId == Id).FirstOrDefault();
            _dbContext.Remove(filteredData);
            _cacheService.RemoveData("product");
            _dbContext.SaveChanges();
        }
    }
}
Step 7: Add the SQL Server connection string and Redis URL inside appsetting.json.
{
    "Logging": {
        "LogLevel": {
            "Default": "Information",
            "Microsoft": "Warning",
            "Microsoft.Hosting.Lifetime": "Information"
        }
    },
    "AllowedHosts": "*",
    "RedisURL": "127.0.0.1:6379",
    "ConnectionStrings": {
        "DefaultConnection": "Data Source=Server;Initial Catalog=RedisCache;User Id=sa;Password=***;"
    }
}
Step 8: Next, Register the ICacheService inside Configure Service method of Startup Class and also add some configuration related to Swagger to test our API endpoints.
using Microsoft.AspNetCore.Builder;
using Microsoft.AspNetCore.Hosting;
using Microsoft.EntityFrameworkCore;
using Microsoft.Extensions.Configuration;
using Microsoft.Extensions.DependencyInjection;
using Microsoft.Extensions.Hosting;
using Microsoft.OpenApi.Models;
using RedisCacheDemo.Cache;
using RedisCacheDemo.Data;
namespace RedisCacheDemo {
    public class Startup {
        public Startup(IConfiguration configuration) {
            Configuration = configuration;
        }
        public IConfiguration Configuration {
            get;
        }
        // This method gets called by the runtime. Use this method to add services to the container.
        public void ConfigureServices(IServiceCollection services) {
            services.AddControllers();
            services.AddScoped < ICacheService, CacheService > ();
            services.AddDbContext < DbContextClass > (options => options.UseSqlServer(Configuration.GetConnectionString("DefaultConnection")));
            services.AddSwaggerGen(c => {
                c.SwaggerDoc("v1", new OpenApiInfo {
                    Title = "RedisCacheDemo", Version = "v1"
                });
            });
        }
        // This method gets called by the runtime. Use this method to configure the HTTP request pipeline.
        public void Configure(IApplicationBuilder app, IWebHostEnvironment env) {
            if (env.IsDevelopment()) {
                app.UseDeveloperExceptionPage();
                app.UseSwagger();
                app.UseSwaggerUI(c => c.SwaggerEndpoint("/swagger/v1/swagger.json", "RedisCacheDemo v1"));
            }
            app.UseHttpsRedirection();
            app.UseRouting();
            app.UseAuthorization();
            app.UseEndpoints(endpoints => {
                endpoints.MapControllers();
            });
        }
    }
}
Step 9: Create one ConfigurationManger Class to configure app setting over there.
using Microsoft.Extensions.Configuration;
using System.IO;
namespace RedisCacheDemo {
    static class ConfigurationManager {
        public static IConfiguration AppSetting {
            get;
        }
        static ConfigurationManager() {
            AppSetting = new ConfigurationBuilder().SetBasePath(Directory.GetCurrentDirectory()).AddJsonFile("appsettings.json").Build();
        }
    }
}
Step 10: Next, Create Connection Helper Class for Redis Connection.
using StackExchange.Redis;
using System;
namespace RedisCacheDemo.Cache {
    public class ConnectionHelper {
        static ConnectionHelper() {
            ConnectionHelper.lazyConnection = new Lazy < ConnectionMultiplexer > (() => {
                return ConnectionMultiplexer.Connect(ConfigurationManager.AppSetting["RedisURL"]);
            });
        }
        private static Lazy < ConnectionMultiplexer > lazyConnection;
        public static ConnectionMultiplexer Connection {
            get {
                return lazyConnection.Value;
            }
        }
    }
}
Step 11: Perform Migration and Database Update for DB Creation using the following commands in Package Manager Console.
add-migration “FirstMigration”
update-database
When you enter and execute this command, it will initiate the migration process and create the necessary database inside SQL Server as specified in the Connection String provided in the appsettings.json file.
Step 12: Finally, run the application and use Swagger UI to add data. Afterward, observe how caching works within the “products” and “product” endpoints.
I have implemented caching for the product and products endpoints in the controller. When a user requests to fetch data for all products, the application first checks whether the data is present inside the Redis Cache. If the data exists in the cache, it is directly returned to the user. On the other hand, if the data is not found in the cache, the application retrieves it from the database and stores it in the cache. Subsequent requests for the same data will then be served directly from the cache, eliminating the need for unnecessary database queries. This efficient caching mechanism helps to enhance application performance by minimizing the database access and response time for frequently accessed data.
Furthermore, when a user requests data based on a specific product ID, the controller utilizes the cached data of all products. It then filters the data using the provided product ID. If the filtered result is present in the cache, it is returned to the user directly from the cache. However, if the filtered data is not found in the cache, the controller fetches it from the database, applies the filter, and then returns the result to the user. This approach optimizes data retrieval by leveraging cached data whenever possible, reducing the reliance on database queries and improving the overall efficiency of the application.
As observed in the update, delete, and post endpoints of the Product Controller, we utilize the “remove” method to delete the data associated with the product key from the cache. This ensures that the cache stays updated and consistent with the latest data.
Redis Cache offers a multitude of scenarios and memory cache usage possibilities, allowing developers to tailor it to their specific needs and requirements. The purpose of this discussion was to provide an introduction to the fundamentals of Redis Cache and its implementation within .NET Core. By employing Redis Cache, developers can optimize application performance, reduce database access, and enhance the overall responsiveness of their applications.
Additionally, there is one important scenario that requires careful consideration when using caching. Let’s suppose there are two users simultaneously using your application. In this case, the following scenarios may occur:
- When the First User sends a request to fetch data for all products, the application first checks whether the data is present inside the cache. If the data exists in the cache, it is directly returned to the user. However, if the data is not found in the cache, the application fetches the data from the database, and then stores it in the cache for future use. This ensures that subsequent requests for the same data can be served directly from the cache, improving response times and reducing the need for additional database queries.
- Meanwhile, while the First User’s request is being processed, the Second User also sends a request to retrieve product details. Since the First User’s request is still in progress and the data is not yet cached, the Second User’s request also hits the database to fetch the product details. This concurrent access can lead to redundant database hits, and it’s a scenario that needs to be carefully managed when using caching to avoid unnecessary database queries and optimize performance.
- To address this issue, a potential solution is to implement a Lock Mechanism. By using a Lock Mechanism, we can ensure that only one user can access the database at a time, preventing concurrent access and redundant database hits. This approach helps manage caching more effectively and avoids potential data inconsistency or performance bottlenecks when multiple users are using the application simultaneously.
To implement the Lock Mechanism, create a private object of lock at the top of the class. This lock object will be used to synchronize access to critical sections of code where the database is being accessed. By using this lock, you can ensure that only one user can access the database at a time, avoiding any potential conflicts or data integrity issues when multiple users access the application concurrently.
private static object _lock = new object()
Next, Modify the Get method as I showed below
public IEnumerable < Product > Get() {
    var cacheData = _cacheService.GetData < IEnumerable < Product >> ("product");
    if (cacheData != null) {
        return cacheData;
    }
    lock(_lock) {
        var expirationTime = DateTimeOffset.Now.AddMinutes(5.0);
        cacheData = _dbContext.Products.ToList();
        _cacheService.SetData < IEnumerable < Product >> ("product", cacheData, expirationTime);
    }
    return cacheData;
}
As you can observe, in this approach, we first check if the requested data is already present in the cache. If the data is available, we immediately return it to the user. However, if the data is not found in the Redis cache, we apply a lock mechanism to synchronize access to the critical section of code.
When the lock is applied, the second user’s request is put on hold in a queue, waiting for the first user’s request to complete. Once the first user’s request is finished, the second request gets its turn to enter the section and fetch the product details from the database. Subsequently, the retrieved data is set to the cache, and then it is returned to the second user.
By using this lock mechanism, we ensure that only one user can access the critical section at a time, preventing concurrency issues and maintaining data integrity. The second user’s request may experience a slight delay due to waiting in the queue, but it will still receive the correct and up-to-date data without any conflicts. This approach effectively manages concurrent requests and optimizes data retrieval while using the Redis cache.
Furthermore, you can view the details of keys that are already present in Redis using the Redis Command Line Interface (CLI) as demonstrated below:
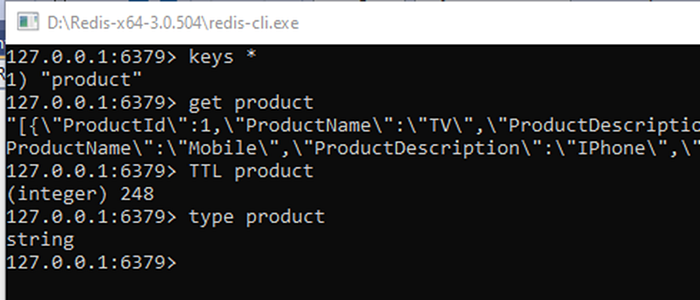
Indeed, there are several commands available in Redis that allow us to obtain information about the keys stored in the Redis Cache.
That concludes our discussion on Redis Cache in .NET Core. I hope you now have a clear understanding of various aspects related to Redis caching and its implementation in .NET Core. If you have any further questions or need additional clarification, feel free to ask.


 CỦA OBJECTIVE (MỤC TIÊU)")
