

Developing a Microservices architecture with back-end Message Queuing Services to support a front-end Angular 6 application built with Angular Material Design
Introduction
The Monolith. By definition, a monolith is a geological feature consisting of a single massive stone or rock, such as a mountain or a single large piece of rock placed as or within a monument or building. Erosion usually exposes these geological formations, which are often made of very hard and solid metamorphic rock.
As most science-fiction fans know; the term monolith became part of pop culture in 1968 through Stanley Kubrick’s movie 2001: A Space Odyssey. Kubrick’s movie introduced a sleek black monolith, one of the most striking icons in film and art history. But what was this black monolith depicted in the movie.
In a moment of the sublime, the black monolith first appears to inspire pre-humans to discover technology and look to the stars. When the apes first see the black monolith, they are experiencing an all-too-human moment of the sublime; the simultaneous feeling of awe, wonder, and terror when gazing upon something majestic and mysterious that seems to overwhelm their reason and sensory perceptions. It’s hard to say what Kubrick was trying to tell us; perhaps the message is simple in that the black monolith represents hope for the human species.
Software Monoliths
In software engineering, a monolithic application describes a single or multi-tiered software application in which a large portion of the code base is combined into a single program or component from a single platform. A monolithic application describes a software application which is designed without modularity. Modularity is desirable in general as it supports reuse of parts of the application logic and also facilitates maintenance by allowing repair or replacement of parts of the application without requiring a wholesale replacement.
Monolithic applications are a natural way for an application to evolve. Most applications start out with a single objective, or a small number of related objectives. Over time, features are added to the application to support business needs. Unfortunately, monoliths are imperfect in many ways and eventually they become very large and too expensive to update and become difficult to deploy and ultimately too risky to replace and modernize.
Good examples of monolithic systems can be found at the federal government and at large insurance and banking institutions. Many of these institutions rely on inefficient, costly, fragile, decades old systems to which more than 75 percent of its total IT budget is allocated. Some agencies have attempted to modernize these massive legacy systems with little or no success.
Of course it didn’t stop there. Through the proliferation of the internet, applications have increasingly been written for the World Wide Web. Unfortunately, the technologies used for web application development through the years have violated well-known software engineering principles in the aftermath of large legacy systems. We now have large legacy web applications that contain mountains of spaghetti code that have been developed over the last fifteen years. Modernization of these systems will be a challenge moving forward.
Microservices Architecture
As an alternative to developing monolithic software applications, a new architectural development technique has recently emerged called microservices. Microservices is a software development technique; a variant of the service-orientated architecture (SOA) that structures an application as a collection of loosely coupled services. In a microservices architecture, services are lightweight. The benefit of decomposing an application into different smaller services is that it improves modularity. This makes the application easier to understand, develop, test, deploy and become more resilient to architectural erosion.
Each microservice is a small application that has its own architecture that can be developed, tested and deployed individually without impacting other parts of the application.
Microservices Design and Planning
So the promise of the microservices architecture sounds great. Unfortunately there is no industry consensus yet regarding the properties of microservices, and an official definition is missing as well. Some of the defining characteristics that are frequently cited include:
- Services in a microservice architecture (MSA) are often processes that communicate over a network to fulfill a goal using technology-agnostic protocols such as HTTP.
- Services in a microservice architecture are independently deployable.
- Services are easy to replace.
- Services are organized around capabilities and functions such as logistics, billing, etc.
- Services can be implemented using different programming languages, databases, hardware and software, depending on what fits best.
- Services are small in size, messaging enabled, bounded by contexts, autonomously developed, independently deployable, decentralized and built and released with automated processes.
With all this being said, it’s obvious that there are architectural challenges and complexities regarding the development and implementation of a well designed microservices architecture. A good plan and design is needed.
Sample Application
The sample application for this article is a mini ERP application consisting of several back-end microservices and several back-end message queuing services serving a front-end Angular 6 application. The following microservices make up the sample application:
- Account Management Web API Microservice
- Inventory Management Web API Microservice
- Sales Order Management Web API Microservice
- Purchase Order Management Web API MicroserviceAdditionally, the following message queuing services are also included in the sample application:
- Inventory Management Message Queuing Service
- Sales Order Management Message Queuing Service
- Purchase Order Management Message Queuing Service
- Logging Management Message Queuing Service
Microservices of the Sample Application
Decoupling capabilities from the monolith is hard. Deciding what capability to decouple into a microservice is one of the architectural challenges of decomposing a monolith application to an ecosystem of microservices. One of the most frequent questions with implementation of a microservices architecture is about size and granularity: how small should microservices be, should a piece of software be split into multiple microservices or built as a single one.
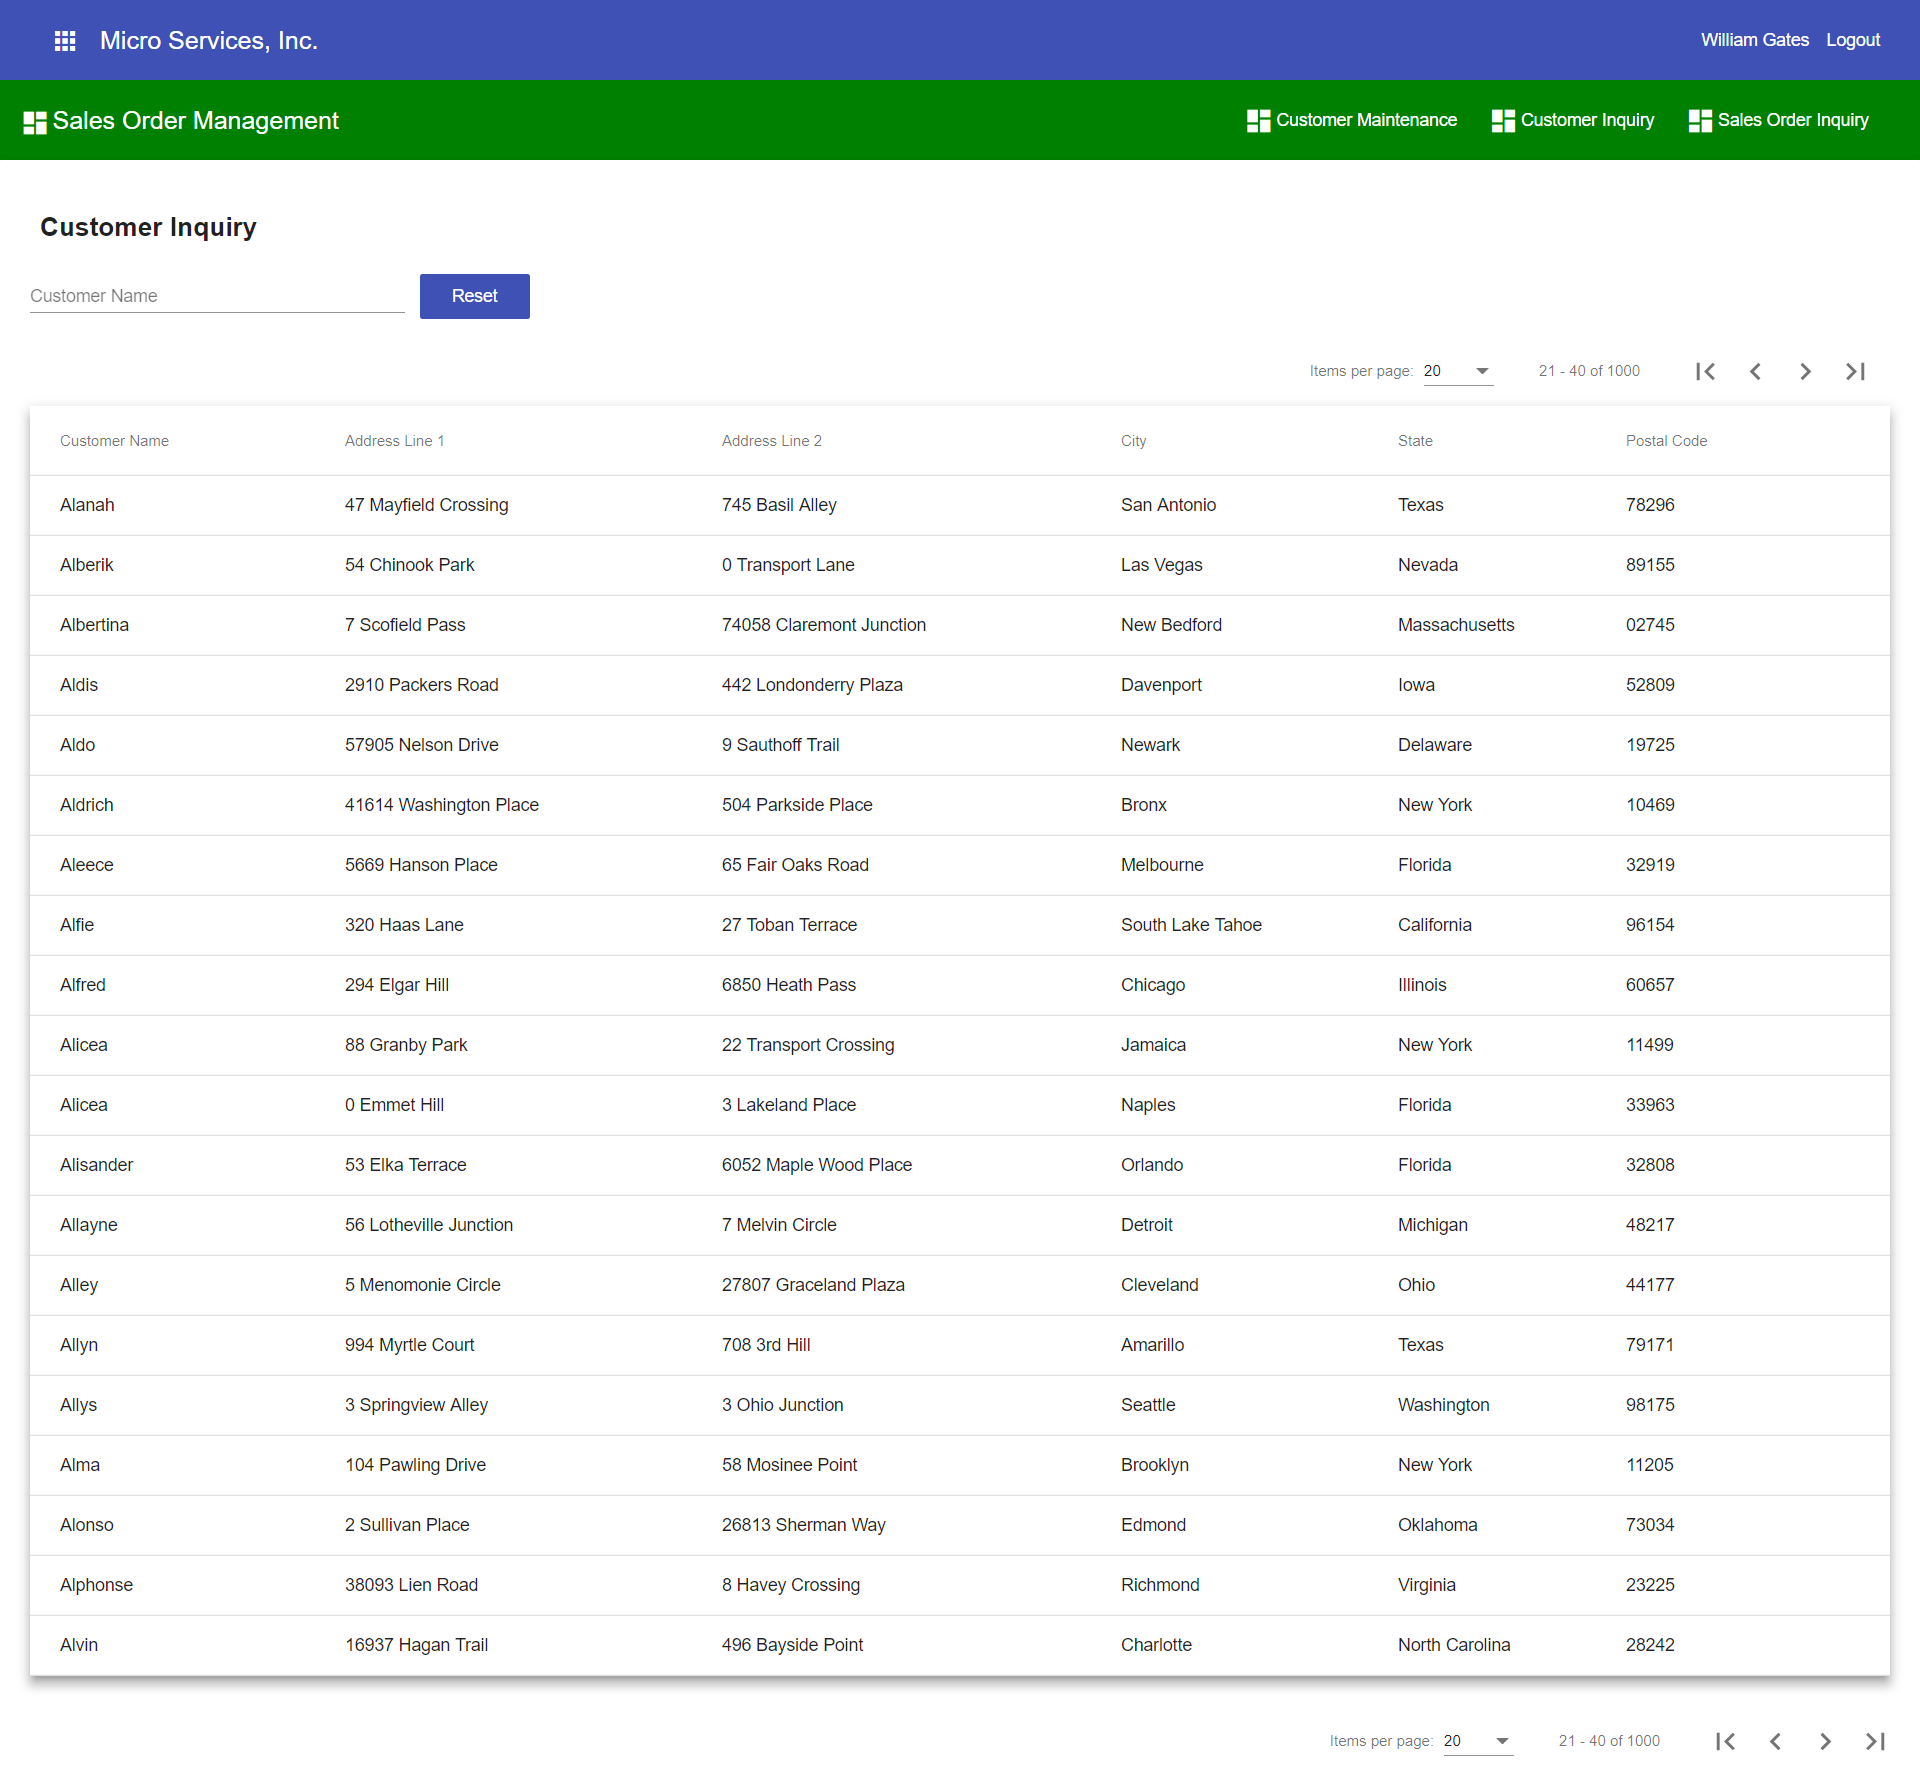
In the microservice design for the Sales Order Management microservice, I combined the functionality of both maintaining customers and entering sales orders. These two pieces of functionality seem to be related. It could be argued that maintaining customers should be a separate microservice from processing sales orders.
Finding the domain boundaries in a legacy monolith is both an art and science. In the grand scheme of things, you have to take every architecture with a grain of salt and create a design that works best for your application. As a general rule applying domain driven design techniques to find the bounded contexts defining microservices boundaries is a good place to start.
Microservices Inter-Process Communications
As long as you build a monolith, you don’t need to put too much thought into how your modules communicate with each other. On the other hand, the implementation of a microservice might seem easy in the beginning. Its smaller size and focus on one specific task reduces its complexity and makes it a lot simpler to understand than the typical monolith. But that quickly changes when you have to implement multiple services that depend on each other that need to communicate with each other and share data.
There isn’t one solution, but several. A microservices-based application is a distributed system running on multiple processes or services, usually even across multiple servers or hosts. Each service instance is typically a process. Therefore, services must interact using an inter-process communication protocol such as HTTP, AMQP, or a binary protocol like TCP, depending on the nature of each service.
Messaging Between Microservices with Message Queuing
Most think that building microservices is based on the same principle as REST with a JSON web service. Of course, this is the most common method. This has some advantages, but it has many drawbacks too. For example, what if the called service has crashed and cannot respond? Your client service has to implement some kind of reconnection or fail over logic, otherwise, you risk to lose requests and pieces of information. A cloud architecture should be resilient and recover gracefully from failures.
An alternative and complementary to HTTP requests are message queues. Using message queuing is actually a fairly old solution (such as Microsoft’s Message Queuing (MSMQ) technology) when dealing with multiple intercommunicating services. Message queuing is a method by which a process can exchange or pass data using an interface to a system-managed queue of messages. A message queue can be created by one process and used by multiple processes that read and/or write messages to and from the queue.
Message Queuing consists of many components such as:
- Message: a package for information, usually composed of two parts; headers, containing metadata, and a body, containing a binary package containing the actual message itself
- Producer: whoever creates and sends a message
- Consumer: whoever receives and reads a message
- Queue: a communication channel that enqueues messages for later retrieval by one or more consumers
- Exchange: a queue aggregator that routes messages to queues based on some predefined logic
Using message queues, you can send, store, and receive messages between application components at any volume, without losing messages or requiring other services to be always available. Message queues offer several options that allow you to specify how messages are delivered, prioritized, and secured.
With the proliferation of cloud technology there are several design and architectural decisions to choose from. For example, Microsoft offers their Azure Service Bus for highly-reliable cloud messaging between applications and services. Additionally, Amazon recently launched a new service called Amazon MQ, a managed message broker service for Apache ActiveMQ; an open-sourced, enterprise-grade message broker compatible with most industry standard protocols. Amazon picked ActiveMQ as it supports most industry standard protocols.
RabbitMQ Message Broker
The sample ERP application was written using Microsoft .NET Core 2.1 with the idea of developing an application that can be ported across various platforms, including running on both Windows and Linux servers. In adherence to maintaining portability, I was looking for an portable messaging queuing technology. In my search I came across RabbitMQ.
RabbitMQ is an open source message broker that supports the Advanced Message Queuing Protocol (AMQP). AMQP is an open standard application layer protocol for message-orientated middleware. The defining features of AMQP are message orientation, queuing, routing (including point-to-point and publish and subscribe), reliability and security.
RabbitMQ is lightweight and easy to deploy on premises and in the cloud. RabbitMQ can also be deployed to meet high-scale, high-availability requirements and runs on many operating systems and cloud environments.
Message Queuing Architectural Goals and Decisions
After much research, I came up with the following microservice design for the sample application:
- The front-end web application will be a single Angular 6 application with each module lazy loaded as separate Angular modules. When deciding to develop your front-end; an approach of separate front-ends for each service could be chosen.
- Each microservice will have its own dedicated SQL-Server database with a single Entity Framework Core database context.
- Each microservice will be self contained and will not cross boundaries or make remote calls into other microservices.
- Each microservice database will maintain separate copies of database tables where shared data across microservices is needed.
- Each microservice transaction will follow the Unit-of-Work design pattern with database ACID (Atomicity, Consistency Isolation, Durability) support with each transaction being completely committed or rolled backed in the database within a scope of a database transaction.
- Each microservice will record both inbound and outbound transactions within each transaction and within each database and message queue payloads will be stored in the inbound and outbound transaction tables.
- Each microservice will have a separate background process for sending, receiving and processing message queue messages.
- Each message queue message will have a unique transaction ID to uniquely identify each message and to prevent the processing of the same message more than once.
- Each transaction will be processed in sequential order of creation (transaction ID) to help maintain data integrity. Depending on the nature of the transactions of your application, this may not be a requirement.
- Each background message queuing service will run in a separate multithreaded console application and will interact directly with RabbitMQ.
- RabbitMQ will be loosely coupled from Web API components and will not be implemented within any Web API processes.
- A logging message queuing service and logging database will be created. All message queue messages that are sent and received through RabbitMQ will be saved in a central logging database for logging, monitoring and acknowledging messages.
- From the logging message queuing service, acknowledgement messages will be sent back to the originating microservice queue to indicate that messages were successfully processed.
- Each microservice will process acknowledgement messages and upon receipt; both inbound and outbound messages will be archived into message queue history tables within each dedicated microservice database.
- Message queues will be durable and persistent; messages will not get lost on service broker restarts.
- SignalR will be used for real-time message processing between the back-end message queueing service and the Web API application.
Now that we will have all this, we can now walk through some of the code of the sample ERP application.
Account Management Login Web API
Each microservice for the sample application will be secured and protected using a JSON web token. A JSON Web Token (JWT) is an open standard (RFC 7419) that defines a compact and self-contained way for securely transmitting information between parties as a JSON object. This information can be verified and trusted because it is digitally signed. A JWT can be signed using a secret (with the HMAC algorithm) or with a public/private key pair using RSA or ECDSA.
To login to the sample application, the login controller action method of the Account Management Web API will get executed with the user’s credentials (email address and password) being passed in from the client web request and the action method will proceed to call the Account Management business service to validate the user against the Account Management database.
Upon successful login a JSON web token will be generated and returned back to the client application where it will be persisted and saved in the client’s local storage. The JSON web token will be included in the header of each client HTTP request made to any Web API end point of the sample application.
/// <summary>
/// Login
/// </summary>
/// <param name="accountDataTransformation"></param>
/// <returns></returns>
[HttpPost]
[Route("Login")]
public async Task<IActionResult> Login([FromBody] AccountDataTransformation accountDataTransformation)
{
    ResponseModel<AccountDataTransformation> returnResponse = new ResponseModel<AccountDataTransformation>();
    try
    {
        returnResponse = await _accountBusinessService.Login(accountDataTransformation);
        if (returnResponse.ReturnStatus == true)
        {
            int userId = returnResponse.Entity.UserId;
            int accountId = returnResponse.Entity.AccountId;
            string firstName = returnResponse.Entity.FirstName;
            string lastName = returnResponse.Entity.LastName;
            string emailAddress = returnResponse.Entity.EmailAddress;
            string companyName = returnResponse.Entity.CompanyName;

            string tokenString = TokenManagement.CreateToken(userId, firstName, lastName, emailAddress, accountId, companyName);
            returnResponse.Entity.IsAuthenicated = true;
            returnResponse.Entity.Token = tokenString;
            return Ok(returnResponse);
         }
         else
         {
            return BadRequest(returnResponse);
         }

    }
    catch (Exception ex)
    {
         returnResponse.ReturnStatus = false;
         returnResponse.ReturnMessage.Add(ex.Message);
         return BadRequest(returnResponse);
    }

}
JSON Web Token Generation
Microsoft .NET Core 2.1 has strong support for generating and validating a JSON web token. The CreateToken method below takes the user’s credentials and account information and creates claim information that will be stored within the token including the user’s account id, user id, first name, last name, and company name. This information will be used to authenticate the user on each HTTP request. Once the claim information is created, the token can be signed and returned as an encrypted string within the Web API response.
/// <summary>
/// Create Token
/// </summary>
/// <param name="userId"></param>
/// <param name="firstName"></param>
/// <param name="lastName"></param>
/// <param name="emailAddress"></param>
/// <param name="companyName"></param>
/// <returns></returns>
public static string CreateToken(int userId, string firstName, string lastName, string emailAddress, int accountId, string companyName)
{
    var sharedKey = new SymmetricSecurityKey(Encoding.UTF8.GetBytes("CodeProject.Shared.Common.TokenManagement"));

    List<Claim> claims = new List<Claim>
    {
        new Claim(ClaimTypes.Email, emailAddress),
        new Claim(ClaimTypes.NameIdentifier, lastName),
        new Claim(ClaimTypes.GivenName, firstName),
        new Claim(ClaimTypes.Name, companyName),
        new Claim(ClaimTypes.PrimarySid, userId.ToString()),
        new Claim(ClaimTypes.PrimaryGroupSid, accountId.ToString())
    };

    var signinCredentials = new SigningCredentials(sharedKey, SecurityAlgorithms.HmacSha512Signature);

    var tokenDescription = new SecurityTokenDescriptor
    {
        Subject = new ClaimsIdentity(claims),
        NotBefore = DateTime.Now,
        Expires = DateTime.Now.AddMinutes(60),
        SigningCredentials = signinCredentials
    };

    var tokenHandler = new JwtSecurityTokenHandler();
    var token = tokenHandler.CreateToken(tokenDescription);
    string tokenString = tokenHandler.WriteToken(token);

    return tokenString;

}
ASP.NET Core 2.1 Web API Configuration and Start Up
ASP.NET Core 2.1 applications use a start up class to configure the applications services and it’s HTTP request processing pipeline. The ASP.NET Core 2.1 architecture features a system of middleware, which are pieces of code that handle requests and responses. Middleware components are chained to each other to form a pipeline. Incoming requests are passed through the pipeline, where each middleware has a chance to do something with the request before passing the request to the next middleware component. Outgoing responses are passed through the pipeline, in reverse order.
The middleware architecture is the key foundational piece to making ASP.NET Core 2.1 a lean and composable framework for building web and cloud applications that can work across Windows, Mac, and Linux OS. Essentially you have complete control over what functionality will be included in the configuration of your web application.
public class Startup
{
    public Startup(IConfiguration configuration)
    {
        Configuration = configuration;
    }

    public IConfiguration Configuration { get; }

    /// <summary>
    /// This method gets called by the runtime. Use this method to add services to the container.
    /// </summary>
    /// <param name="services"></param>
    public void ConfigureServices(IServiceCollection services)
    {

        CorsPolicyBuilder corsBuilder = new CorsPolicyBuilder();

        corsBuilder.AllowAnyHeader();
        corsBuilder.AllowAnyMethod();
        corsBuilder.AllowAnyOrigin();
        corsBuilder.AllowCredentials();

        services.AddCors(options =>
        {
            options.AddPolicy("SiteCorsPolicy", corsBuilder.Build());
        });

        ConnectionStrings connectionStrings = new ConnectionStrings();
        Configuration.GetSection("ConnectionStrings").Bind(connectionStrings);

        services.AddDbContext<AccountManagementDatabase>(options => options.UseSqlServer(Configuration.GetConnectionString("PrimaryDatabaseConnectionString")));

        //
        //    Built-In Dependency Injection
        //

        services.AddTransient<IAccountManagementDataService, AccountManagementDataService>();
        services.AddTransient<IAccountManagementBusinessService>(provider =>
        new AccountManagementBusinessService(provider.GetRequiredService<IAccountManagementDataService>(), connectionStrings));

        services.AddAuthentication(JwtBearerDefaults.AuthenticationScheme).AddJwtBearer(options =>
        {
            options.TokenValidationParameters = new TokenValidationParameters
            {
                ValidateIssuer = false,
                ValidateAudience = false,
                ValidateLifetime = true,
                ValidateIssuerSigningKey = true,
                ValidIssuer = "https://codeproject.microservices.com",
                ValidAudience = "https://codeproject.microservices.com",
                IssuerSigningKey = new SymmetricSecurityKey(Encoding.ASCII.GetBytes("CodeProject.Shared.Common.TokenManagement"))
            };
        });

        services.AddScoped<SecurityFilter>();

        services.AddMvc().SetCompatibilityVersion(CompatibilityVersion.Version_2_1);

        services.AddSignalR();

    }

    // This method gets called by the runtime. Use this method to configure the HTTP request pipeline.
    public void Configure(IApplicationBuilder app, IHostingEnvironment env)
    {

        app.UseCors("SiteCorsPolicy");
        app.UseAuthentication();

        if (env.IsDevelopment())
        {
            app.UseDeveloperExceptionPage();
        }
        else
        {
            app.UseHsts();
        }

        app.UseHttpsRedirection();

        app.UseMvc();
    }
}
In the start up class above for the Account Management Web API application, the following items are being configured:
- CORS Policy Configuration – The sample application will make cross-origin web requests. The CORS middleware component is required to handle cross-origin requests to the application. A cross-origin policy can be specified when adding the CORS middleware component.
- Database Configuration – Database connection strings can be retrieved from the application’s JSON configuration settings and injected into the pipeline on start up while also configuring the Entity Framework Core DbContext and it’s database provider (in this case, the SQL Server provider is being configured).
- Dependency Injection – ASP.NET Core 2.1 supports the dependency injection (DI) software design pattern, which is a technique for achieving Inversion of Control (IoC) between classes and their dependencies. The Account Management Web API application is loosely coupled and requires an Account Management business service and a Account Management data service. Both of these services implement an interface and are automatically injected into the Account Management Web API controller constructor.
- JWT Bearer Token Authentication – Adding token authentication to your Web API in ASP.NET Core is easy thanks to the JwtBearerAuthentication middleware component included in the framework. This allows you to configure how JSON web tokens are authenticated and configured.
- Action Filters – Filters in ASP.NET Core 2.1 allow you to run code before or after specific stages in the request processing pipeline. For the sample application, the user’s JSON web token will be parsed on each web request to extract claim information about the user.
- Add MVC – Adding MVC to the request execution pipeline will ensure that all requests to your web application are routable to the MVC framework, meaning you can use controllers, views and anything else contained within the MVC implementation.
- Add SignalR – Adds support for the SignalR framework that makes developing real-time web functionality easy. SignalR allows for bi-directional communication between the server and the client. Servers can push content to connected clients instantly.
ASP.NET Core 2.1 ships with a simple built-in dependency injection container. Dependency injection is at the core of ASP.NET Core 2.1. It allows the components in your application to have improved testability and makes your components loosely coupled and adds extensibility.
When you configure dependency injection, it is critical that you understand the lifetime management of your application’s dependencies. When registering your dependencies with the default ASP.NET Core 2.1 dependency injection container, you need to think about lifetime management. You might have noticed the usage of different methods to register dependencies like services.AddScoped and services.AddTransient in the start up class above.
There are three services lifetimes in ASP.NET Core 2.1 Dependency Injection:
- Transient services are created every time they are injected or requested. A new instance of the object will be created on every HTTP request.
- Scoped services will be provided every time the dependency is resolved within the same HTTP request. You can think of it as a singleton in the context of one web request.
- Singleton services are created per DI container. That generally means that they are created only one time per application and then used for the whole application life time. This is the same as implementing the singleton pattern.
The sample ERP application is a stateless application as threads and objects are created and destroyed on each web request. With this in mind, the application’s business and data access dependencies were created with a transient lifetime.
Configuring ASP.NET Core 2.1 Web API Endpoints
With the .NET Core 2.1 pipeline configured in the start up class, you can now secure the application’s Web API endpoints. In the code below for the Sales Order controller, the following things are configured:
- Action Filter – The SecurityFilter action filter is added to the controller which will execute a piece of code before executing each of the controller’s action methods.
- Authorization -The Authorize attribute is added that will perform JSON Web Token authentication.
- EnableCors – Enabling CORS will implement the CORS policy as it was configured in the start up class.
- Dependency Injection – Will automatically inject the Inventory Management Business Service through the controller’s constructor. A SignalR context will also be injected through the constructor.
[ServiceFilter(typeof(SecurityFilter))]
[Authorize]
[Route("api/[controller]")]
[EnableCors("SiteCorsPolicy")]
[ApiController]
public class SalesOrderController : ControllerBase
{
    private readonly IInventoryManagementBusinessService _inventoryManagementBusinessService;

    private IHubContext<MessageQueueHub> _messageQueueContext;

    /// <summary>
    /// Sales Controller
    /// </summary>
    public SalesOrderController(IInventoryManagementBusinessService inventoryManagementBusinessService, IHubContext<MessageQueueHub> messageQueueContext)
    {
        _inventoryManagementBusinessService = inventoryManagementBusinessService;
        _messageQueueContext = messageQueueContext;
    }

}
Parsing the JSON Web Token
When you configure ASP.NET Core 2.1 to use JWT Bearer Token Authentication, you will have access to the claim information provided in the token on each web request. As previously configured in the start up and at the controller class level, the below ActionFilter will get executed prior to the execution of each Web API controller action method. ASP.NET Core 2.1 exposes the HttpContext.User property as a ClaimsPrincipal object. The User object is automatically populated by ASP.NET Core with claim information from the JSON web token.
The action filter below extracts the claims provided in the JSON web token that was included in the header of the HTTP request and writes them to a SecurityModel class. The SecurityModel class is added to the HTTP context so that the Web API controller action method can reference the claim information and forward this information to the business and data access components for filtering and securing data at the user and account level.
public class SecurityFilter : IAsyncActionFilter
{
    /// <summary>
    /// Action Filter
    /// </summary>
    /// <param name="context"></param>
    /// <param name="next"></param>
    /// <returns></returns>
    public async Task OnActionExecutionAsync(ActionExecutingContext context, ActionExecutionDelegate next)
    {
        string firstName = context.HttpContext.User.FindFirst(ClaimTypes.GivenName).Value;
        string lastName = context.HttpContext.User.FindFirst(ClaimTypes.NameIdentifier).Value;
        string emailAddress = context.HttpContext.User.FindFirst(ClaimTypes.Email).Value;
        string companyName = context.HttpContext.User.FindFirst(ClaimTypes.Name).Value;
        int userId = int.Parse(context.HttpContext.User.FindFirst(ClaimTypes.PrimarySid).Value);
        int accountId = int.Parse(context.HttpContext.User.FindFirst(ClaimTypes.PrimaryGroupSid).Value);

        string token = TokenManagement.CreateToken(userId, firstName, lastName, emailAddress, accountId, companyName);

        SecurityModel securityModel = new SecurityModel();
        securityModel.EmailAddress = emailAddress;
        securityModel.FirstName = firstName;
        securityModel.LastName = lastName;
        securityModel.UserId = userId;
        securityModel.AccountId = accountId;
        securityModel.Token = token;

        context.HttpContext.Items["SecurityModel"] = securityModel;

        var resultContext = await next();

    }
}
Sample Application Walkthrough

Now that we have everything configured for ASP.NET Core 2.1, we can begin to walk through one of the business transactions of the sample application. In the sample ERP application, a complete end-to-end business process would consist of the following workflow:
- A product is created in the Inventory Management microservice.
- The product is transmitted to the Sales Order Management and Purchase Order Management microservices through messaging.
- A purchase order is created in the Purchase Order Management microservice to order the product from the supplier.
- The purchase order is transmitted to the Inventory Management microservice for receiving product into the warehouse.
- Product is received in the warehouse and recorded on the purchase order in the Inventory Management microservice and an inventory received transaction is created.
- The inventory received transaction is transmitted to the Purchase Order Management microservice to update the quantity received on the purchase order.
- The inventory received transaction is also transmitted to the Sales Order Management microservice so that sales orders can be placed against the available product on hand.
- A sales order is created in the Sales Order Management microservice for the available product and is transmitted to the Inventory Management microservice so that the product on the sales order can be shipped to the customer.
- The Inventory Management microservice ships the product on the sales order in the Inventory Management microservice and creates a shipment inventory transaction to reduce the available on hand quantity in the Inventory Management microservice database.
- The shipment inventory transaction is transmitted to the Sales Order Management microservice to update the shipped quantity on the sales order.
Shipping Product
For this article, we will walk through the process of shipping product on a sales order to a customer. The walk through will cover key points of interest from the both the .NET Core 2.1 Web API and the back-end .NET Core 2.1 Message Queuing Services and it’s interaction with RabbitMQ.
The back-end workflow between the Web API and the message queuing services will be as follows:
- Commit a shipment transaction to the Inventory Management database in the Web API.
- Send a SignalR message to the Inventory Management Message Queuing Service from the Web API
- Upon receipt of a SignalR message, the Inventory Management Message Queuing Service will read pending shipment transactions from the Inventory Management database
- The Inventory Management Message Queuing Service will send shipment messages to the RabbitMQ Inventory Shipped exchange
- The RabbitMQ Inventory Shipped exchange will route the shipment messages to the both the RabbitMQ Sales Order message queue and the RabbitMQ Logging message queue
- The Sales Order Message Queuing Service will listen for inbound messages and commit the message to an inbound transaction queue table in the Sales Order Management database
- The Sales Order Message Queuing Service will send an acknowledgement to RabbitMQ to delete the message from the Sales Order message queue.
- The Sales Order Message Queuing Service will process the inbound messages in the Sales Order Management database and update sales order line items with the shipped quantity.
- The Logging Message Queuing Service will send an acknowledgement message to the Inventory Management queue.
- The Inventory Management Message Queuing Service will archive outbound transactions to a outbound transaction history table in the Inventory Management database.
In the sample application, shipping product requires logging into the Angular front-end application and accessing the Inventory Management module and locating the sales order and by pulling up the details of the order and entering shipment quantities on the sales order line items.
When entering a shipped quantity on a line item and hitting save will trigger the execution of the below UpdateSalesOrderDetail controller action method in the Inventory Management Web API.
/// <summary>
/// Update Sales Order Detail
/// </summary>
/// <param name="salesOrderDetailDataTransformation"></param>
/// <returns></returns>
[HttpPost]
[Route("UpdateSalesOrderDetail")]
public async Task<IActionResult> UpdateSalesOrderDetail([FromBody] SalesOrderDetailDataTransformation salesOrderDetailDataTransformation)
{

    SecurityModel securityModel = (SecurityModel)(HttpContext.Items["SecurityModel"]);

    int accountId = securityModel.AccountId;
    salesOrderDetailDataTransformation.AccountId = accountId;

    ResponseModel<SalesOrderDetailDataTransformation> returnResponse = new ResponseModel<SalesOrderDetailDataTransformation>();

    try
    {
        returnResponse = await _inventoryManagementBusinessService.UpdateSalesOrderDetail(salesOrderDetailDataTransformation);
        returnResponse.Token = securityModel.Token;
        if (returnResponse.ReturnStatus == false)
        {
            return BadRequest(returnResponse);
        }

        await _messageQueueContext.Clients.All.SendAsync(MessageQueueEndpoints.InventoryQueue, string.Empty);

        return Ok(returnResponse);

    }
    catch (Exception ex)
    {
         returnResponse.ReturnStatus = false;
         returnResponse.ReturnMessage.Add(ex.Message);
         return BadRequest(returnResponse);
    }

}
Async Await – Asynchronous Processing
The UpdateSalesOrderDetail controller action method in the Inventory Management Web API will run asynchronously. Creating asynchronous Web API controller action methods improves server performance dramatically by allowing for an increase in the number of concurrent clients the server can handle. This is achieved because asynchronous controller action methods free up server threads faster by returning threads back into the available thread pool while the method awaits on other asynchronous processes to finish.
ASP.NET Core 2.1 allows Web API controllers and action methods to run asynchronously by using the async awaitkeywords. All the controller action methods in the sample application will use the async keyword in the method signature. All controller action methods will also return a Task containing IActionResult.
The UpdateSalesOrderDetail controller action method also calls the Inventory Management business service using an await keyword. All the Inventory Management business service methods implement the async/await pattern all the way to the data access service layer where Entity Framework Core will execute LINQ statements asynchronously.
To properly implement asynchronous processing, each layer of the application must implement asynchronous await functionality all the way through the process.
Security, Data Transformation Object and Response Models
Prior to the execution of the UpdateSalesOrderDetail controller action method, the security action filter executed and claim information from the JSON web token was extracted to populate a SecurityModel object that was appended to the HttpContext. The controller action method references this object through the HttpContext and passes the user’s account id into the Inventory Management business service. Using information from the JSON web token is a good way to secure your application’s data.
The UpdateSalesOrderDetail controller action method will use a sales order Data Transformation Object (DTO). A DTO is a design pattern that encapsulates data and is used to transfer data between software application subsystems. In the sample application, A DTO is the middleman between the front-end view models and the back-end database entity models.
Finally the UpdateSalesOrderDetail controller action method will return a ResponseModel object back to the client along with a HTTP response with a HTTP status code of 200 (OK) if the transaction succeeded. If the transaction fails a ResponseModel object is returned with an HTTP status code of 401 (Bad Request).
Inventory Management Business Service
When the controller action method requests the UpdateSalesOrderDetail method in the Inventory Management business service, the following will be performed in the business service method while supporting and running as an asynchronous task:
- Validate that the quantity shipped does not equal zero
- Begin a serializable database transaction
- Update the sales order line item with the quantity shipped
- Acquire an exclusive update row lock on the product row being updated
- Update the product row to reduce the quantity on hand by the quantity shipped
- Create an inventory transaction record for the quantity shipped
- Create an outbound queue record with a serialized JSON string to be used as the payload for a message queue message
- Commit the database transaction on successful execution
/// <summary>
/// Update Sales Order Detail
/// </summary>
/// <param name="salesOrderDetailDataTransformation"></param>
/// <returns></returns>
public async Task<ResponseModel<SalesOrderDetailDataTransformation>> UpdateSalesOrderDetail(SalesOrderDetailDataTransformation salesOrderDetailDataTransformation)
{

    ResponseModel<SalesOrderDetailDataTransformation> returnResponse = new ResponseModel<SalesOrderDetailDataTransformation>();

    SalesOrderDetail salesOrderDetail = new SalesOrderDetail();

    try
    {
        int accountId = salesOrderDetailDataTransformation.AccountId;
        int salesOrderId = salesOrderDetailDataTransformation.SalesOrderId;
        int salesOrderDetailId = salesOrderDetailDataTransformation.SalesOrderDetailId;

        //
        //    Validate Shipped Quantity
        //

        if (salesOrderDetailDataTransformation.CurrentShippedQuantity == 0)
        {
            returnResponse.ReturnMessage.Add("Invalid Shipped Quantity");
            returnResponse.ReturnStatus = false;

            return returnResponse;
        }

        //
        //    Begin a Serializable Transaction
        //

        _inventoryManagementDataService.OpenConnection(_connectionStrings.PrimaryDatabaseConnectionString);
        _inventoryManagementDataService.BeginTransaction((int)IsolationLevel.Serializable);

        //
        //    Get Sales Order Header
        //

        SalesOrder salesOrder = await _inventoryManagementDataService.GetSalesOrderHeader(accountId, salesOrderId);
        if (salesOrder == null)
        {
            _inventoryManagementDataService.RollbackTransaction();

            returnResponse.ReturnMessage.Add("Sales Order not found");
            returnResponse.ReturnStatus = false;

            return returnResponse;
        }

        //
        //    Get Sales Order Detail
        //

        salesOrderDetail = await _inventoryManagementDataService.GetSalesOrderDetailForUpdate(salesOrderDetailId);
        if (salesOrderDetail == null)
        {
            _inventoryManagementDataService.RollbackTransaction();

            returnResponse.ReturnMessage.Add("Sales Order Detail not found");
            returnResponse.ReturnStatus = false;

            return returnResponse;
        }

        //
        //    Update Sales Order Shipped Quantity
        //

        salesOrderDetail.ShippedQuantity = salesOrderDetail.ShippedQuantity + salesOrderDetailDataTransformation.CurrentShippedQuantity;

        await _inventoryManagementDataService.UpdateSalesOrderDetail(salesOrderDetail);

        //
        //    Get Product Record with an exclusive update lock
        //

        Product product = await _inventoryManagementDataService.GetProductInformationForUpdate(salesOrderDetail.ProductId);
        if (product == null)
        {
            _inventoryManagementDataService.RollbackTransaction();

            returnResponse.ReturnMessage.Add("Product not found");
            returnResponse.ReturnStatus = false;

            return returnResponse;
        }

        //
        //    Reduce Product OnHand Quantity by the quantity shipped
        //

        product.OnHandQuantity = product.OnHandQuantity - salesOrderDetailDataTransformation.CurrentShippedQuantity;

        await _inventoryManagementDataService.UpdateProduct(product);

        //
        //    Create Inventory Transaction Record
        //

        InventoryTransaction inventoryTransaction = new InventoryTransaction();
        inventoryTransaction.EntityId = salesOrderDetail.SalesOrderDetailId;
        inventoryTransaction.MasterEntityId = salesOrderDetail.MasterSalesOrderDetailId;
        inventoryTransaction.ProductId = salesOrderDetail.ProductId;
        inventoryTransaction.UnitCost = product.AverageCost;
        inventoryTransaction.Quantity = salesOrderDetailDataTransformation.CurrentShippedQuantity;
        inventoryTransaction.TransactionDate = DateTime.UtcNow;

        await _inventoryManagementDataService.CreateInventoryTransaction(inventoryTransaction);

        //
        //    Create Transaction Queue record and create inventory transaction payload
        //

        TransactionQueueOutbound transactionQueue = new TransactionQueueOutbound();
        transactionQueue.Payload = GenerateInventoryTransactionPayload(inventoryTransaction);
        transactionQueue.TransactionCode = TransactionQueueTypes.InventoryShipped;
        transactionQueue.ExchangeName = MessageQueueExchanges.InventoryManagement;

        await _inventoryManagementDataService.CreateOutboundTransactionQueue(transactionQueue);

        await _inventoryManagementDataService.UpdateDatabase();

        //
        //    Commit Transaction
        //

        _inventoryManagementDataService.CommitTransaction();

        returnResponse.ReturnStatus = true;

    }
    catch (Exception ex)
    {
       _inventoryManagementDataService.RollbackTransaction();
       returnResponse.ReturnStatus = false;
       returnResponse.ReturnMessage.Add(ex.Message);
    }
    finally
    {
       _inventoryManagementDataService.CloseConnection();
    }

    returnResponse.Entity = salesOrderDetailDataTransformation;

    return returnResponse;

}
Isolation Levels – Serializable Transactions
Database transactions specify an isolation level that defines the degree to which one transaction must be isolated from data modifications made by other transactions. Isolation levels are described in terms of which concurrency side effects, such as dirty reads or phantom reads, are allowed.
The SQL standard defines four isolation levels:
- Read Uncommitted – Read Uncommitted is the lowest isolation level. In this level, one transaction may read not yet committed changes made by other transactions, thereby allowing dirty reads. In this level, transactions are not isolated from each other.
- Read Committed – This isolation level guarantees that any data read is committed at the moment it is read. Thus it does not allows dirty reads. The transaction holds a read or write lock on the current row, and thus prevents other transactions from reading, updating or deleting.
- Repeatable Read – This is the most restrictive isolation level. The transaction holds read locks on all rows it references and write locks on all rows it inserts, updates, or deletes. Since other transactions cannot read, update or delete these rows, consequently it avoids non repeatable reads.
- Serializable – This is the highest isolation level. A serializable execution is guaranteed to be serializable. Serializable execution is defined to be an execution of operations in which concurrently executing transactions appears to be serially executing.
By default, Entity Framework Core uses an isolation level of Read Committed. Because the sample ERP application could be used by hundreds of users simultaneous updating product and stock quantities, there is a good chance more than one user could be requesting an update to the same database table rows concurrently. To insure data integrity and to prevent phantom updates and loss of data, the UpdateSalesOrderDetail method will begin a serializable transaction. Using a serializable transaction will guarantee that updates to the same product rows will be done in a sequential order in which each SQL-transaction will execute to completion before the next SQL-transaction begins.
//
//    Begin a Serializable Transaction
//

_inventoryManagementDataService.OpenConnection(_connectionStrings.PrimaryDatabaseConnectionString);
_inventoryManagementDataService.BeginTransaction((int)IsolationLevel.Serializable);
UPDLOCK SQL Hints and Entity Framework Core 2.1
As it turns out, simply creating a serializable transaction is not enough to ensure data integrity while multiple simultaneous updates are being performed on the same database table rows.
Additionally you need to acquire a row level update lock when selecting a row to be updated. Applying the SQL Server UPDLOCK hint to your SELECT statement will do this for you. The UPDLOCK hint specifies that update locks are to be taken and held until the transaction completes.
One of the cool things with the latest version of Entity Framework Core is that you can now override the SELECT statement that Entity Framework Core would normally create. Entity Framework Core allows you to drop down to raw SQL queries when working with a relational database.
This can be useful if the query you want to perform can’t be expressed using LINQ. This is useful in this case because we can create a SQL statement with an UPDLOCK hint and use the Entity Framework Core FromSQL method to execute the SQL statement with a row-level update lock.
As with any API that accepts SQL, it is important to parameterize any user input to protect against a SQL injection attack. Entity Framework Core also supports parameterized queries. You can include parameter placeholders in the SQL query string and then supply parameter values as additional arguments. Any parameter values you supply will automatically be converted to a DbParameter object. In the GetProductInformationUpdate method of the Inventory Management data service, the product id is being supplied as a parameterized argument and the selected row is returned to the Inventory Management business service while SQL Server holds a lock on that row.
/// <summary>
/// Get Product Information For Update with exclusive row lock
/// </summary>
/// <param name="productId"></param>
/// <returns></returns>
public async Task<Product> GetProductInformationForUpdate(int productId)
{
    string sqlStatement = "SELECT * FROM PRODUCTS WITH (UPDLOCK) WHERE PRODUCTID = @ProductId";

    DbParameter productIdParameter = new SqlParameter("ProductId", productId);

    Product product = await dbConnection.Products.FromSql(sqlStatement, productIdParameter).FirstOrDefaultAsync();
    return product;
}
Message Queue Transaction Tables
As a design decision, I wanted each of the microservices to be self contained and not cross boundaries or make remote calls into other microservices. As with most architectural decisions, there is a price for entry. In this case, data must be shared across microservices.
To support microservice isolation, the price of entry is duplicating database information in more than one microservice. For example, product information is created and maintained in the Inventory Management microservice. Both the Purchase Order Management microservice and the Sales Order Management microservice need product information to allow product managers to order products from suppliers and allow customers to place sales orders against available inventory. Product tables and data must exist in each of these microservices.
This is where message queuing will come into play where information can be transmitted and shared to these microservices real-time. The structure of the Product table can and will be different between microservices. For example, the Product table in the Inventory Management database will contain every piece of information for a product, but neither the Purchase Order Management database or the Sales Order Management database will need to keep track of things like the product’s bin location and other warehouse information.
As part of this design decision, I wanted to create message queue messages and payloads that can participate and be committed within a database business transaction before any messages are sent to RabbitMQ. This will guarantee that messages are never lost and that they can be logged and resent if needed.
For each microservice, the following four tables were created in each dedicated microservice database for processing message queue messages and logging their activity.
- TransactionQueueInbound – contains message queue payload information for inbound messages ready to be processed
- TransactionQueueInboundHistory – contains archived inbound message queue messages as they are acknowledged as being completely processed.
- TransactionQueueOutbound – contains message queue payload information for outbound messages ready to be processed and sent
- TransactionQueueOutboundHistory – contains archived outbound message queue messages as they are acknowledged as being completely processed
Creating a Message Queue Message Payload
One of the pieces of a message queue message is its payload. The payload is the data that you want to transmit. For the sample application payload information will be saved in the TransactionOutboundQueue table for sending message queue payload information. In the UpdateSalesOrderDetail method of the Inventory Management business service, an inventory transaction was committed to the database, For message queue payload purposes, the inventory transaction will get serialized to a JSON structure and saved as a string in the TransactionOutboundQueue table that will later be retrieved and included in the message queue message payload.
/// <summary>
/// Generate Inventory Transaction Payload
/// </summary>
/// <param name="inventoryTransaction"></param>
/// <returns></returns>
private string GenerateInventoryTransactionPayload(InventoryTransaction inventoryTransaction)
{
    InventoryTransactionPayload inventoryTransactionPayload = new InventoryTransactionPayload();

    inventoryTransactionPayload.ProductId = inventoryTransaction.ProductId;
    inventoryTransactionPayload.Quantity = inventoryTransaction.Quantity;
    inventoryTransactionPayload.UnitCost = inventoryTransaction.UnitCost;
    inventoryTransactionPayload.EntityId = inventoryTransaction.EntityId;
    inventoryTransactionPayload.MasterEntityId = inventoryTransaction.MasterEntityId;
    inventoryTransactionPayload.TransactionDate = inventoryTransaction.TransactionDate;

    string payload = SerializationFunction<InventoryTransactionPayload>.ReturnStringFromObject(inventoryTransactionPayload);

    return payload;

}
RabbitMQ Best Practices
At this point in the process we have a shipment inventory transaction committed to the Inventory Management database but we have yet to tell the Sales Order Management microservice that an order has been shipped. The sales order was updated in the Inventory Management database but the sales order also needs to be updated in the Sales Order Management database.
Before going ahead and implementing RabbitMQ to send a message from the Inventory Management microservice to the Sales Order Management microservice, I wanted to learn more about RabbitMQ best practices.
Some applications require really high throughput while other applications are running batch jobs that can be delayed for a while. The goal when designing your system should be to maximize a combination of performance and availability that makes sense for your specific application. Bad architecture design decisions or bugs can damage or affect your throughput.
The following RabbitMQ best practices are documented on the internet:
- Connections and Channels – Each RabbitMQ connection uses about 100 KB of RAM (and even more, if TLS is used). Thousands of connections can be a heavy burden on a RabbitMQ server. In the worst case, the server can crash due to out-of-memory. The AMQP protocol has a mechanism called channels that “multiplexes” a single TCP connection. It’s recommended that each process only creates one TCP connection, and uses multiple channels in that connection for different threads. Connections should also be long-lived. The handshake process for an AMQP connection is quite involved and requires at least 7 TCP packets (more if TLS is used).
- Don’t share channels between threads – You should also make sure that you don’t share channels between threads as most clients don’t make channels thread-safe as it would have a serious negative effect on performance.
- Don’t open and close connections or channels repeatedly – Have long lived connections if possible, and use channels for each task. The handshake process for an AMQP connection is quite complex. Channels can be opened and closed more frequently if needed, but channels should also be long-lived if possible, for example, reusing the same channel per thread for publishing. Don’t open a channel each time you are publishing. If you can’t have long lived connections, then make sure to gracefully close the connection.
- Separate connections for the publisher and the consumer – Create separate connections for publishing and consuming messages to get high throughput. RabbitMQ can apply back pressure on the TCP connection when the publisher is sending too many messages to the server to handle. If you consume on the same TCP connection the server might not receive the message acknowledgements from the client. Thus, the consume performance will be affected too. And with lower consume speed the server will be overwhelmed.
ASP.NET Core 2.1 Scalability
Reading in detail the RabbitMQ best practices led me to believe that it was not such a great idea to incorporate and implement RabbitMQ directly in the Web API application.
Web server memory and resources should be considered limited resources. ASP.NET Core Web API applications are designed to be stateless applications with threads that are constantly being created and destroyed per web request and thus freeing up memory and increasing application scalability; holding onto to resources increases server memory usage as the user base increases.
As stated in their best practices and recommendations, RabbitMQ connections need to be implemented without repeatedly opening and closing connections. A separate connection should be created for sending and consuming messages, meaning you would at a minimum need to create two separate singleton lifetime threads in the Web API application.
Creating multiple singleton threads seems like an anti-pattern for a stateless ASP.NET Core Web API application. A class object with a singleton lifetime needs to managed for thread safety too. Not handled properly could create a race condition bug in the Web API application. A race condition bug occurs when two or more threads reaches a particular block of code at the same time that produces corrupted object and property state.
Avoiding a race condition requires a block of code to be locked so that only one thread at a time can execute the block of code at one time. Locking blocks of code in a Web API application would seem to create a bottleneck and reduce application scalability when you have hundreds of concurrent users accessing your application.
The Merits of Building a Message Queuing Service
To avoid creating and managing singleton lifetime objects in the Web API application, I decided to create a separate multi-threaded .NET Core 2.1 console application acting as a message queuing service for each microservice that will manage and handle all of the RabbitMQ connections, channels and message processing.
These console applications will run multiple threads with each thread running on an predefined interval (5 or 15 minutes) with each thread interacting with both RabbitMQ and SQL-Server.
Building message queuing services has a lot of merits and advantages over integrating message queue processing within your Web API application as they can provide the following:
- You can deploy a message queuing service to one or more separate application servers and off-load the processing of message queue messages and not consume web server resources and thus improving Web API throughput and ultimately better web application response time.
- There are many points of failure in a microservices workflow. For example, what happens when you have an online application and the user hits the save button and the changes are committed to the database and immediately after the commit, you try to send a message to a message queue but the message broker is down. How to do recover from this? A better design would include committing the message to the database with the rest of the business transaction and having a message queuing service pick up the message in the next step of the process.
- A message queuing service can be designed with retry and recover functionality that can gracefully handle points of failure (such as when the message broker is down) without effecting the end user.
- Implementing message queuing services deployed on a separate server doesn’t always have to be available even when you have online users. Managing server memory and message queuing connections and channels may initially be a challenge as you learn to properly tune and configure the message broker over time. Being able to restart a production server and fix server issues provides a lot of flexibility and will lead to better application availability sooner in the long run.
Implementing ASP.NET Core 2.1 SignalR
As a nice to have, I wanted to send messages real-time. So I needed a way to send a message to the message queuing service (console application) to wake it up to process messages in case it was sitting idle between intervals. This led me to ASP.NET Core 2.1 SignalR.
ASP.NET Core SignalR is an open-source library that simplifies the adding of real-time web functionality to applications. Real-time web functionality enables server-side code to push content to clients instantly. SignalR is most often used to interact with JavaScript clients. In this case, the client is a console application.
SignalR uses hubs to communicate between clients and servers. A hub is a high-level pipeline that allows a client and a server to call methods on each other. SignalR handles the dispatching across machine boundaries automatically, allowing clients to call methods on the server and vice versa.
To create the Hub you just add a class that inherits from Microsoft.AspNetCore.SignalR.Hub and define methods within the Hub class that can be executed by clients. Since the Inventory Management Web API application will only use SignalR to send messages, the MessageQueueHub class will not have any methods defined.
namespace CodeProject.InventoryManagement.WebApi.SignalRHub
{
    public class MessageQueueHub : Hub
    {

    }
}
In ASP.NET Core SignalR, you can access an instance of IHubContext via dependency injection. An instance of IHubContext is configured in the start up class and is injected into the controller and the instance can be used to send messages to clients. In the UpdateSalesOrderDetail action method, the following line is executed after the Inventory Management business service has successfully committed the inventory shipped transaction. The Clients.All.SendAynsc statement will send a message to all clients listening for events occurring on URL “https://localhost:44340/MessageQueueHub“. In the case of the Inventory Management Web API, only the Inventory Management Message Queuing Service will be listening on this URL.
await _messageQueueContext.Clients.All.SendAsync(MessageQueueEndpoints.InventoryQueue, string.Empty);
Listening for ASP.NET Core SignalR Messages
To listen to ASP.NET Core SignalR messages, the Inventory Management Message Queuing Service implements the Microsoft.AspNetCore.SignalR.Client package. The ASP.NET Core SignalR .NET client library lets you communicate with SignalR hubs from .NET applications.
The message queuing service will kick off separate thread tasks for sending, receiving and processing message queue messages. In the start up of the SendMessages task thread, a connection to SignalR is established based on the Inventory Management Web API SignalR URL of “https://localhost:44340/MessageQueueHub“.
In case the hub is not up and running when trying to connect to it, reconnection logic was added to retry the connection. Once connected to the hub, the message queuing service listens for On events and on each event raised the queuing service will call the GetMessgaesInQueue method to retrieve messages and send them off to RabbitMQ.
/// <summary>
/// Start Process Interval
/// </summary>
/// <param name="cancellationToken"></param>
/// <returns></returns>
public Task StartAsync(CancellationToken cancellationToken)
{

    StartSignalRConnection();

    _timer = new Timer(GetMessagesInQueue, null, TimeSpan.Zero, TimeSpan.FromSeconds(_appConfig.SendingIntervalSeconds));

    return Task.CompletedTask;
}

/// <summary>
/// Start SignalR Connection
/// </summary>
private async void StartSignalRConnection()
{
    if (string.IsNullOrEmpty(_appConfig.SignalRHubUrl))
    {
        return;
    }

    string url = _appConfig.SignalRHubUrl; /// "https://localhost:44340/MessageQueueHub",

    //
    //  Build Hub Connection
    //

    Boolean buildHubConnection = false;
    while (buildHubConnection  == false)
    {
        try
        {
            _signalRHubConnection = new HubConnectionBuilder().WithUrl(url).Build();
            buildHubConnection  = true;
        }
        catch (Exception ex)
        {
            Console.WriteLine(ex.Message);
            await Task.Delay(5000);
        }

    }

    //
    //   Listen for SignalR messages
    //

    _signalRHubConnection.On<string>(_signalRQueue, (message) =>
    {
        this.GetMessagesInQueue(null);

    });

    //
    //   Listen for Hub Connection Closed Event
    //

    _signalRHubConnection.Closed += async (error) =>
    {
        Console.WriteLine("SignalR Connection Closed");
        await Task.Delay(10000);
        await _signalRHubConnection.StartAsync();
        Console.WriteLine("Restart SignalR");
    };

    //
    //  Start Hub Connection
    //

    connected = false;
    while (connected == false)
    {
         try
         {
               await _signalRHubConnection.StartAsync();
               connected = true;

        }
        catch (Exception ex)
        {
              await Task.Delay(10000);
        }

    }

}
Configuring the Inventory Management Message Queuing Service
When you create a console application using .NET Core, you will notice that an exe will not be created when you build the application. By default .NET Core will generate a dll that is built as a portable application which does not generate an exe. They are executed by the .NET Core shared run-time. You can just run the application by running the command dotnet run. But, if you really want to generate the exe then just run the below command:
dotnet publish -c Debug -r win10-x64 or dotnet publish -c Release -r win10-x64
This will create a stand alone console application similar to current .NET console applications. This allows us to run the application without having to have the .NET Core run-time on the target machine.
Starting with C# version 7.1, you can create console applications with a static entry point as an asynchronous task allowing you to create a multi-threaded console application. Additionally, .NET Core 2.1 comes with a new feature set to simplify the creation of console based services. These new features include IHost and HostBuilder.
.NET Core 2.1 applications configure and launch a host. The host is responsible for application start up and lifetime management. With the .NET Core HostBuilder, background tasks can be implemented as hosted services. A hosted service is a class with background task logic that implements the IHostedService interface. For the Inventory Management Message Queuing Service, three background tasks are created that will run on a timer; one for sending messages, one for receiving messages and one for processing messages.
In the Main method of the console application, you can start by creating a HostBuilder and then use extension methods to register services with dependency injection, read configuration information and configure the logging that you need for your application. For the message queuing console application, each background task is registered as a service with a transient lifetime using the services.AddTransient method.
public static async Task Main(string[] args)
{
    //
    //    get configuration information
    //

    MessageQueueAppConfig messageQueueAppConfig = new MessageQueueAppConfig();
    ConnectionStrings connectionStrings = new ConnectionStrings();

    string environment = Environment.GetEnvironmentVariable("ASPNETCORE_ENVIRONMENT");
    string jsonFile = $"appsettings.{environment}.json";

    var configBuilder = new ConfigurationBuilder()
        .SetBasePath(Directory.GetCurrentDirectory())
        .AddJsonFile(jsonFile, optional: true, reloadOnChange: true);

    IConfigurationRoot configuration = configBuilder.Build();

    configuration.GetSection("MessageQueueAppConfig").Bind(messageQueueAppConfig);
    configuration.GetSection("ConnectionStrings").Bind(connectionStrings);

    //
    //    Sending Message
    //

    IHostedService sendInventoryManagementMessages = new SendMessages();

    //
    //   Receive Messages
    //

    IHostedService receiveInventoryManagementMessages = new ReceiveMessages();

    //
    //    Message Processing
    //

    IHostedService processMessages = new ProcessMessages();

    var builder = new HostBuilder().ConfigureAppConfiguration((hostingContext, config) => {})
        .ConfigureServices((hostContext, services) =>
        {
            services.AddTransient<IHostedService>(provider => processMessages);
        })
        .ConfigureServices((hostContext, services) =>
        {
            services.AddTransient<IHostedService>(provider => sendInventoryManagementMessages);
        })
        .ConfigureServices((hostContext, services) =>
        {
            services.AddTransient<IHostedService>(provider => receiveInventoryManagementMessages);
        })
        .ConfigureLogging((hostingContext, logging) =>
        {
            logging.AddConfiguration(hostingContext.Configuration.GetSection("Logging"));
            logging.AddConsole();
        });

        await builder.RunConsoleAsync();
}
Getting started with RabbitMQ
To get started with RabbitMQ, you must download the RabbitMQ server and follow the installation instructions as detailed on their web site at https://www.rabbitmq.com. The installation instructions have also been provided towards the end of this article. When you run the RabbitMQ installer for Windows, it installs RabbitMQ as a Windows service and starts it using the default configuration.
The service will run fine using its default settings. You can customize the RabbitMQ environment and change it’s configuration where needed. The RabbitMQ service starts automatically. You can stop/reinstall/start the RabbitMQ service from the Start Menu.
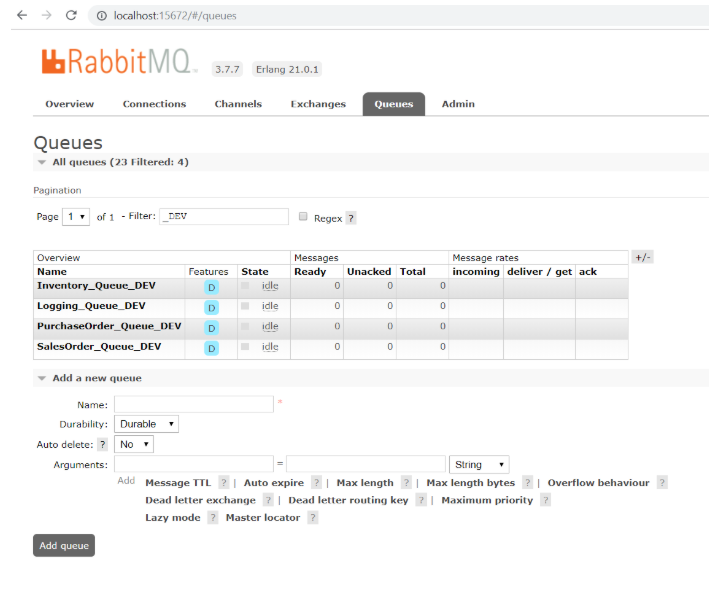
RabbitMQ provides a Web UI management and monitoring tool for your RabbitMQ server. From the management interface, you can monitor, create, delete and list all your exchanges and queues. You can also monitor server connections and channels and monitor queue length and check message rates, etc.
RabbitMQ Queues and Exchanges
Before you can start sending and receiving messages with RabbitMQ, you need to take a RabbitMQ deep dive and understand some concepts of AMQP and RabbitMQ. Some of the main concepts of RabbitMQ messaging includes:
- Exchanges – Exchanges are AMQP entities where messages are sent. Exchanges take a message and route it into zero or more queues. The routing algorithm used depends on the exchange type and binding rules.
- Queues – Queues in the AMQP model are very similar to queues in other message and task queuing systems: they store messages that are consumed by applications. Queues share some properties with exchanges, but also have some additional properties:
- Bindings – Bindings map an exchange to a queue. Bindings are rules for how messages gets routed from an exchange to one or more queues.
When it comes to an exchange, there are four type of exchanges in RabbitMQ:
- Direct Exchange – A direct exchange delivers messages to queues based on the message routing key.
- Fanout Exchange – A fanout exchange routes messages to all of the queues that are bound to it and the routing key is ignored.
- Topic Exchange – Topic exchanges route messages to one or many queues based on matching between a message routing key and the pattern that was used to bind a queue to an exchange.
- Headers Exchange – A headers exchange is designed for routing on multiple attributes that are more easily expressed as message headers than a routing key.
Sending RabbitMQ Messages With a Fanout Exchange
For the sample application, sending messages using a Fanout Exchange seemed liked the best choice. For example, when creating a product in the Inventory Management microservice, the product information needs to be shared with the Sales Order Management microservice and the Purchase Order Management microservice.
Additionally a message should be sent to a logging queue for monitoring and acknowledging the successful completion of the full life-cycle of a message being sent, received and successfully processed by all queues and microservices.
Looking at the Inventory Management Message Queuing Service, the following exchanges have been set up:
//
//    Inventory Received Transactions
//

IMessageQueueConfiguration inventoryReceivedConfiguration = new MessageQueueConfiguration(MessageQueueExchanges.InventoryReceived, messageQueueAppConfig, sendingQueueConnection);

inventoryReceivedConfiguration.AddQueue(MessageQueueEndpoints.SalesOrderQueue);
inventoryReceivedConfiguration.AddQueue(MessageQueueEndpoints.PurchaseOrderQueue);
inventoryReceivedConfiguration.AddQueue(MessageQueueEndpoints.LoggingQueue);

inventoryReceivedConfiguration.InitializeOutboundMessageQueueing();
messageQueueConfigurations.Add(inventoryReceivedConfiguration);

//
//    Product Creation and Updates
//

IMessageQueueConfiguration productUpdatedConfiguration = new MessageQueueConfiguration(MessageQueueExchanges.ProductUpdated, messageQueueAppConfig, sendingQueueConnection);

productUpdatedConfiguration.AddQueue(MessageQueueEndpoints.SalesOrderQueue);
productUpdatedConfiguration.AddQueue(MessageQueueEndpoints.PurchaseOrderQueue);
productUpdatedConfiguration.AddQueue(MessageQueueEndpoints.LoggingQueue);

productUpdatedConfiguration.InitializeOutboundMessageQueueing();
messageQueueConfigurations.Add(productUpdatedConfiguration);

//
//    Inventory Shipped Transactions
//

IMessageQueueConfiguration inventoryShippedConfiguration = new MessageQueueConfiguration(MessageQueueExchanges.InventoryShipped, messageQueueAppConfig, sendingQueueConnection);

inventoryShippedConfiguration.AddQueue(MessageQueueEndpoints.SalesOrderQueue);
inventoryShippedConfiguration.AddQueue(MessageQueueEndpoints.LoggingQueue);

inventoryShippedConfiguration.InitializeOutboundMessageQueueing();
messageQueueConfigurations.Add(inventoryShippedConfiguration);
Sending RabbitMQ Messages With a Fanout Exchange
With RabbitMQ, you’ll need to plan a strategy for defining and designing your exchanges and queues. There are best practices and design patterns for designing exchanges and queues on the internet that you can read but for the sample application, the approach I took was to create a separate RabbitMQ exchange for each type of business transaction.
For example, when creating a product in the Inventory Management microservice, a dedicated RabbitMQ exchange was created just to route product creation and product update messages.
To meet the requirements for the sample application, the fanout exchange type will route messages to all of the queues that are bound to it. In the Inventory Management microservice there are three business transactions and thus I created three RabbitMQ exchanges for sending and routing messages as follows:
- Product Creation and Updates Exchange – Sends messages to the Purchase Order Queue, the Sales Order Queue and the Logging Queue
- Inventory Received Exchange – Sends messages to the Purchase Order Queue, the Sales Order Queue and the Logging Queue
- Inventory Shipped Exchange – Sends messages to the Sales Order Queue and the Logging Queue
Other exchanges included in the sample application are:
- Purchase Order Submitted Exchange – Sends messages to the Inventory Management Queue and the Logging Queue
- Sales Order Submitted Exchange – Sends messages to the Inventory Management Queue and the Logging Queue
- Logging Exchange – Sends messages directly to the Logging Queue
Sending an Inventory Shipped Message
For sending message queue messages in the sample application, a generic SendMessages class was created that all message queuing services will implement. The basic functionality of this class includes:
- Start a SignalR connection
- Run on a preset internal to retrieve messages in the TransactionQueueOutBound table in SQL-Server
- Listen for SignalR On events and retrieve messages real-time in the TransactionQueueOutBound table in SQL-Server.
using CodeProject.Shared.Common.Interfaces;
using Microsoft.Extensions.Hosting;
using System;
using System.Collections.Generic;
using System.Text;
using System.Reactive.Subjects;
using System.Threading;
using System.Threading.Tasks;
using Microsoft.Extensions.Logging;
using Microsoft.Extensions.Options;
using CodeProject.Shared.Common.Models;
using CodeProject.MessageQueueing;
using Microsoft.AspNetCore.SignalR.Client;
using RabbitMQ.Client;

namespace CodeProject.MessageQueueing
{
    public class SendMessages : IHostedService, IDisposable
    {
        private readonly List<IMessageQueueConfiguration> _messageQueueConfigurations;
        private readonly IMessageQueueConnection _messageQueueConnection;
        private readonly IMessageQueueProcessing _messageProcessor;
        private readonly MessageQueueAppConfig _appConfig;
        private readonly ConnectionStrings _connectionStrings;
        private readonly string _signalRQueue;

        private HubConnection _signalRHubConnection;
        private Timer _timer;

        /// <summary>
        /// Send Messages
        /// </summary>
        /// <param name="messageQueueConnection"></param>
        /// <param name="messageProcessor"></param>
        /// <param name="appConfig"></param>
        /// <param name="connectionStrings"></param>
        /// <param name="messageQueueConfigurations"></param>
        public SendMessages(IMessageQueueConnection messageQueueConnection,
                            IMessageQueueProcessing messageProcessor,
                            MessageQueueAppConfig appConfig,
                            ConnectionStrings connectionStrings,
                            List<IMessageQueueConfiguration> messageQueueConfigurations,
                            string signalRQueue)
        {
            _messageQueueConnection = messageQueueConnection;
            _messageQueueConfigurations = messageQueueConfigurations;
            _connectionStrings = connectionStrings;
            _messageProcessor = messageProcessor;
            _appConfig = appConfig;
            _signalRQueue = signalRQueue;
        }

        /// <summary>
        /// Start Process Interval
        /// </summary>
        /// <param name="cancellationToken"></param>
        /// <returns></returns>
        public Task StartAsync(CancellationToken cancellationToken)
        {

            StartSignalRConnection();

            _timer = new Timer(GetMessagesInQueue, null, TimeSpan.Zero, TimeSpan.FromSeconds(_appConfig.SendingIntervalSeconds));

            return Task.CompletedTask;
        }

        /// <summary>
        /// Start SignalR Connection
        /// </summary>
        private async void StartSignalRConnection()
        {
            _signalRHubConnection = new HubConnectionBuilder().WithUrl(url).Build();

            _signalRHubConnection.On<string>(_signalRQueue, (message) =>
            {
                this.GetMessagesInQueue(null);

            });

            _signalRHubConnection.Closed += async (error) =>
            {
                await Task.Delay(10000);
                await _signalRHubConnection.StartAsync();
            };

            await _signalRHubConnection.StartAsync();

        }

        /// <summary>
        /// Get Messages In Queue
        /// </summary>
        /// <param name="state"></param>
        private async void GetMessagesInQueue(object state)
        {
            ResponseModel<List<MessageQueue>> messages =
                 await _messageProcessor.SendQueueMessages(_messageQueueConfigurations, _appConfig.OutboundSemaphoreKey, _connectionStrings);

            Console.WriteLine("total messages " + messages.Entity.Count.ToString() + " sent at " + DateTime.Now);

        }

        /// <summary>
        /// Stop Process
        /// </summary>
        public Task StopAsync(CancellationToken cancellationToken)
        {
            _timer?.Change(Timeout.Infinite, 0);

            return Task.CompletedTask;
        }

        /// <summary>
        /// Dispose Timer
        /// </summary>
        public void Dispose()
        {
            _timer?.Dispose();
        }

    }

}
One of my design decisions for message queuing in the sample application was to make sure that all business transactions are processed sequentially as business transactions are being committed to the database. In an environment where there could be hundreds of concurrent users on the system, the Inventory Management Queuing Service will receive multiple real-time message requests simultaneously and perhaps affecting the same pieces of data. The goal of of processing business transactions sequentially is to ensure that all transaction logs are recording business transactions in proper order across microservices and ultimately to maintain data integrity.
To guarantee the sequential processing of business transactions, the SendQueueMessages method implements a lock statement to block multiple requests from trying to send messages at the same time. The first request through will acquire an exclusive SQL-Server row lock and proceed to read all pending transactions in the TransactionQueueOutbound table in sequential transaction Id order and extract out the message queue payload for each transaction and a message for each transaction will be sent to the appropriate RabbitMQ exchange when the SendMessage method gets executed. Once this cycle has completed, the next message request through will proceed to process the next batch of pending business transactions.
/// <summary>
/// Send Queue Messages
/// </summary>
/// <param name="messageQueueConfigurations"></param>
/// <param name="outboundSemaphoreKey"></param>
/// <param name="connectionStrings"></param>
/// <returns></returns>
public async Task<ResponseModel<List<MessageQueue>>> SendQueueMessages(
             List<IMessageQueueConfiguration> messageQueueConfigurations,
             string outboundSemaphoreKey,
             ConnectionStrings connectionStrings)
{
    ResponseModel<List<MessageQueue>> returnResponse = new ResponseModel<List<MessageQueue>>();
    returnResponse.Entity = new List<MessageQueue>();

    Console.WriteLine("sending = " + _sending);

    lock (_sendingLock)
    {
        if (_sending)
        {
            Console.WriteLine("Aborted iteration still sending");
            return returnResponse;
        }

        _sending = true;

    }

    Console.WriteLine("Start sending");

    Boolean getMessages = true;

    while (getMessages==true)
    {
        ResponseModel<List<MessageQueue>> response = await GetMessagesToSend(messageQueueConfigurations, outboundSemaphoreKey, connectionStrings);
        foreach (MessageQueue message in response.Entity)
        {
            returnResponse.Entity.Add(message);
        }

        if (response.Entity.Count == 0)
        {
            _sending = false;
            getMessages = false;
        }
    }

    return returnResponse;

}

/// <summary>
/// Get Messages To Send
/// </summary>
/// <param name="messageQueueConfigurations"></param>
/// <param name="outboundSemaphoreKey"></param>
/// <param name="connectionStrings"></param>
/// <returns></returns>
private async Task<ResponseModel<List<MessageQueue>>> GetMessagesToSend(
     List<IMessageQueueConfiguration> messageQueueConfigurations,
     string outboundSemaphoreKey, ConnectionStrings connectionStrings)
{
    TransactionQueueSemaphore transactionQueueSemaphore = null;

    ResponseModel<List<MessageQueue>> returnResponse = new ResponseModel<List<MessageQueue>>();
    returnResponse.Entity = new List<MessageQueue>();

    try
    {
        _inventoryManagementDataService.OpenConnection(connectionStrings.PrimaryDatabaseConnectionString);
        _inventoryManagementDataService.BeginTransaction((int)IsolationLevel.Serializable);

         //
         // get all pending outbound transactions
         //

         List<TransactionQueueOutbound> transactionQueue =
              await _inventoryManagementDataService.GetOutboundTransactionQueue();

         foreach (TransactionQueueOutbound transactionQueueItem in transactionQueue)
         {
            MessageQueue message = new MessageQueue();
            message.ExchangeName = transactionQueueItem.ExchangeName;
            message.TransactionQueueId = transactionQueueItem.TransactionQueueOutboundId;
            message.TransactionCode = transactionQueueItem.TransactionCode;
            message.Payload = transactionQueueItem.Payload;

            //
            //  the message queue configurations object has a list of the all exchange/queue
            //  configurations - the where clause finds the configration needed for the
            //  particular transaction being processed
            //

            IMessageQueueConfiguration messageQueueConfiguration = messageQueueConfigurations
                     .Where(x => x.TransactionCode == message.TransactionCode).FirstOrDefault();
            if (messageQueueConfiguration == null)
            {
                break;
            }

            //
            //  The SendMessage method will send a message to RabbitMQ
            //

            ResponseModel<MessageQueue> messageQueueResponse = messageQueueConfiguration.SendMessage(message);
            if (messageQueueResponse.ReturnStatus == true)
            {
                transactionQueueItem.SentToExchange = true;
                transactionQueueItem.DateSentToExchange = DateTime.UtcNow;
                await _inventoryManagementDataService.UpdateOutboundTransactionQueue(transactionQueueItem);

                returnResponse.Entity.Add(message);
            }
            else
            {
                break;
            }

        }

        await _inventoryManagementDataService.UpdateDatabase();

        _inventoryManagementDataService.CommitTransaction();
        _inventoryManagementDataService.CloseConnection();

    }
    catch (Exception ex)
    {
        _inventoryManagementDataService.RollbackTransaction();
        returnResponse.ReturnStatus = false;
        returnResponse.ReturnMessage.Add(ex.Message);
    }
    finally
    {
        _inventoryManagementDataService.CloseConnection();
    }

    return returnResponse;
}
Creating a RabbitMQ Connection
To write C# code using RabbitMQ, you must install the .NET RabbitMQ.Client library. The RabbitMQ .NET client is an open source library and is an implementation of an AMQP client library for C# and other .NET languages. The first thing you need to do to send and receive messages with RabbitMQ is to create a connection to RabbitMQ. In development mode, the connection just needs the following properties set with the development defaults as:
HostName = localhost
UserName = guest
Password = guest
For the sample application, each asynchronous task/thread running in each message queuing service will create and maintain a separate connection to RabbitMQ.
using CodeProject.Shared.Common.Interfaces;
using CodeProject.Shared.Common.Models;
using RabbitMQ.Client;
using System;
using System.Collections.Generic;
using System.Text;

namespace CodeProject.MessageQueueing
{
    public class MessageQueueConnection  : IMessageQueueConnection
    {

        private ConnectionFactory _connectionFactory;
        private MessageQueueAppConfig _messageQueueAppConfig;
        private IConnection _connection;

        public MessageQueueConnection(MessageQueueAppConfig messageQueueAppConfig)
        {
            _messageQueueAppConfig = messageQueueAppConfig;
        }

        /// <summary>
        /// Create RabbitMQ Connection
        /// </summary>
        public void CreateConnection()
        {
            _connectionFactory = new ConnectionFactory();

            _connectionFactory.HostName = _messageQueueAppConfig.MessageQueueHostName;
            _connectionFactory.UserName = _messageQueueAppConfig.MessageQueueUserName;
            _connectionFactory.Password = _messageQueueAppConfig.MessageQueuePassword;

            _connection = _connectionFactory.CreateConnection();

        }

        public IConnection GetConnection()
        {
            return _connection;
        }

    }
}
Declaring, Creating and Configuring RabbitMQ Exchanges and Queues
There are a couple of ways you can configure and create RabbitMQ exchanges and queues. You can perform these actions using the RabbitMQ Web UI Management console or through the RabbitMQ management command line tools. Another option is to configure exchanges and queues programmatically, which I chose to do.
Once you have a connection established to RabbitMQ, you can begin to create and configure RabbitMQ exchanges and queues programmatically. For the sample application, all exchanges will be configured as fanout exchanges. In the MessageQueueConfiguration class below, the following is being executed:
- Creates a RabbitMQ channel from an established RabbitMQ connection
- Creates a IBasicProperties object to configure the exchange to be persistent
- Declares the exchange with the name of the exchange, the exchange type “fanout“, and sets the exchange to be durable with no auto-delete.
- Declares a collection of queues setting each queue to be durable and with no auto-delete.
- Binds each queue to the exchange to fanout messages to these queues when a message is received on the exchange.
When declaring exchanges and queues programmatically, if the exchange or queue has not been created on the RabbitMQ server, then it’s at this point where they will be dynamically created. Queues can be bound to more than one exchange.
There are a lot of configuration settings to choose from when declaring exchanges and queues. The main configurations you will probably want to understand are:
- Persistent Messages – Persistent messages will be written to disk as soon as they reach the queue, while transient messages will be written to disk only so that they can be removed from memory when memory gets low. Persistent messages are also kept in memory when possible and only removed from memory when memory gets low.
- Durable and Non-Durable Queues – Durable queues are persisted to disk and thus survive broker restarts. Queues that are not durable are called transient. Not all scenarios and use cases mandate queues to be durable. Durability of a queue does not make messages that are routed to that queue durable. If the broker is taken down and then brought back up, a durable queue will be re-declared during broker startup, however, only persistent messages will be recovered.
- Auto-Delete -If a queue is set to auto-delete, the queue will be deleted when the last consumer unsubscribes.
using CodeProject.Shared.Common.Interfaces;
using CodeProject.Shared.Common.Models;
using Newtonsoft.Json;
using RabbitMQ.Client;
using System;
using System.Collections.Generic;
using System.Text;
using RabbitMQ.Client.Events;
using RabbitMQ.Client.MessagePatterns;

namespace CodeProject.MessageQueueing
{
    public class MessageQueueConfiguration : IMessageQueueConfiguration
    {

        private string _exchangeName;
        private List<string> _boundedQueues;
        private MessageQueueAppConfig _messageQueueAppConfig;
        private readonly IMessageQueueConnection _messageQueueConnection;
        private Subscription _subscription;
        private IBasicProperties _basicProperties;
        private IModel _channel;

        /// <summary>
        /// Constructor
        /// </summary>
        /// <param name="exchangeName"></param>
        /// <param name="messageQueueAppConfig"></param>
        /// <param name="messageQueueConnection"></param>
        public MessageQueueConfiguration(string exchangeName,
                                         List<string> boundedQueues,
                                         MessageQueueAppConfig messageQueueAppConfig,
                                         IMessageQueueConnection messageQueueConnection)
        {
            _messageQueueAppConfig = messageQueueAppConfig;
            _messageQueueConnection = messageQueueConnection;
            _exchangeName = exchangeName;
            _boundedQueues = boundedQueues;
        }

        /// <summary>
        /// Initialize Initialize RabbitMQ Exchange
        /// </summary>
        public void InitializeRabbitMQExchange()
        {
            _channel = _messageQueueConnection.GetConnection().CreateModel();

            _basicProperties = _channel.CreateBasicProperties();
            _basicProperties.Persistent = true;

            string exchangeName = _exchangeName + "_" + _messageQueueAppConfig.MessageQueueEnvironment;

            _channel.ExchangeDeclare(exchangeName, "fanout", true, false);

            foreach (string queueName in _boundedQueues)
            {
                string queue = queueName + "_" + _messageQueueAppConfig.MessageQueueEnvironment;

                _channel.QueueDeclare(queue, true, false, false);
                _channel.QueueBind(queue, exchangeName, _messageQueueAppConfig.RoutingKey);
            }
        }

    }

}
Sending a Message to a RabbitMQ Exchange
When the Inventory Management Message Queuing Service picked up the pending business transactions from the TransactionQueueOutbound table in the Inventory Management database, it extracted payload information for each transaction and passed the payload to the following SendMessage method which publishes the message to the InventoryShipped RabbitMQ exchange.
RabbitMQ supports the Publish/Subscribe message queuing pattern. The Publish/Subscribe messaging pattern is where senders of messages (publishers or producers) publish messages without the knowledge of which subscribers if any there may be. Similarly, subscribers or consumers, only receive messages that they require, without knowledge of which publishers, if any, there are.
To publish a message with RabbitMQ, you first create a PublicationAddress instance and set the exchange name and exchange type properties. To actually send a message to the exchange, the BasicPublish method is executed from a RabbitMQ channel with the publication address, basic properties and the payload for the message being passed into the method. When sending a message, the payload is sent as a UTF8 byte array.
In the SendMessage method below, a try/catch block surrounds the code that is sending the message to RabbitMQ and if an error occurs trying to send the message the error is returned back to the Inventory Management Message Queuing Service where it will leave the business transaction as pending in the TransactionQueueOutbound table. If an error occurs sending a message to RabbitMQ, it essentially means that the RabbitMQ server is down.
Implementing intermediary TransactionQueueInbound and TransactionQueueOutbound tables in SQL-Server makes the entire message queuing process more fault-tolerant and easier to monitor and facilitates recovery and retry functionality. Implementing message queuing without intermediary message queue tables that participate in a SQL-Server commit/rollback transaction makes recovery and retry from error functionality much more difficult to implement.
/// <summary>
/// Send Message
/// </summary>
/// <param name="entity"></param>
public ResponseModel<MessageQueue> SendMessage(MessageQueue entity)
{
    ResponseModel<MessageQueue> response = new ResponseModel<MessageQueue>();
    response.Entity = new MessageQueue();

    try
    {
        string output = JsonConvert.SerializeObject(entity);

        byte[] payload = Encoding.UTF8.GetBytes(output);

        string exchangeName = _exchangeName + "_" + _messageQueueAppConfig.MessageQueueEnvironment;

        PublicationAddress address = new PublicationAddress(ExchangeType.Fanout, exchangeName, _messageQueueAppConfig.RoutingKey);

        _channel.BasicPublish(address, _basicProperties, payload);

        response.Entity.Payload = output;

        response.ReturnStatus = true;
    }
    catch (Exception ex)
    {
        response.ReturnStatus = false;
        response.ReturnMessage.Add(ex.Message);
    }

    return response;

}
Creating and Configuring a RabbitMQ Subscription
The recommended and most convenient way to receive messages is to set up a subscription. In RabbitMQ there are a couple different configuration options for setting up a subscription. For the sample application subscriptions are created using the RabbitMQ Subscription object. Once created, the subscription consumes from a queue. Received deliveries can be retrieved by calling Next(), or by using the Subscription object as an IEnumerator in a foreach loop.
In the InitializeRabbitMQSubscription method a Subscription object is created and configured by first declaring a queue in the same way when declaring queues to be bound to an exchange. Once the queue is declared, it is assigned to the subscription and the Subscription object is assigned to a RabbitMQ channel.
using CodeProject.Shared.Common.Interfaces;
using CodeProject.Shared.Common.Models;
using Newtonsoft.Json;
using RabbitMQ.Client;
using System;
using System.Collections.Generic;
using System.Text;
using RabbitMQ.Client.Events;
using RabbitMQ.Client.MessagePatterns;

namespace CodeProject.MessageQueueing
{
    public class MessageQueueConfiguration : IMessageQueueConfiguration
    {

        private string _exchangeName;
        private List<string> _boundedQueues;
        private MessageQueueAppConfig _messageQueueAppConfig;
        private readonly IMessageQueueConnection _messageQueueConnection;
        private Subscription _subscription;
        private IBasicProperties _basicProperties;
        private IModel _channel;
        private string _originatingQueueName;

        /// <summary>
        /// Constructor
        /// </summary>
        /// <param name="exchangeName"></param>
        /// <param name="messageQueueAppConfig"></param>
        /// <param name="messageQueueConnection"></param>
        public MessageQueueConfiguration(string exchangeName, MessageQueueAppConfig messageQueueAppConfig, IMessageQueueConnection messageQueueConnection)
        {
            TransactionCode = exchangeName;

            _messageQueueAppConfig = messageQueueAppConfig;
            _messageQueueConnection = messageQueueConnection;
        }

        /// <summary>
        /// Initialize RabbitMQ Subscription
        /// </summary>
        /// <param name="queueName"></param>
        public void InitializeRabbitMQSubscription(string queueName)
        {
            _channel = _messageQueueConnection.GetConnection().CreateModel();

            string queue = queueName + "_" + _messageQueueAppConfig.MessageQueueEnvironment;

 _          _channel.QueueDeclare(queue: queue, durable: true, exclusive: false, autoDelete: false, arguments: null);

            _subscription = new Subscription(_channel, queue, false);

        }

    }

}
Consuming and Receiving Messages from a RabbitMQ Queue
For the sample application, a generic ReceiveMessages class was created that all message queuing services will use to consume messages from a queue. The ReceiveMessages class is created as a Hosted Service and runs as a separate asynchronous task in each message queuing service for each microservice,
As the Inventory Management Message Queuing Service sends inventory shipment messages to the Inventory Shipment exchange, the Sales Order Management Queuing Service is simultaneously subscribing and listening to the sales order queue which is bound to the Inventory Shipment exchange. The Sales Order Management Message Queuing Service implements the ReceiveMessages class to receive messages.
In the GetMessagesInQueue method, a reference to the Subscription object is acquired after it was previously created during the connection and subscription initialization process.
In the Sales Order Management Message Queuing Service, the Subscription consumes from the sales order queue. Received deliveries are retrieved by using the Subscription as an IEnumerator in a foreach loop. With each iteration, a BasicDeliverEventArg object is returned from the subscription. The BasicDeliverEventArg contains all the information about a message delivered from an AMQP broker.
The foreach loop will iterate continuously. When there are no more messages in the queue to process, the loop will sit idle. The foreach loop will automatically begin to iterate again when more messages come into the queue.
The ReceiveMessages class makes reference to a custom message processor component that contains methods to process inbound an outbound transactions and update database tables.
The Sales Order Management Message Queuing Service will take the inbound RabbitMQ message and deserialize it into a MessageQueue object and pass the deserialized object to the CommitInBoundMessage method of the message processor and the method will commit the message into the TransactionQueueInbound table in the Sales Order Management database.
Once committed to the TransactionQueueInbound table, an acknowledgement message is sent to the RabbitMQ server letting the server know that the message can be removed from the sales order message queue. Finally the message processor is executed again to process the message committed in the TransactionQueueInbound table to update the quantity shipped on the sales order.
using System;
using System.Collections.Generic;
using System.Text;
using System.Reactive.Subjects;
using System.Threading;
using System.Threading.Tasks;
using Microsoft.Extensions.Hosting;
using Microsoft.Extensions.Logging;
using Microsoft.Extensions.Options;
using CodeProject.Shared.Common.Models;
using CodeProject.Shared.Common.Interfaces;
using CodeProject.Shared.Common.Models.MessageQueuePayloads;
using Newtonsoft.Json;
using RabbitMQ.Client;
using RabbitMQ.Client.Events;
using RabbitMQ.Client.MessagePatterns;

namespace CodeProject.MessageQueueing
{

    public class ReceiveMessages : IHostedService, IDisposable
    {

        private readonly List<IMessageQueueConfiguration> _messageQueueConfigurations;
        private readonly IMessageQueueConnection _messageQueueConnection;
        private readonly IMessageQueueProcessing _messageProcessor;
        private readonly MessageQueueAppConfig _appConfig;
        private readonly ConnectionStrings _connectionStrings;

        private Timer _timer;
        private Boolean _running = false;

        public ReceiveMessages(IMessageQueueConnection messageQueueConnection,
                               IMessageQueueProcessing messageProcessor,
                               MessageQueueAppConfig appConfig, ConnectionStrings connectionStrings,
                               List<IMessageQueueConfiguration> messageQueueConfigurations)
        {
            _messageQueueConnection = messageQueueConnection;
            _messageQueueConfigurations = messageQueueConfigurations;
            _connectionStrings = connectionStrings;
            _messageProcessor = messageProcessor;
            _appConfig = appConfig;
        }

        /// <summary>
        /// Start
        /// </summary>
        /// <param name="cancellationToken"></param>
        /// <returns></returns>
        public Task StartAsync(CancellationToken cancellationToken)
        {
            Console.WriteLine("Starting Receiving Messages");

            _timer = new Timer(GetMessagesInQueue, null, TimeSpan.Zero, TimeSpan.FromSeconds(_appConfig.ReceivingIntervalSeconds));

            return Task.CompletedTask;
        }

        /// <summary>
        /// Get Messages In Queue
        /// </summary>
        /// <param name="state"></param>
        private async void GetMessagesInQueue(object state)
        {

            if (_running == true)
            {
                return;
            }

            _running = true;

            Console.WriteLine("Receiving Messages at " + DateTime.Now);

            Subscription subscription = _messageQueueConfigurations[0].GetSubscription();

            foreach (BasicDeliverEventArgs e in subscription)
            {
                string message = Encoding.UTF8.GetString(e.Body);

                MessageQueue messageQueue = JsonConvert.DeserializeObject<MessageQueue>(message);

                ResponseModel<MessageQueue> responseMessage = await _messageProcessor.CommitInboundMessage(messageQueue, _connectionStrings);
                if (responseMessage.ReturnStatus == true)
                {

                    Console.WriteLine($"Message Committed: {messageQueue.TransactionQueueId}");

                    subscription.Ack(e);

                    await _messageProcessor.ProcessMessages(_appConfig.InboundSemaphoreKey, _connectionStrings);

                }

            }

        }

        /// <summary>
        /// Stop Async
        /// </summary>
        /// <param name="cancellationToken"></param>
        /// <returns></returns>
        public Task StopAsync(CancellationToken cancellationToken)
        {
            Console.WriteLine("Stopping.");

            return Task.CompletedTask;
        }

        public void Dispose()
        {

        }
    }
}
Microservices Logging Best Practices
The microservice architecture offers a lot of great benefits like the ability to use different technology stacks, deploy applications independently, solve small problems one at a time, and more. But using microservices comes with a high cost in that they are complex. Not only in how they communicate with each other but also in how to manage them. And they get even more complicated when one or more services fail. Troubleshooting microservices is hard without a meaningful logging mechanism.
For the sample application, a separate logging database was created. All message queue messages that are sent and received through RabbitMQ are also routed to a logging message queue. A Logging Message Queue Service was created to log the messages into either a MessagesSent table or a MessagesReceived table in the centralized logging database.
Take for example creating a product in the Inventory Management microservice. When this business transaction occurs a message is sent to the ProductUpdate exchange and the message is routed to both the sales order queue and the purchase order queue. When successfully processed by all message queue services, three rows will have been added to the logging database. One for the original sent message that was inserted into the MessagesSent table and two rows inserted into the MessagesReceived table; one each for messages received by the sales order queue and the purchase order queue.
The Logging Messaging Queue Service maintains a count of queues bound to each RabbitMQ exchange. This count is used to reconcile messages. When messages have been reconciled, the Logging Message Queuing Service will send out acknowledgement messages back through RabbitMQ. In the case of the product creation example, the inventory queue will receive an acknowledgement message and the Inventory Management Message Queuing Service will process the message and archive TransactionQueueOutbound rows to an TransactionQueueOutboundHistory table.
Additionally, all application error exceptions should also be logged into a centralized logging database. Centralizing error messages can be done the same way as any other type of message via RabbitMQ message queuing.
Some good pieces of information for logging errors include:
- Date and Time – It is recommended to use the UTC date and time especially if your servers are running in different time zones in a cloud scenario.
- Stack errors. You could pass the exception object as a parameter to a logging library.
- Microservice Name – This will help you to differentiate which logs are from which microservice.
- Functions, Class and Method Names -The function, class, or method name where the error occurred so that you don’t have to guess where the problem is.
- IP address – The IP address of the server and client request. This information will make it easy to spot an unhealthy server.
- User-agent – The User-agent of the application so that you know which browsers or users are having issues.
Contextualizing centralized logging will save you time when you need to troubleshoot problems in the system.
Microservices and Shared Libraries
In the sample application, a common shared library was created that all microservices reference. The shared library in the sample application contains all the models and interfaces for processing messages. The shared library also contains utility functions and methods for serialization, token management, hashing and other general infrastructure functionality. The common shared library contains no business logic.
As we have made the progression from a monolith toward a microservices based architecture, the topic of shared libraries in microservices has continued to be a point of contention. One of the primary goals of microservices is to create loosely coupled services which can be changed independently from other microservices. The creation of our own “common” libraries creates coupling between the projects that depend on them.
As a rule of thumb there should be no need to put business logic into a common library. If you are doing this, then the bounded context of your microservices domains are most likely incorrect, and/or you are missing a microservice. Developers of microservices need to embrace the reality that duplication of code between microservices is actually okay; up to a point. Duplication of code within a specific microservice is not okay.
Of course the reality is that there will be some need for a shared library in a microservice architecture. Like the shared library in the sample application, code in shared libraries in a microservice architecture should mostly just include functions and classes that support common infrastructure functionality across microservices.
There are a several techniques for managing shared libraries in a microservice architecture. In a Microsoft world, shared libraries can be deployed as versioned Nuget packages across microservices, allowing the various microservices to implement the latest version of a shared library when desired. Taking care to avoid making breaking changes to a shared library is another option. Using overloaded functions can help prevent creating a breaking change in a shared library.
Following SOLID Design Principles can help too. SOLID is one of the most popular sets of design principles in object-oriented software development. It’s a mnemonic acronym for the following five design principles:
- Single Responsibility Principle
- Open/Closed Principle
- Liskov Substitution Principle
- Interface Segregation Principle
- Dependency Inversion
The argument for both the Single Responsibility Principle and the Open/Closed Principle is relatively simple: it makes your software easier to implement and prevents unexpected side-effects of future changes.
Installing the Sample Application
Between Angular 6, .NET Core 2.1 and RabbitMQ, there are a lot of moving parts to install and configure to get the sample application up and running. The sample application also consists of nine Visual Studio 2017 projects.
As exciting as these new technologies are, it can be a Nightmare on Elm Street trying to upgrade to the latest version of these technologies and dealing with all the dependencies surrounding these technologies including dealing with version incompatibilities. And if you have ever upgraded to the latest version of any Visual Studio edition, you probably know how painful upgrading can be; to the point that you often regret even upgrading. The sometimes fragile nature of Visual Studio upgrades is almost always about two steps forward, one step back.
In attempt to make getting the sample application up and running in your local development environment as painless as possible, I have outlined below the prerequisites and install steps needed to get up and running.
Software installation prerequisites:
- SQL Server Management Studio and SQL Server Express 2014 or greater
- Visual Studio 2017 Professional or Community Edition
- .NET Core 2.1
- RabbitMQ 3.7.9
- NodeJS 10.13.0 or greater
- Angular CLI 6
Installing the RabbitMQ Server – RabbitMQ requires a 64-bit supported version of Erlang for Windows to be installed. There’s a Windows installer for Erlang at http://www.erlang.org/downloads. Important note: the Erlang installer must be run using an administrative account otherwise a registry key expected by the RabbitMQ installer will not be present. Once Erlang has been installed, run the RabbitMQ installer rabbitmq-server-3.7.9.exe,downloadable at https://www.rabbitmq.com/install-windows.html. It installs RabbitMQ as a Windows service and starts it using the default configuration.
Installing the RabbitMQ Web UI Management tool – To install the RabbitMQ Web UI Management tool, a management plugin needs to be installed as follows:
- Open a Windows command window in administrator mode
- Change directory to C:\Program Files\RabbitMQ Server\rabbitmq_server-3.7.9\sbin
- From the command line execute: rabbitmq-plugins enable rabbitmq_management
- Go to Windows Services and restart the RabbitMQ service.
- Go to browser and enter the url: http://localhost:15672 and the default login will be user name: guest, password: guest
Download the Sample Application Source Code – The source code for the sample application can be downloaded from my github.com account. Simply download the zip file and extract all files to a folder of your choice.
Sample Application Databases – After downloading the source code, run SQL Server Management Studio as Administrator and attach the following databases that resides in the downloaded Databases folder:
- MS_AccountManagement_DEV
- MS_InventoryManagement_DEV
- MS_LoggingManagement_DEV
- MS_PurchaseOrderManagement_DEV
- MS_SalesOrderManagement_DEV
.NET Core 2.1 – When you download and install Visual Studio 2017 Professional or Community Edition, .NET Core 2.1 should automatically get installed with Visual Studio. If you already have Visual Studio 2017, you can verify your installation by going to the Tools menu and selecting Get Tools and Features and this will start the Visual Studio Installer. From the installer options, you can verify that .NET Core 2.1 has been installed.
Build and Run the Sample Application Web API Projects – To verify everything has been installed correctly, compile the following four Web API projects for the sample application. Be sure to wait a minute or two when opening and building these projects with Visual Studio 2017 because Visual Studio will need to restore the packages required to compile these projects when the project is opened.
- InventoryManagement -> CodeProject.InventoryManagement.WebApi.sln
- SalesOrderManagement -> CodeProject.SalesOrderManagement.WebApi.sln
- OrderManagement -> CodeProject.PurchaseOrderManagement.WebApi.sln
- AccountManagement -> CodeProject.AccountManagement.WebApi.sln
These Web API projects were configured to use SSL. To avoid SSL issues you’ll need to try and run the project by selecting the IISExpress profile and selecting the run button and ASP.NET Core will create an SSL certificate. Visual Studio will ask you if you would like to trust the self-signed certificate that ASP.NET Core has generated. Choose yes to trust the certificate. Because Visual Studio is Visual Studio, you might have to run the project a second or third time or exit and reload Visual Studio to confirm that everything with the project is working. When running the project from Visual Studio, the browser should launch and display a database connection string in the browser from the Values controller.
Build All Projects using the .NET Core CLI – The .NET Core command-line interface (CLI) is a new cross-platform tool chain for developing .NET applications. The CLI is a foundation upon which higher-level tools, such as Integrated Development Environments (IDEs), editors, and build orchestrators, can use.
There are nine .NET Core projects in the sample application that need to be built. After manually building the Web API projects, the rest of the projects can be built using a DOS batch file called _BuildAllProjects.bat that you can find in the Support folder. This DOS batch file executes the .NET Core CLI build command for each project:
dotnet build SpawnProcesses\SpawnProcesses
dotnet build ..\AccountManagement\CodeProject.AccountManagement.WebApi
dotnet build ..\InventoryManagement\CodeProject.InventoryManagement.MessageQueueing
dotnet build ..\InventoryManagement\CodeProject.InventoryManagement.WebApi
dotnet build ..\LoggingManagement\CodeProject.LoggingManagement.MessageQueueing
dotnet build ..\PurchaseOrderManagement\CodeProject.PurchaseOrderManagement.MessageQueueing
dotnet build ..\PurchaseOrderManagement\CodeProject.PurchaseOrderManagement.WebApi
dotnet build ..\SalesOrderManagement\CodeProject.SalesOrderManagement.MessageQueueing
dotnet build ..\SalesOrderManagement\CodeProject.SalesOrderManagement.WebApi
Angular CLI 6.0.8 – The Angular 6 front-end application is built and served through the Angular CLI. You can verify your Angular CLI installation by running the Angular CLI command: ng version. If the Angular CLI is not installed you can install it from the command window by typing npm install -g @angular/cli@6.0.8.
Build the Angular 6 front-end application – The Angular 6 front-end application is dependent on node modules to be installed in the project’s node_modules folder. Creating all the node modules can be done by going to the Portal folder and opening the Visual Studio 2017 project solution file CodeProject.Portal.sln. After opening the project, right-click on the packages.json file and select Restore Packages. If there is packages-lock.json file, delete it, otherwise the packages will not get restored. Once the packages have been installed you can build the Angular 6 project using the Angular 6 CLI in a DOS command window and navigate to the Portal -> CodeProject.Portal folder and execute: ng build.
Running the Sample Application Back-End Services and Front-End Portal
Once you have everything built you can begin to run the sample application. First start up all the back-end Web API applications and message queuing services by executing the DOS batch file _StartAllDevelopmentWebServersAndQueues.bat from the Support folder. This file executes a custom built .NET Core application called SpawnProcesses that will start up all the back-end processes for the sample application.
The SpawnProcesses application will start a new process for each of the eight back-end applications. By setting the property CreateNoWindow to false for each process will force each process to execute in the same DOS window. This is nice because it doesn’t pollute your environment with eight separate windows being opened.
If you need to run and debug one or more of the back-end services from Visual Studio, you can set a property to true or false in the appsettings.development.json file in the SpawnProcesses project to tell the application which particular processes should be started. If you change any settings, just rebuild the SpawnProcesses project so that the settings get added to the bin folder.
if (startUpProcesses.InventoryManagementWebApi == true)
{
        Console.WriteLine("Starting Inventory Management Web Api");

        Process process1 = new Process();
        process1.StartInfo.CreateNoWindow = false;
        process1.StartInfo.UseShellExecute = false;
        process1.StartInfo.RedirectStandardOutput = false;
        process1.StartInfo.FileName = runningPath + @"Support\StartInventoryManagementWebApi.bat";
        process1.StartInfo.Arguments = runningPath;
        process1.Start();

}

if (startUpProcesses.SalesOrderManagementWebApi == true)
{
        Console.WriteLine("Starting Sales Order Management Web Api");
        Process process2 = new Process();
        process2.StartInfo.CreateNoWindow = false;
        process2.StartInfo.UseShellExecute = false;
        process2.StartInfo.RedirectStandardOutput = false;
        process2.StartInfo.FileName = runningPath + @"Support\StartSalesOrderManagementWebApi.bat";
        process2.StartInfo.Arguments = runningPath;
        process2.Start();

}
Each process calls a DOS batch file that executes the .NET Core CLI run command to launch each application. The below code snippet launches the Inventory Management Web API application.
dotnet run --verbosity m --launch-profile CodeProject.InventoryManagement.WebApi --no-build
Now with the all the back-end services up and running, we can now serve up the sample application’s web front-end Angular 6 application. From the DOS command window, navigate to the Portal -> CodeProject.Portal folder and execute the Angular CLI command: ng serve. This will kick off an IIS Express web server on localhost:4200. To access the Microservices Portal application, navigate to http://localhost:4200 in your browser.
Angular 6 Web Application – Points of Interest
I didn’t get too much into the front-end Angular 6 TypeScrip code for the sample application but below is a brief list of points of interest you may want to explore:
- The Inventory Management, Sales Order Management and Purchase Order Management modules are loaded as separately lazy-loaded modules.
- The Angular 6 application implements Angular Material Design components that renders an alternate fresh look and feel compared to the traditional bootstrap format and layout.
- An Angular module called auth0/angular-jwt was implemented and uses the module’s JWT Helper Service to extract claim information client-side from the user’s JSON web token, including extracting the expiration date of the token which is used to automatically log out the user when their token has expired.
For more information regarding Angular 6 and .NET Core 2.1, check out my Code Project article Deploying an Angular 6 Application with ASP.NET Core 2.
Summary
In Kubrick’s movie 2001: A Space Odyssey, there was a fictional character called the HAL 9000 computer. HAL is initially considered a dependable member of the crew, maintaining ship functions and engaging with its human crew mates on an equal footing. In the film, the artificial intelligence of HAL is shown to triumph easily. However, as time progresses, HAL begins to malfunction in subtle ways and, as a result, the decision is made to shut down HAL in order to prevent more serious malfunctions.
The microservice architecture is exciting and has a lot of promise and like HAL, it seems dependable and engaging. But as good as microservices sounds on paper, they are not without their challenges, the biggest of which is its added complexity. Microservices must be well planned, developed and managed. Inter-process communications need to be facilitated, data must be shared and/or duplicated and all parts of a microservices ecosystem must be continuously monitored to track abnormal behavior and possible failures. As an information technology professional I quote the HAL 9000 – “I’ve still got the greatest enthusiasm and confidence in the mission”. I am excited and hopeful that the fate of microservices will be a much better one than the fate that became of the HAL 9000.


")


 CỦA OBJECTIVE (MỤC TIÊU)")
