

CQRS (Command Query Responsibility Segregation) allows developers to segregate data modification from selecting data. In this first article of the series, Diogo Souza walks you through configuring the environment and creating the start an application to demonstrate this architecture.
Most developers are used to creating and handling CRUD (create, read, update, delete) systems for operations that divide tasks into updating and searching for data. When it comes to the problems this kind of well-known practice causes when considering the huge number of different frameworks, solutions, and infrastructural issues that arise every day, the life of those same developers can get tricky.
One of the main concerns regarding this is the increasing number of representations that your models can have when the application must serve more and more clients. Most of the time, the architectural design of the applications is made in the common CRUD-like way, that is, a single database (whether it is relational or not) that’ll both store and serve as the querying center of all requirements.
That concern about aligning these worlds every time a new microservice is born, for example, ties the developer’s hands to create each side in a more specialized manner when it comes to performance issues, object model complexities, resilience, and scalability independence, etc.
The term CQRS, (Command Query Responsibility Segregation) is based on the famous CQS idea. It is the closest architecture available to split these responsibilities to accomplish more and simplify the design. It’s all about separating things, especially if they’re very different conceptually when it comes to reading and updating models.
The pattern basically divides into two categories:
- Queries: get the information only, and never change anything within the model;
- Commands: that’s when you perform the writes, updates, and deletes (along with all the logic’s complexities inherent to the business rules).
Figure 1 illustrates how this communication usually happens. Notice, specifically, the event sync in white that’ll take the written model data and send it asynchronously to another module in order to save the same data to the materialized view (NoSQL database, in this case).
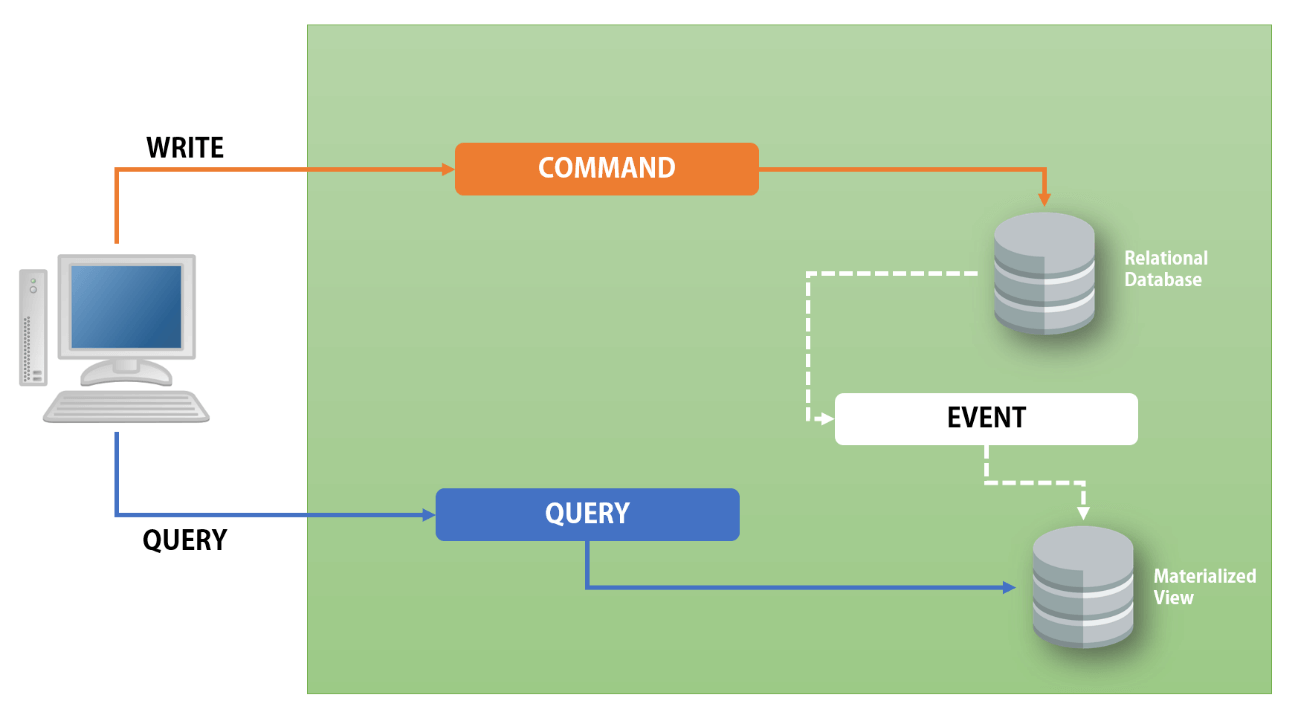
Figure 1. CQRS architectural representation.
CQRS goes a bit further allowing you to have both worlds deployed and working structurally and physically separated from each other, even on different hardware, cloud, etc. There’s a lot of flexibility here since you can define your own toolset, along with event-driven and message-driven architectures, DDD, etc. to make it more dynamic depending on your reality.
In this series, you’ll learn how to create and gradually enhance one basic CQRS-like application, created upon ASP.NET Core. It consists of a Web API, a REST web service that will deal with customers data in a CRUD fashion, however, sending each of the commands to its respective handler. Then, you can decide where to manage the data flows: whether it is on the command or query’s database/datastore.
In this first part of the article, you’ll get started with the project setups. The project relies on a REST-like application that handles customer information (basically user’s data and a list of phones) to demonstrate how a single model lives within a CQRS structure.
Setting up the environment
The first thing you must install is the latest version of Visual Studio (the Community edition is good to go). For this article, Visual Studio 2017 is the chosen version, since it is the latest. The prerequisites consist of two workloads:
- ASP.NET and web development;
- .NET Core cross-platform development.
Also, make sure that the .NET Core SDK (latest version) is properly installed on your machine.
If you have already installed VS, you can change the IDE setup by launching the installer, running it again, and selecting the proper workloads.
Setting up SQLite
SQLite is used as the relational database to store the customer’s data – the ‘write’ side of the project. First, go to the download page of DB Browser (a famous GUI tool to manage the SQLite databases) and install it.
Setting up MongoDB
For the querying side of the model, we’ll use MongoDB as the database. First of all, you need to download and install it on your Windows machine. Follow the default installation steps and don’t forget to keep the option that installs MongoDB Compass (the default GUI for MongoDB) as well. Once it’s finished, open Compass and create a new database with the Figure 2 configurations.
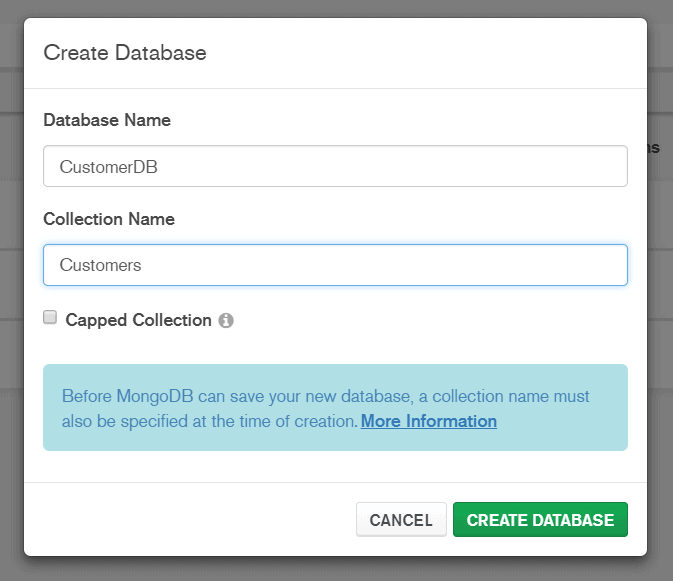
Figure 2. Configuring MongoDB new database.
Setting up RabbitMQ
RabbitMQ is going to be the default message broker to the Event processing side of the CQRS model. You can pick up another broker that you feel more comfortable with, just be sure to keep the same (similar) configurations. For this, go to the installation page, and following the instructions to install and sets it up.
Additionally, don’t forget to install the Erlang dependency for Windows. Once the installer finishes the process, RabbitMQ will be a Windows service that starts up along with your machine, through its default configurations: guest as both user and password. To access the administration page, just go to http://localhost:15672/ in your browser (Figure 3).
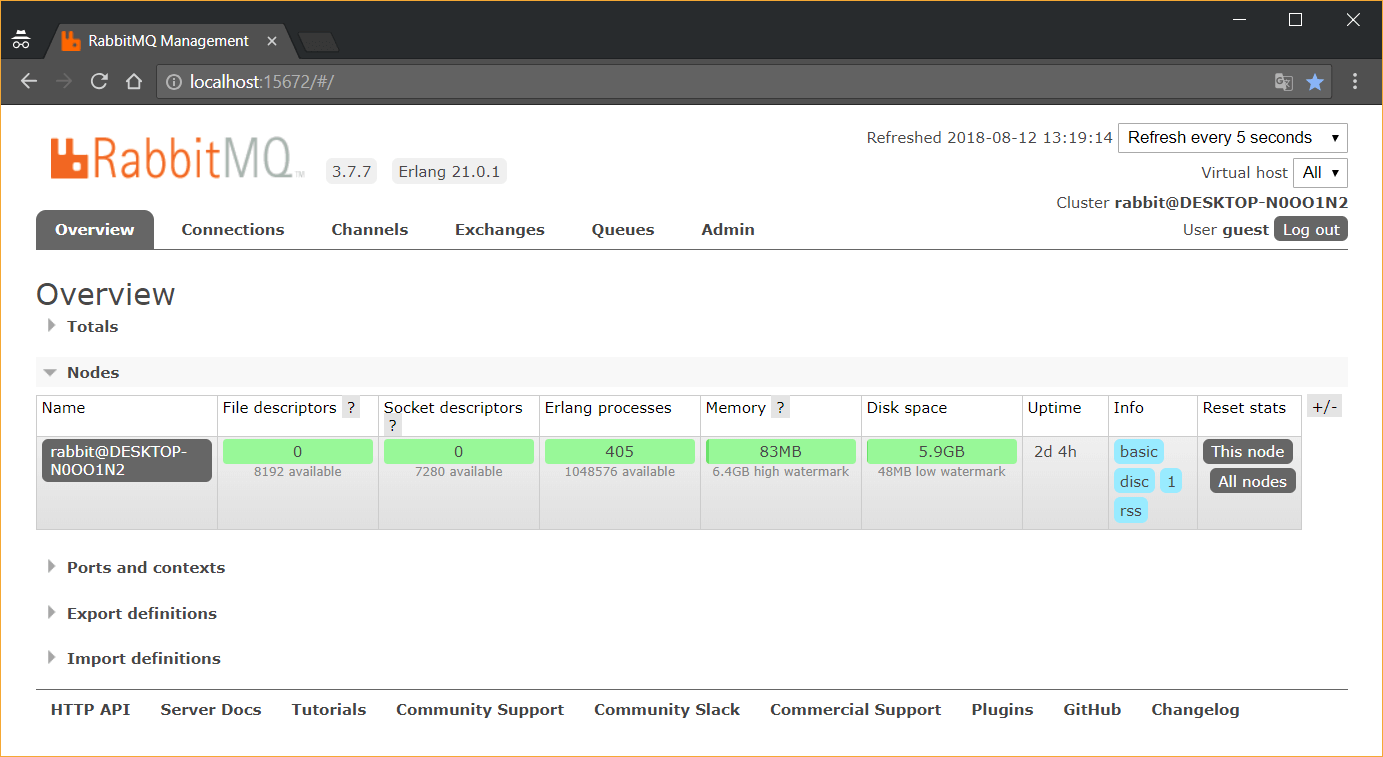
Figure 3. RabbitMQ administration page.
In case this page doesn’t show up the first time, you can force the RabbitMQ Management plugin to restart. For this, go to the RabbitMQ installation \sbin folder and run the following command:
| rabbitmq-plugins.bat enable rabbitmq_management |
Figure 4 goes back step by step. Then, restart your computer and try to access the URL again.
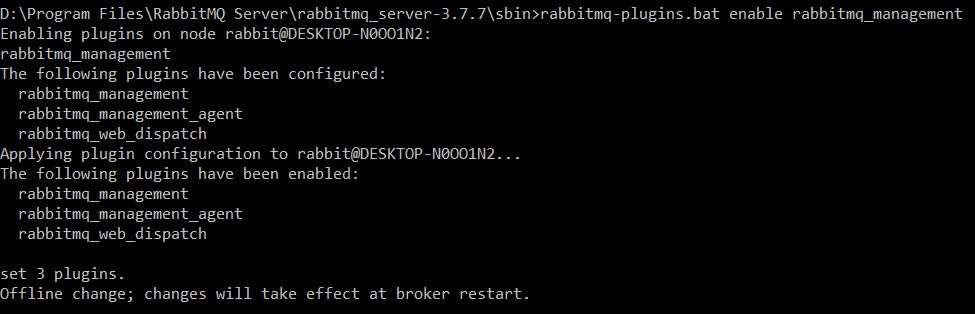
Figure 4. Enabling RabbitMQ Management plugin.
Creating the Project
Create a new Web Application project by going to File > New > Project. Then, select the template ASP.NET Core Web Application and name it as CustomerApi (Figure 5).
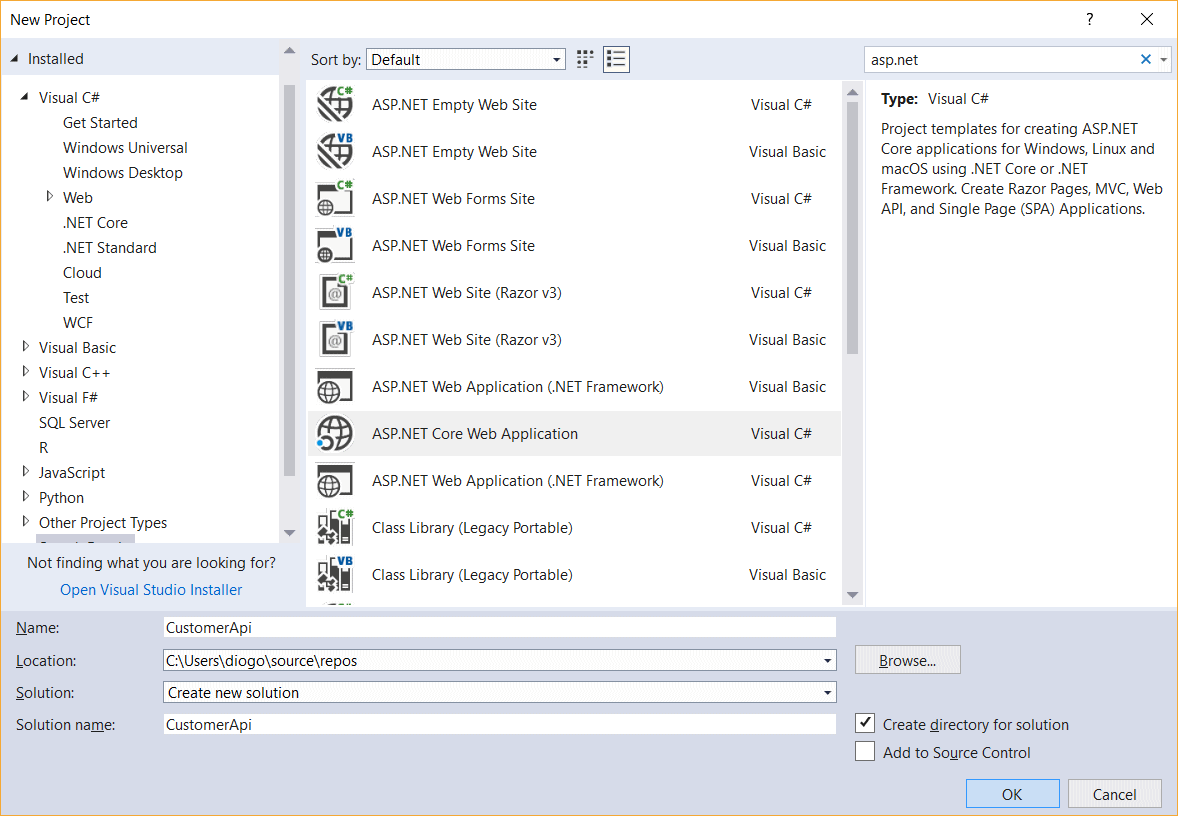
Figure 5. Creating a new ASP.NET Core Web Application.
You’ll be prompted to select a template for your Web Application, like that shown in Figure 6. Since the application just needs to expose endpoints for the tests, you can select the API option and, if you wish to deploy your application on a local Docker container, you can select the Enable Docker Support. Remember that this option will require you to have Docker previously installed on your computer.
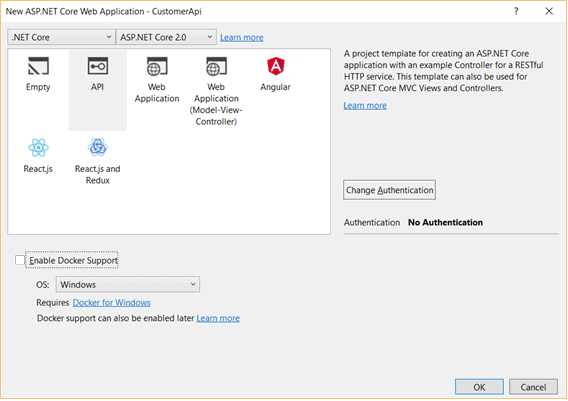
Figure 6. Selecting the application template.
Note: You can download the completed project from the link at the bottom of the article.
Next, you need to add the Entity Framework dependencies to your NuGet dependencies, specifically the one that refers to the SQLite integration. For this, go to menu View > Other Windows > Package Manager Console and run the following commands:
| install-package Microsoft.EntityFrameworkCoreinstall-package Microsoft.EntityFrameworkCore.Sqliteinstall-package Microsoft.EntityFrameworkCore.Tools.DotNet |
Then, do the same to the Extensions.Configuration in order to enable the binding of our objects based on predefined key-value pairs; as well as the ASP.NET Core package:
| install-package Microsoft.Extensions.Configurationinstall-package Microsoft.Extensions.Configuration.Jsoninstall-package Microsoft.AspNetCore.All |
Next, add the MongoDB C# Driver dependency to your NuGet dependencies going again to View > Other Windows > Package Manager Console and running the following command:
| install-package mongocsharpdriver |
Finally, let’s config the Web API project to have the RabbitMQ Client (once we need it to post and consume messages) installed as a NuGet dependency going once more to the Package Manager Console and issuing the command:
| install-package RabbitMQ.Client |
At the end of all these setups, you’ll have the same NuGet Dependencies structure as shown in Figure 7.
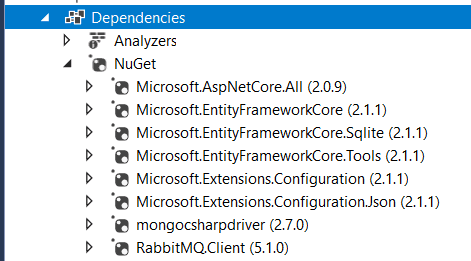
Figure 7. Final NuGet Dependencies tree.
Let’s get started with the project configurations letting it know how to interpret the initial launching and app settings. By default, the files launchSettings.json (which defines the rules for the IIS server, build, profiling, etc.) and appsettings.json (which is responsible for defining the settings in app scope like database connections, amqp, etc.) are created to enable your project configuration customization.
Take a look at the following code listing, starting by the launchSettings.json file found in the Propertiesfolder. Make a note of the original ports in your file. Change it according to this code and add the original HTTP port back:
| { “iisSettings”: { “windowsAuthentication”: false, “anonymousAuthentication”: true, “iisExpress”: { “applicationUrl”: “http://localhost:58751/”, “sslPort”: 0 } }, “buildOptions”: { “emitEntryPoint”: true, “preserveCompilationContext”: true, “copyToOutput”: { “include”: [ “appsettings.json” ] } }, “profiles”: { “IIS Express”: { “commandName”: “IISExpress”, “launchBrowser”: true, “launchUrl”: “api/customers”, “environmentVariables”: { “ASPNETCORE_ENVIRONMENT”: “Development” } }, “CustomerApi”: { “commandName”: “Project”, “launchBrowser”: true, “launchUrl”: “api/customers”, “environmentVariables”: { “ASPNETCORE_ENVIRONMENT”: “Development” }, “applicationUrl”: “http://localhost:58752/” } }} |
Notice too that we have two IIS configurations in the file:
- The first defined in a global IIS server scope, for you to access as a Windows service deployed every time you run the application. This way, it’s not necessary to be in debug mode to access the application;
- The second is focused on the development process itself, that is, VS starts the app in a different port in order to allow you to debug the app on that address:port.
The second file, appsettings.json, must be changed to the following:
| { “Logging”: { “IncludeScopes”: false, “LogLevel”: { “Default”: “Debug”, “System”: “Information”, “Microsoft”: “Information” } }, “ConnectionStrings”: { “DefaultConnection”: “Filename=./customer_db.db” }, “amqp”: { “username”: “guest”, “password”: “guest”, “hostname”: “localhost”, “uri”: “amqp://localhost:5672/”, “virtualhost”: “/” }} |
Some configurations are familiar and come within the file when it is created by VS, like the Debug, Console and Logging settings. Here, we’ve added a few others, like:
- ConnectionStrings: The default connection configuration for your SQLite database (you’ll see how to create the file customer_db.db further in the article);
- amqp: Default settings for the RabbitMQ connection. Here, no vhost was created to evict greater complexities. The rest are just the default key:values pairs of the broker (pay attention to change this to your broker or own properties if they’re not the default ones). Note that the configs, including the port, are the defaults for RabbitMQ. If you have installed it with different properties, so change them here too.
Plus, once you’re running this example in a local development environment, make sure to copy the same properties to the file appsettings.Development.json.
SQLite Integration
Once all the environment frameworks and tools are configured, let’s move on to the model definitions. We’ll start by creating the C# class of our Repositories and Entities since these integrations require some work regarding their complexities until we have all of them properly working along with the ASP.NET project.
Before going to the classes creation, you need to create the database file. SQLite was chosen as the CQRS relational database because it is serverless (unlike many other databases, it doesn’t need the common client/server architecture), that is, it works inside the applications, allowing the reads and writes directly from the file that represents the database itself. It’s perfect for test and quality assurance environments, so we’ll pick it up in order to evict complexity increasing.
So, first, open the DB Browser for SQLite, click on New Database, navigate to the root folder of the CustomerApi project and save this connection there with the name of customer_db.db. Leave the database empty for now.
Get back to the project and create a new project folder called Models. Then, another called SQLite under Models. This is to keep the files of each repository approach separated (since we’re not creating an independent project for each solution). And finally, create three new files called CustomerRecord.cs, PhoneRecord.cs and PhoneType.cs. They must have the following contents:
CustomerRecord.cs
| using System.Collections.Generic;namespace CustomerApi.Models.SQLite{ public class CustomerRecord { public long Id { get; set; } public string Email { get; set; } public string Name { get; set; } public int Age { get; set; } public List<PhoneRecord> Phones { get; set; } }} |
PhoneRecord.cs
| namespace CustomerApi.Models.SQLite{ public class PhoneRecord { public long Id { get; set; } public PhoneType Type { get; set; } public int AreaCode { get; set; } public int Number { get; set; } }} |
PhoneType.cs
| namespace CustomerApi.Models.SQLite{ public enum PhoneType { HOMEPHONE, CELLPHONE, WORKPHONE }} |
The structure is lean: some simple attributes and a list phones represented by the second record entity. This one, specifically, needs to have the back-relation to the customer defined in order for the Entity Framework migration feature be able to understand and create the proper relationship between them.
The Entity Framework First Migration is a feature that allows you to migrate the structure of your Entities models to the original database. Once you’ve defined the model classes, Entity Framework will be able, through this feature, to read the entities structure metadata and execute the corresponding scripts to create the tables, columns, etc. in the final datastore.
To use this, go to the project root folder and edit the file CustomerApi.csproj. Search for the tag <ItemGroup> and add the following item to it:
<DotNetCliToolReference Include=”Microsoft.EntityFrameworkCore.Tools.DotNet” Version=”2.0.2″ />
Restart your IDE. Now, you need to create the database context that’ll command the rules of the migration. In the Models/SQLite folder, create a new class and name it as CustomerSQLiteDatabaseContext.cs. Add the following content:
| using Microsoft.EntityFrameworkCore;namespace CustomerApi.Models.SQLite{ public class CustomerSQLiteDatabaseContext : DbContext { public CustomerSQLiteDatabaseContext(DbContextOptions<CustomerSQLiteDatabaseContext> options) : base(options) { } protected override void OnModelCreating(ModelBuilder modelBuilder) { modelBuilder.Entity<CustomerRecord>() .HasMany(x => x.Phones); } public DbSet<CustomerRecord> Customers { get; set; } }} |
It basically defines the model builder and how it is going to consider the customer -> phones relation when generating the database structures. Here, it’s important to correctly set up the one and manysides of the entity relationships, as well as the foreign keys.
Then, go again to the Models/SQLite folder and create the repository class, called CustomerSQLiteRepository.cs. This one will be responsible for holding the context object and managing the operations of the SQLite database file:
| using System.Collections.Generic;using System.Linq;namespace CustomerApi.Models.SQLite{ public class CustomerSQLiteRepository { private readonly CustomerSQLiteDatabaseContext _context; public CustomerSQLiteRepository(CustomerSQLiteDatabaseContext context) { _context = context; } public CustomerRecord Create(CustomerRecord customer) { Microsoft.EntityFrameworkCore.ChangeTracking.EntityEntry<CustomerRecord> entry = _context.Customers.Add(customer); _context.SaveChanges(); return entry.Entity; } public void Update(CustomerRecord customer) { _context.SaveChanges(); } public void Remove(long id) { _context.Customers.Remove(GetById(id)); _context.SaveChanges();<a id=”post-81017-_Hlk525287084″></a> } public IQueryable<CustomerRecord> GetAll() { return _context.Customers; } public CustomerRecord GetById(long id) { return _context.Customers.Find(id); } }} |
Note that the methods are common CRUD operations performed onto the Customers object of the context.
Finally, you must adjust the Startup.cs file of the project to understand the new configs, by adding a new DBContext as well as a repository transient to the ConfigureServices method:
| services.AddDbContext<CustomerSQLiteDatabaseContext>(options => options.UseSqlite(Configuration.GetConnectionString(“DefaultConnection”)));services.AddTransient<CustomerSQLiteRepository>(); |
Don’t forget the proper using statements in the beginning of the file:
| using CustomerApi.Models.SQLite;using Microsoft.EntityFrameworkCore; |
To guarantee that the database is in fact created, you can also add the following code to the Configure method:
| using (var serviceScope = app.ApplicationServices.GetService<IServiceScopeFactory>().CreateScope()) { var context = serviceScope.ServiceProvider.GetRequiredService<CustomerSQLiteDatabaseContext>(); context.Database.EnsureCreated();} |
Now, let’s test the migrations feature. Open the command prompt, navigate to the project root folder and issue the following commands:
| dotnet ef migrations add CreateDatabasedotnet ef database update |
The first command will build the project, read the entity models and create the migration files to migrate the model. The second command triggers the commands to be executed directly into the database.
After that, open the DB Browser again for SQLite and observe the tables generated automatically.
First Hints with the API
To give you a taste of how this API must operate the command side of the CQRS application, let’s create the controller facade for the API to handle basic CRUD operations.
For this, in the /Controllers folder, rename the default generated controller class to CustomersController.cs and change its content to the following:
| using CustomerApi.Models.SQLite;using Microsoft.AspNetCore.Mvc;namespace CustomerApi.Controllers{ [Route(“api/[controller]”)] public class CustomersController : Controller { private readonly CustomerSQLiteRepository _sqliteRepository;<a id=”post-81017-_Hlk525286977″></a> public CustomersController(CustomerSQLiteRepository sqliteRepository) { _sqliteRepository = sqliteRepository; } [HttpGet] public IActionResult GetAll() { var customers = _sqliteRepository.GetAll(); if (customers == null) { return NotFound(); } return new ObjectResult(customers); } [HttpGet(“{id}”, Name = “GetCustomer”)] public IActionResult GetById(long id) { var customer = _sqliteRepository.GetById(id); if (customer == null) { return NotFound(); } return new ObjectResult(customer); } [HttpPost] public IActionResult Post([FromBody] CustomerRecord customer) { CustomerRecord created = _sqliteRepository.Create(customer); return CreatedAtRoute(“GetCustomer”, new { id = created.Id }, created); } [HttpPut(“{id}”)] public IActionResult Put(long id, [FromBody] CustomerRecord customer) { var record = _sqliteRepository.GetById(id); if (record == null) { return NotFound(); } customer.Id = id; _sqliteRepository.Update(customer); return NoContent(); } [HttpDelete(“{id}”)] public IActionResult Delete(long id) { var record = _sqliteRepository.GetById(id); if (record == null) { return NotFound(); } _sqliteRepository.Remove(id); return NoContent(); } }} |
Notice that the same endpoints (each HTTP method) are created based on the RESTful principles to facilitate the pattern and make it more understandable for the clients to integrate.
Now, you can test each endpoint and check the data being saved to the SQLite database, as well as being queried from there when it comes to the GET operation. You can use Postman, or any other REST-like testing tool of your preference, to test the calls to the API. For example, let’s create a new customer just like shown in Figure 8. Make sure to modify the port. Here is the JSON code you will need to create the customer:
| { “phones”: [ { “type”:0, “areacode”:321, “number”: 0003010 } ], “email”:”georgi@michales.com”, “name”: “Georgia Michales”, “age”: 12} |
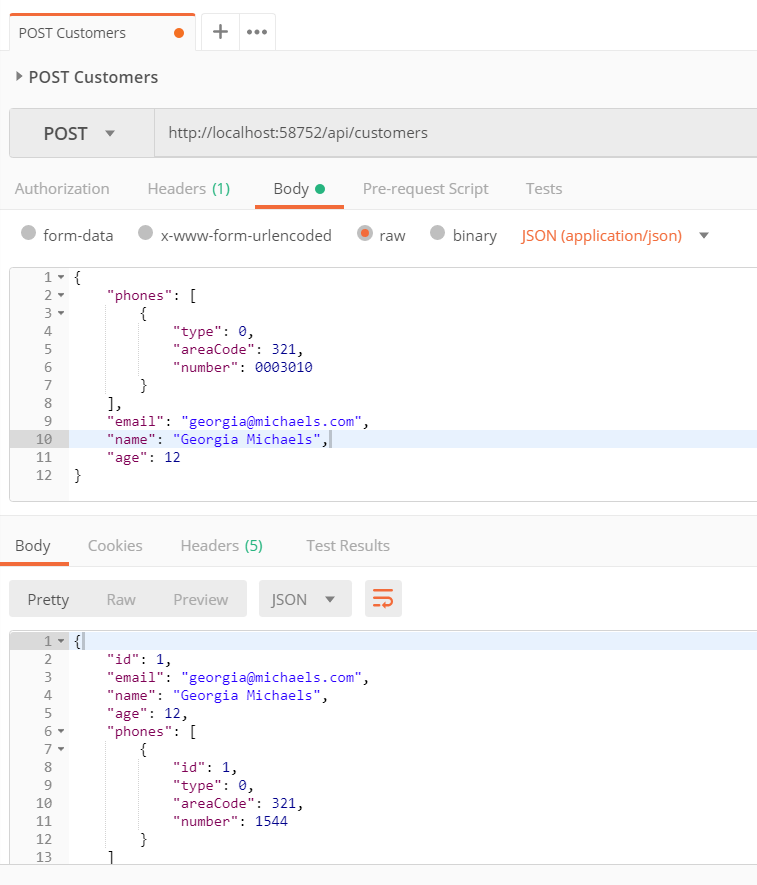
Figure 8. Testing the customer’s creation with Postman.
Now, go and check the database where you should see the new record added to the table. Also, call the GET (and the other HTTP verbs) operation with this URL to see if the result is coming correctly.
Conclusion
This will give you that notion of CRUD that most developers are used to when it comes to application development. In fact, that sense is part of the CQRS nature, which means that one thing doesn’t need to live without the other. Actually, they refer to each other in a way that are complementary operations.
In the next part of this series, we’ll dive into event processing, the NoSQL side of the querying model and how everything can work together.


 CỦA OBJECTIVE (MỤC TIÊU)")
