

In this second article of the series, Diogo Souza walks you through creating the MongoDB code, the query side of the pattern, to complete the CQRS configuration.
The first article of the series dove into the main concepts of CQRS along with the project configuration and setup. You learned how to create a basic CRUD-like application with ASP.NET and integrate it with a simple data source structure that relies on the Entity Framework and SQLite.
It’s important to notice, until here, that no CQRS concept was applied yet, since the whole implementation is about CRUD operations. This is intentional, for you to better understand how this pattern can apply in existing REST applications as well as web and even desktop applications that want to take advantage of it.
For the second part of the tutorial, you’ll finish the CQRS configurations by creating the MongoDB code, which is going to be responsible for the query side of the pattern. Also, you are going to create the commands that will operate over the creation and update of the data through normal relational database operations; finish the customer controller, which, in turn, will access the commands and queries to serve each appropriate endpoint; and, finally, set up the event-driven architecture with RabbitMQ for the publishing and subscribing of all the events the application has to deal with. The source code is available at the end of the article.
Creating the Query Side
Start by creating the MongoDB configurations, necessary for the Query side of the CQRS model. Open the CustomerAPI application in Visual you created in the first article and open your Startup.cs class. (You can find the code for this article here.) Add another transient repository setting, right below the SQLite one:
| services.AddTransient<CustomerMongoRepository>(); |
Don’t forget the proper using statement at the beginning of the file:
| using CustomerApi.Models.Mongo; |
Add a new folder to the project: \Models\Mongo. Create a new class, CustomerMongoRepositoryin the new folder. This new class will accommodate the same CRUD operations you’ve created in the SQLite repository. However, using the specific configurations provided by the previously imported Mongo driver library. Replace the code:
| using System.Collections.Generic;using MongoDB.Driver;namespace CustomerApi.Models.Mongo{ public class CustomerMongoRepository { private const string _customerDB = “CustomerDB”; private const string _customerCollection = “Customers”; private IMongoDatabase _db; public CustomerMongoRepository() { MongoClient _client = new MongoClient(“mongodb://localhost:27017”); _db = _client.GetDatabase(_customerDB); } public List<CustomerEntity> GetCustomers() { return _db.GetCollection<CustomerEntity>(_customerCollection).Find(_ => true).ToList(); } public CustomerEntity GetCustomer(long id) { return _db.GetCollection<CustomerEntity>(_customerCollection).Find(customer => customer.Id == id).SingleOrDefault(); } public CustomerEntity GetCustomerByEmail(string email) { return _db.GetCollection<CustomerEntity>(_customerCollection).Find(customer => customer.Email == email).Single(); } public void Create(CustomerEntity customer) { _db.GetCollection<CustomerEntity>(_customerCollection).InsertOne(customer); } public void Update(CustomerEntity customer) { var filter = Builders<CustomerEntity>.Filter.Where(_ => _.Id == customer.Id); _db.GetCollection<CustomerEntity>(_customerCollection).ReplaceOne(filter, customer); } public void Remove(long id) { var filter = Builders<CustomerEntity>.Filter.Where(_ => _.Id == id); var operation = _db.GetCollection<CustomerEntity>(_customerCollection).DeleteOne(filter); } }} |
Notice that, this time, you have more operations for retrieving/searching elements from the database than in the SQLite repository. It happens because, as the Query side of the model, some flexibilities like searching by the id or email must exist in order to accommodate the different types of searches the client may perform.
The other operations will help with tests, like creating, updating and removing items from the database for checking purposes.
Also, it’s important to attain to the name of the database and the collection (_customerDB and _customerCollection, respectively). They must be exactly the same as the ones you created before at MongoDB Compass in the previous article. Thanks to the lambda functionalities .NET provides, you can pass summarized functions as arguments to most of the methods of MongoDB database.
Next, it’s time to create the Mongo entities, mapping exactly the same values to expose to the clients, in response to the values saved in the SQLite entities. Inside the \Mongo folder, create a new class called CustomerEntity.cs and add the following code:
| using MongoDB.Bson;using MongoDB.Bson.Serialization.Attributes;using System.Collections.Generic;namespace CustomerApi.Models.Mongo{ public class CustomerEntity { [BsonElement(“Id”)] public long Id { get; set; } [BsonElement(“Email”)] public string Email { get; set; } [BsonElement(“Name”)] public string Name { get; set; } [BsonElement(“Age”)] public int Age { get; set; } [BsonElement(“Phones”)] public List<PhoneEntity> Phones { get; set; } }} |
The class is basically composed of the same properties found in the corresponding SQLite code. The annotation BsonElement is provided by the MongoDB library and specifies the element name of each field of the entity. This is important, because this is how Mongo will identify each field when saving the document-based values to the database through a key-value system. Add another class to folder, PhoneEntity.
Here is the code for PhoneEntity.cs:
| using MongoDB.Bson.Serialization.Attributes;namespace CustomerApi.Models.Mongo{ public partial class PhoneEntity { [BsonElement(“Type”)] public PhoneType Type { get; set; } [BsonElement(“AreaCode”)] public int AreaCode { get; set; } [BsonElement(“Number”)] public int Number { get; set; } }} |
Both SQLite and MongoDB use the same PhoneType.cs class from the previous article. Make sure that it is in the \Models folder.
Setting up the Event Handler
In order for RabbitMQ to work in an ASP.NET project, besides having a proper RabbitMQ client dependency configured on the project, it’s also necessary to register the publisher and the subscriber beans in the Startup.cs class (ConfigureServices() method):
| services.AddTransient<AMQPEventPublisher>();services.AddSingleton<CustomerMessageListener>(); |
Don’t forget to import the proper using statements at the beginning of the class.
| using CustomerApi.Models.Mongo; |
Start with the publisher by creating a new \Events folder on the root folder. Then, create a class called AMQPEventPublisher.cs and add the following code:
| using Microsoft.AspNetCore.Hosting;using Microsoft.Extensions.Configuration;using Newtonsoft.Json;using RabbitMQ.Client;using System.Text;namespace CustomerApi.Events{ public class AMQPEventPublisher { private readonly ConnectionFactory connectionFactory; public AMQPEventPublisher(IHostingEnvironment env) { connectionFactory = new ConnectionFactory(); var builder = new ConfigurationBuilder() .SetBasePath(env.ContentRootPath) .AddJsonFile(“appsettings.json”, optional: false, reloadOnChange: false) .AddEnvironmentVariables(); builder.Build().GetSection(“amqp”).Bind(connectionFactory); } public void PublishEvent<T>(T @event) where T : IEvent { using (IConnection conn = connectionFactory.CreateConnection()) { using (IModel channel = conn.CreateModel()) { var queue = @event is CustomerCreatedEvent ? Constants.QUEUE_CUSTOMER_CREATED : @event is CustomerUpdatedEvent ? Constants.QUEUE_CUSTOMER_UPDATED : Constants.QUEUE_CUSTOMER_DELETED; channel.QueueDeclare( queue: queue, durable: false, exclusive: false, autoDelete: false, arguments: null ); var body = Encoding.UTF8.GetBytes(JsonConvert.SerializeObject(@event)); channel.BasicPublish( exchange: “”, routingKey: queue, basicProperties: null, body: body ); } } } }} |
A few important points to notice here include the ConnectionFactory object. It is part of RabbitMQ Client library and responsible for creating and managing the connections, models and channels to publish the events. The ConfigurationBuilder helps with importing the proper configurations from the appsettings.json file (see its code below). And, finally, the PublishEvent() method was built upon a generic implementation; in other words, the generic T tells this method to expect any type of object to be published, which makes it also reusable for other more abstract constructions you may want.
Once the connection is opened, and the model is created, you can declare the queue, its configs, and perform a basic publish through the BasicPublish method of the model. Notice that three types of events will be published: when a customer is created, updated or deleted. Don’t worry about the compilation errors for now, you’ll soon create those classes as well.
Add the Constants class to the \Events folder:
| namespace CustomerApi.Events{ public class Constants { public const string QUEUE_CUSTOMER_CREATED = “customer_created”; public const string QUEUE_CUSTOMER_UPDATED = “customer_updated”; public const string QUEUE_CUSTOMER_DELETED = “customer_deleted”; }} |
The generic T you’ve seen before is also inheriting from an interface called IEvent. It helps to identify what is an event only in the project. Add the IEvent class. The following code represents it (yes, just a marking interface):
| namespace CustomerApi.Events{ public interface IEvent { }} |
Now, create the events themselves starting with the CustomerCreatedEvent. The structure is very similar to the entities you created before, mainly because no big changes will be made to avoid adding complexity:
| using CustomerApi.Models.Mongo;using System.Collections.Generic;using System.Linq;namespace CustomerApi.Events{ public class CustomerCreatedEvent : IEvent { public long Id { get; set; } public string Email { get; set; } public string Name { get; set; } public int Age { get; set; } public List<PhoneCreatedEvent> Phones { get; set; } public CustomerEntity ToCustomerEntity() { return new CustomerEntity { Id = this.Id, Email = this.Email, Name = this.Name, Age = this.Age, Phones = this.Phones.Select(phone => new PhoneEntity { Type = phone.Type, AreaCode = phone.AreaCode, Number = phone.Number }).ToList() }; } }} |
NOTE: Architecturally, it’s common to give event class names of a past nature, meaning that the event has already happened and you’re dealing with something in the past.
Notice that a method to convert each event to an entity will be useful since they mostly must be persisted after being received and processed (Linq will be used as a good option to iterate and perform operations over the lists of your event models).
The phone created event class (it can be just a single value object if you desire):
| using CustomerApi.Models;namespace CustomerApi.Events{ public class PhoneCreatedEvent : IEvent { public PhoneType Type { get; set; } public int AreaCode { get; set; } public int Number { get; set; } }} |
Next, the updated event class:
| using CustomerApi.Models.Mongo;using System.Collections.Generic;using System.Linq;namespace CustomerApi.Events{ public class CustomerUpdatedEvent : IEvent { public long Id { get; set; } public string Name { get; set; } public int Age { get; set; } public List<PhoneCreatedEvent> Phones { get; set; } public CustomerEntity ToCustomerEntity(CustomerEntity entity) { return new CustomerEntity { Id = this.Id, Email = entity.Email, Name = entity.Name.Equals(this.Name) ? entity.Name : this.Name, Age = entity.Age.Equals(this.Age) ? entity.Age : this.Age, Phones = GetNewOnes(entity.Phones).Select(phone => new PhoneEntity { AreaCode = phone.AreaCode, Number = phone.Number }).ToList() }; } private List<PhoneEntity> GetNewOnes(List<PhoneEntity> Phones) { return Phones.Where(a => !this.Phones.Any(x => x.Type == a.Type && x.AreaCode == a.AreaCode && x.Number == a.Number)).ToList<PhoneEntity>(); } }} |
This class has a structure similar to that of the previous one, except for a bolder approach to deal with the phones updating. You’ll only update phones that had, in fact, suffered any change whether it was in the area code or the number. So, for the update in the database, they’ll be overwritten every time. Plus, don’t forget to always check if each attribute inside the event had really changed compared to the received entity object.
The deleted event class:
| namespace CustomerApi.Events{ public class CustomerDeletedEvent : IEvent { public long Id { get; set; } }} |
The only thing that’s needed to delete an object to the database is the customer id.
Be aware that, in real world applications, it’s against the event-storing patterns to update/delete data in any situation. Events must be preserved in their original precedence as much as possible, to simulate exactly what happened. Here, the implementation tries to go, initially, through the old-fashion design most applications used to be built.
And finally, create the consumer class, CustomerMessageListener, responsible for listening to the events and processing them:
| using CustomerApi.Models.Mongo;using Microsoft.Extensions.Configuration;using Newtonsoft.Json;using RabbitMQ.Client;using RabbitMQ.Client.Events;using RabbitMQ.Client.MessagePatterns;using System;using System.Text;using System.Threading;namespace CustomerApi.Events{ public class CustomerMessageListener { private readonly CustomerMongoRepository _repository; public CustomerMessageListener(CustomerMongoRepository repository) { _repository = repository; } public void Start(string contentRootPath) { ConnectionFactory connectionFactory = new ConnectionFactory(); var builder = new ConfigurationBuilder() .SetBasePath(contentRootPath) .AddJsonFile(“appsettings.json”, optional: false, reloadOnChange: false) .AddEnvironmentVariables(); builder.Build().GetSection(“amqp”).Bind(connectionFactory); connectionFactory.AutomaticRecoveryEnabled = true; connectionFactory.NetworkRecoveryInterval = TimeSpan.FromSeconds(15); using (IConnection conn = connectionFactory.CreateConnection()) { using (IModel channel = conn.CreateModel()) { DeclareQueues(channel); var subscriptionCreated = new Subscription(channel, Constants.QUEUE_CUSTOMER_CREATED, false); var subscriptionUpdated = new Subscription(channel, Constants.QUEUE_CUSTOMER_UPDATED, false); var subscriptionDeleted = new Subscription(channel, Constants.QUEUE_CUSTOMER_DELETED, false); while (true) { // Sleeps for 5 sec before trying again Thread.Sleep(5000); new Thread(() => { ListerCreated(subscriptionCreated); }).Start(); new Thread(() => { ListenUpdated(subscriptionUpdated); }).Start(); new Thread(() => { ListenDeleted(subscriptionDeleted); }).Start(); } } } } private void ListenDeleted(Subscription subscriptionDeleted) { BasicDeliverEventArgs eventArgsDeleted = subscriptionDeleted.Next(); if (eventArgsDeleted != null) { string messageContent = Encoding.UTF8.GetString(eventArgsDeleted.Body); CustomerDeletedEvent _deleted = JsonConvert.DeserializeObject<CustomerDeletedEvent>(messageContent); _repository.Remove(_deleted.Id); subscriptionDeleted.Ack(eventArgsDeleted); } } private void ListenUpdated(Subscription subscriptionUpdated) { BasicDeliverEventArgs eventArgsUpdated = subscriptionUpdated.Next(); if (eventArgsUpdated != null) { string messageContent = Encoding.UTF8.GetString(eventArgsUpdated.Body); CustomerUpdatedEvent _updated = JsonConvert.DeserializeObject<CustomerUpdatedEvent>(messageContent); _repository.Update(_updated.ToCustomerEntity(_repository.GetCustomer(_updated.Id))); subscriptionUpdated.Ack(eventArgsUpdated); } } private void ListerCreated(Subscription subscriptionCreated) { BasicDeliverEventArgs eventArgsCreated = subscriptionCreated.Next(); if (eventArgsCreated != null) { string messageContent = Encoding.UTF8.GetString(eventArgsCreated.Body); CustomerCreatedEvent _created = JsonConvert.DeserializeObject<CustomerCreatedEvent>(messageContent); _repository.Create(_created.ToCustomerEntity()); subscriptionCreated.Ack(eventArgsCreated); } } private static void DeclareQueues(IModel channel) { channel.QueueDeclare( queue: Constants.QUEUE_CUSTOMER_CREATED, durable: false, exclusive: false, autoDelete: false, arguments: null ); channel.QueueDeclare( queue: Constants.QUEUE_CUSTOMER_UPDATED, durable: false, exclusive: false, autoDelete: false, arguments: null ); channel.QueueDeclare( queue: Constants.QUEUE_CUSTOMER_DELETED, durable: false, exclusive: false, autoDelete: false, arguments: null ); } }} |
Please, keep in mind that for most real CQRS applications, the event subscriber objects/components are usually built out of the publisher application for resiliency purposes. Here, they’ll be together just for simplification.
The class starts with the same RabbitMQ connection factory configs, connections and models. However, two new configs are used:
AutomaticRecoveryEnabled: its value is already true, but you’ll use it here to enforce the setup of the auto recovery feature, that instructs RabbitMQ to retry the current connection once it is lost or dealing with connectivity issues;NetworkRecoveryInterval: defines the time it will wait to retry the connection when facing network issues.
There are several approaches, including external frameworks, to consume events from a queue in RabbitMQ. The focus is on simplicity, so basically the queues are going to be declared (just in case they don’t exist yet in RabbitMQ server, so they’ll be automatically created), along with subscription objects.
Subscription objects control a model channel over a specific queue, as well as the acknowledge mode the delivery will be made with. In the example, each queue has its own subscription object set with autoAck mode to false, so you’re the one who must manually acknowledge the channel once the event consuming is done.
Then, an infinite loop will happen (with 5 seconds of delay from one iteration to another) opening three different threads, one for each event type can be received over the subscription objects. The reason for the loop is because new events can arrive at any moment, so you have to guarantee they will be consumed. And the threads are just to make sure no event will delay or alter the state of the others.
In the end, the only action to be performed will be the respective operation in the repository object.
Setting up the Commands
The Command pattern is well known to every OO developer, mainly because it helps to construct structures to process separately objects that act in similar ways. In this case, start with the abstract class that’ll represent it. Create a new folder \Commands and add the Command class.
| namespace CustomerApi.Commands{ public abstract class Command { public long Id { get; set; } }} |
The Id will be useful since it is used everywhere to identify a customer. Then, the customer created command object, CreateCustomerCommand class, that’ll support the data transit:
| using CustomerApi.Events;using CustomerApi.Models.SQLite;using System.Collections.Generic;using System.Linq;namespace CustomerApi.Commands{ public class CreateCustomerCommand : Command { public string Name { get; set; } public string Email { get; set; } public int Age { get; set; } public List<CreatePhoneCommand> Phones { get; set; } public CustomerCreatedEvent ToCustomerEvent(long id) { return new CustomerCreatedEvent { Id = id, Name = this.Name, Email = this.Email, Age = this.Age, Phones = this.Phones.Select(phone => new PhoneCreatedEvent { AreaCode = phone.AreaCode, Number = phone.Number }).ToList() }; } public CustomerRecord ToCustomerRecord() { return new CustomerRecord { Name = this.Name, Email = this.Email, Age = this.Age, Phones = this.Phones.Select(phone => new PhoneRecord { AreaCode = phone.AreaCode, Number = phone.Number }).ToList() }; } }} |
They are very similar to the event objects regarding the attributes but carry auxiliary methods to construct SQLite records and event objects, translating from one type of model schema to another.
Notice that, here, you’re using a second command for phone data, CreatePhoneCommand. Create the class and add the following code:
| using CustomerApi.Models;namespace CustomerApi.Commands{ public class CreatePhoneCommand : Command { public PhoneType Type { get; set; } public int AreaCode { get; set; } public int Number { get; set; } }} |
See the code for the updated and deleted commands, as well:
| using CustomerApi.Events;using CustomerApi.Models.SQLite;using System.Collections.Generic;using System.Linq;namespace CustomerApi.Commands{ public class UpdateCustomerCommand : Command { public string Name { get; set; } public int Age { get; set; } public List<CreatePhoneCommand> Phones { get; set; } public CustomerUpdatedEvent ToCustomerEvent() { return new CustomerUpdatedEvent { Id = this.Id, Name = this.Name, Age = this.Age, Phones = this.Phones.Select(phone => new PhoneCreatedEvent { Type = phone.Type, AreaCode = phone.AreaCode, Number = phone.Number }).ToList() }; } public CustomerRecord ToCustomerRecord(CustomerRecord record) { record.Name = this.Name; record.Age = this.Age; record.Phones = this.Phones.Select(phone => new PhoneRecord { Type = phone.Type, AreaCode = phone.AreaCode, Number = phone.Number }).ToList() ; return record; } }} |
For the deleted one, remember that only the id is important to be passed on:
| using CustomerApi.Events;namespace CustomerApi.Commands{ public class DeleteCustomerCommand : Command { internal CustomerDeletedEvent ToCustomerEvent() { return new CustomerDeletedEvent { Id = this.Id }; } }} |
All the command objects need a handler object, that will take care of receiving and distributing the operations through the different service/repository layers. Start with the command handler interface code:
| namespace CustomerApi.Commands{ public interface ICommandHandler<T> where T : Command { void Execute(T command); }} |
The method Execute() receives the specific command represented by its interface declaration and calls the proper operations for each one. See the following code for the implementation:
| using CustomerApi.Events;using CustomerApi.Models.SQLite;using System;namespace CustomerApi.Commands{ public class CustomerCommandHandler : ICommandHandler<Command> { private CustomerSQLiteRepository _repository; private AMQPEventPublisher _eventPublisher; public CustomerCommandHandler(AMQPEventPublisher eventPublisher, CustomerSQLiteRepository repository) { _eventPublisher = eventPublisher; _repository = repository; } public void Execute(Command command) { if (command == null) { throw new ArgumentNullException(“command is null”); } if (command is CreateCustomerCommand createCommand) { CustomerRecord created = _repository.Create(createCommand.ToCustomerRecord()); _eventPublisher.PublishEvent(createCommand.ToCustomerEvent(created.Id)); } else if (command is UpdateCustomerCommand updateCommand) { CustomerRecord record = _repository.GetById(updateCommand.Id); _repository.Update(updateCommand.ToCustomerRecord(record)); _eventPublisher.PublishEvent(updateCommand.ToCustomerEvent()); } else if (command is DeleteCustomerCommand deleteCommand) { _repository.Remove(deleteCommand.Id); _eventPublisher.PublishEvent(deleteCommand.ToCustomerEvent()); } } }} |
Here, roughly, you can already see the command running the code that’ll deal with relational database operations, and its segregation from the event publishing, always at the end of each command processing.
Finally, you need to add the handler as a scoped service. So, open the Startup.cs file again and add the following using command to the beginning of the file and AddScope() operation to the ConfigureServices() method:
| using CustomerApi.Commands;// …services.AddScoped<ICommandHandler<Command>, CustomerCommandHandler>(); |
Testing the New Controller
To make sure the new structures are fully working together, change the current customer controller to support the new commands, along with the proper REST results. This is the final CustomersController class:
| using CustomerApi.Commands;using CustomerApi.Models;using CustomerApi.Models.Mongo;using CustomerApi.Models.SQLite;using Microsoft.AspNetCore.Mvc;using System.Collections.Generic;namespace CustomerApi.Controllers{ [Route(“api/[controller]”)] public class CustomersController : Controller { private readonly ICommandHandler<Command> _commandHandler; private readonly CustomerMongoRepository _mongoRepository; private readonly CustomerSQLiteRepository _sqliteRepository; public CustomersController(ICommandHandler<Command> commandHandler, CustomerSQLiteRepository sqliteRepository, CustomerMongoRepository repository) { _commandHandler = commandHandler; _sqliteRepository = sqliteRepository; _mongoRepository = repository; if (_mongoRepository.GetCustomers().Count == 0) { var customerCmd = new CreateCustomerCommand { Name = “George Michaels”, Email = “george@email.com”, Age = 23, Phones = new List<CreatePhoneCommand> { new CreatePhoneCommand { Type = PhoneType.CELLPHONE, AreaCode = 123, Number = 7543010 } } }; _commandHandler.Execute(customerCmd); } } [HttpGet] public List<CustomerEntity> Get() { return _mongoRepository.GetCustomers(); } [HttpGet(“{id}”, Name = “GetCustomer”)] public IActionResult GetById(long id) { var product = _mongoRepository.GetCustomer(id); if (product == null) { return NotFound(); } return new ObjectResult(product); } [HttpGet(“{email}”)] public IActionResult GetByEmail(string email) { var product = _mongoRepository.GetCustomerByEmail(email); if (product == null) { return NotFound(); } return new ObjectResult(product); } [HttpPost] public IActionResult Post([FromBody] CreateCustomerCommand customer) { _commandHandler.Execute(customer); return CreatedAtRoute(“GetCustomer”, new { id = customer.Id }, customer); } [HttpPut(“{id}”)] public IActionResult Put(long id, [FromBody] UpdateCustomerCommand customer) { var record = _sqliteRepository.GetById(id); if (record == null) { return NotFound(); } customer.Id = id; _commandHandler.Execute(customer); return NoContent(); } [HttpDelete(“{id}”)] public IActionResult Delete(long id) { var record = _sqliteRepository.GetById(id); if (record == null) { return NotFound(); } _commandHandler.Execute(new DeleteCustomerCommand() { Id = id }); return NoContent(); } }} |
Basically, what changed is that the commands are now being handled by the REST automatic conversions and a new customer is being added once the constructor of the class runs, to make sure you’ll have some data in the database as soon as the application starts.
Before you run the application, make sure everything is up and running (the MongoDB and RabbitMQ servers) and, once Visual Studio finishes the starting up, you’d have the data stored in the SQLite database (just like you can see in Figure 1).
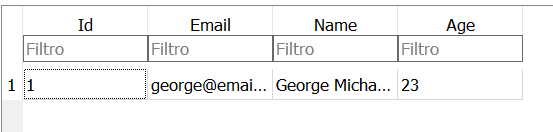
Figure 1. SQLite data after app started up.
Then, after persisting to the SQLite database, the customer_created event will be published. The RabbitMQ queue will receive the event (Figure 2), prepare a consumer to deliver it directly to the message listener.
Figure 2. RabbitMQ event consuming.
And finally, when the event is received at the listener, process the MongoDB data persisting, to guarantee the data is safe there, all in an asynchronous way.

Figure 3. MongoDB data after event being consumed.
Conclusion
It is now time to go and create more tests. Make sure to try each of your REST API operations with Postman (like the POST to create a new customer), checking to make sure each customer was stored in the SQLite database and, then, posted to RabbitMQ and, subsequently, to the MongoDB database asynchronously.
Some other structures of the architecture could be improved as well. If the application itself (or one of the nodes it is hosted when in a clustered environment) crashes in the very right moment the event would be published. For this, a couple of options are available such as considering a bigger transactional design that thinks of the processing as a whole that’s complete only when everything important is done. Or you could pick up a different messaging tool that guarantees, with more consistency, the delivery of the events (like Apache Kafka, for example, a very popular player at the moment). Just be sure to play with different scenarios, considering that they can happen in the real world.
The next part of this series will explore a totally new architecture considering the paradigm of Event Sourcing and Processing to map the events the application receives, reduce them when necessary, and make the application more scalable.


")


 CỦA OBJECTIVE (MỤC TIÊU)")
