

What is this buzz word ‘Docker’? Let’s understand this.
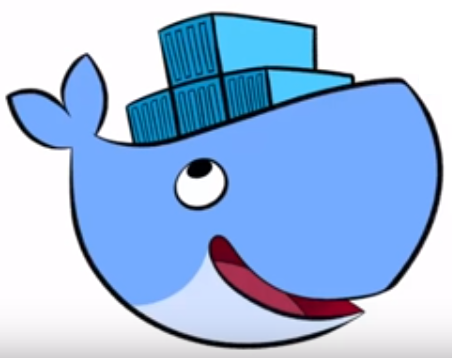
In the image, we can see that whale is carrying so many boxes and going very happily. These boxes are called Containers which contain everything that is required to run our software and docker is the platform that provides this containerization. In technical terms, containers are nothing but VM images.
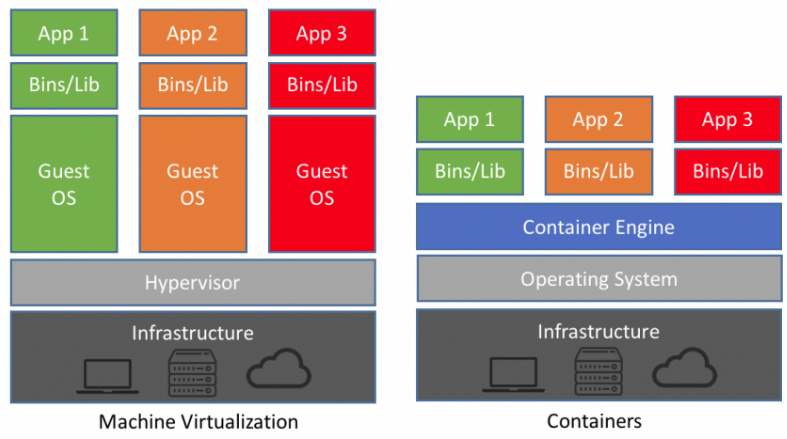
Image source: from blog of Doug
The above picture depicts how traditional vm images look as compared to containers. Both the pictures have the same base as Infrastructure (which can be considered as a server) and the Operating System sits on top of that. In the first image, Hypervisor is a virtual box which can be anything like Hypervisor, VMWare, etc. and holds all the guest Operating Systems. Further, these guest Operating Systems contain source code and binaries, along with the application. Whereas, in the second image, which is a container environment, has Docker Engine without any guest Operating System. So, where is that Operating System?
No worries. It is there. Docker Engine itself contains a small Operating System inside it, which holds everything as a container. Which means this small kernel is shared by each and every application/binary sitting on it.
In essence, we can say that Docker serves as a lightweight alternative to VMs as it doesn’t need Hypervisor.
What Does Docker Contain?
Docker contains Operating System, Source code, Environment variables (if any) and Dependent components to run the software. So, if anyone wants to run your software, they can simply take the container and get started, without putting effort to do the machine set up to make things work.
Why Do We Need It?
Many times, you must have heard developers saying – it is working fine on my machine, but I don’t know what is missing on your machine or say why the same software is not working on your machine? Such discussions usually pop up during the testing phase and as my personal experience, sometimes it takes hours to identify that small missed out dependency. Here, Docker comes to rescue. As it is containerization, each and every dependency is packed in the form of containers and is available for both Linux and Windows. Hence, everyone using the software will have the same environment. Basically, the concept of docker has completely vanished the problem of mismatch environments. Isn’t it amazing?
Creating an ASP.NET Core Application with Docker Support
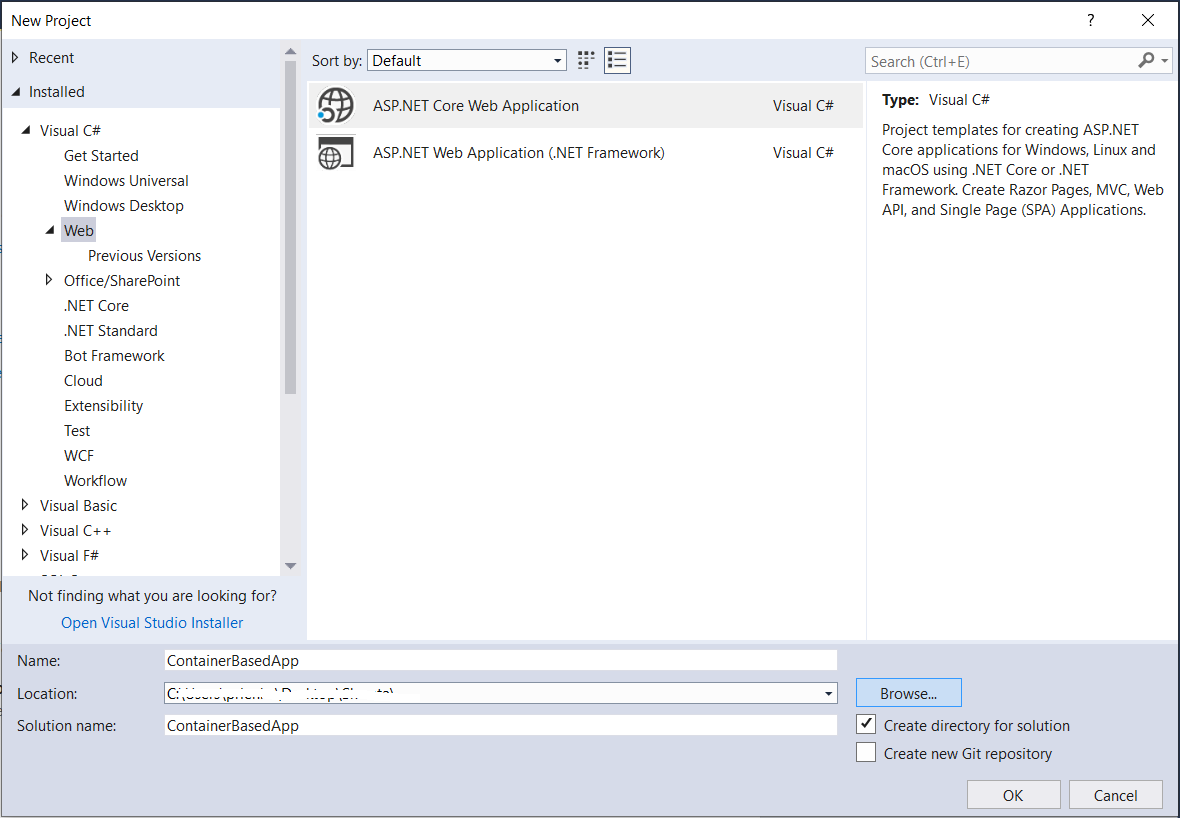
Open Visual Studio, go to New Project and Select ASP.NET Core Web Application as shown below:
Once you click on Ok, you will get the below screen where you have to select the checkbox ‘Enable Docker Support (Requires Docker for Windows)’ and OS as ‘Windows’.
There is also a hyperlink given ‘Requires Docker for Windows’, which can be used to install docker for Windows. In case you didn’t install docker before starting this exercise, it can be done now by clicking on this hyperlink. You can also verify the docker installation by typing the below command on Windows PowerShell:
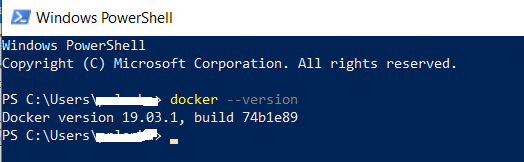
Docker –version
Once the application is created, you will see a file named Dockerfile is added to the application. At this point, if you want, you can change the views for your application.
What is Dockerfile?
On navigating to Solution Explorer, you will see Dockerfile having content similar to the below one:Hide Copy Code
FROM microsoft/dotnet:2.1-aspnetcore-runtime-nanoserver-1803 AS base
WORKDIR /app
EXPOSE 80

FROM microsoft/dotnet:2.1-sdk-nanoserver-1803 AS build
WORKDIR /src
COPY ["ContainerBasedApp/ContainerBasedApp.csproj", "ContainerBasedApp/"]
RUN dotnet restore "ContainerBasedApp/ContainerBasedApp.csproj"
COPY . .
WORKDIR "/src/ContainerBasedApp"
RUN dotnet build "ContainerBasedApp.csproj" -c Release -o /app

FROM build AS publish
RUN dotnet publish "ContainerBasedApp.csproj" -c Release -o /app

FROM base AS final
WORKDIR /app
COPY --from=publish /app .
ENTRYPOINT ["dotnet", "ContainerBasedApp.dll"]
Dockerfile is a text file which contains some commands. These commands are used to create docker image. Let’s take a brief of these commands:
FROM– This sets the base image for the following instructions and our base image isdotnet:2.1-aspnetcoreWORKDIR– This sets the working directory for storing the outputs, which are generated using the given commandEXPOSE– This informs docker that container listens on a given portCOPY– This copies files/folders from source to destination pathRUN– Executes given command on given imageENTRYPOINT– This sets the container to be run as an executable
More information about Dockerfile can be found here.
Generating Docker Image From Dockerfile
Dockerfile is used to create a docker image as this file contains all the necessary information which is required to build an image. Build is the command which is used to create an image from the docker file. Now generating an image can be done either by using the Visual Studio UI or by using CLI. Let’s have a look at the Visual Studio path here.
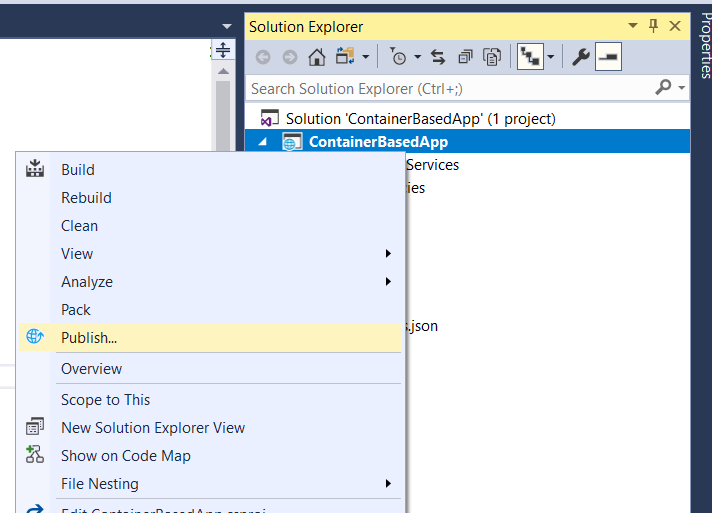
Right click on the project and click on Publish…
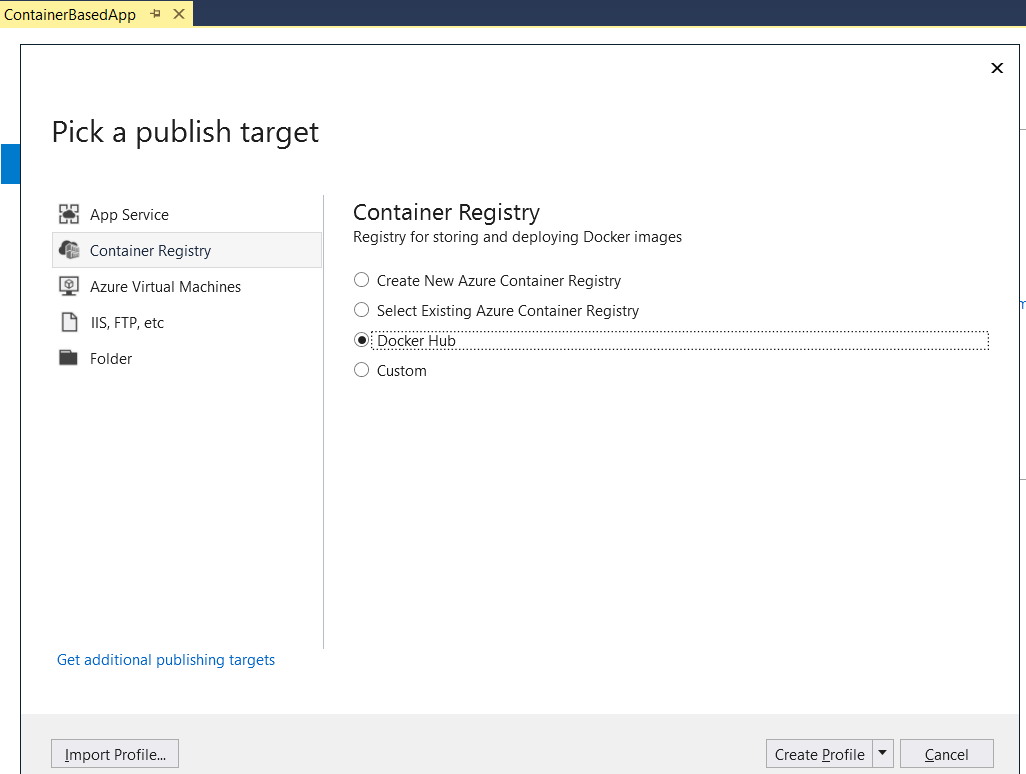
Next is to create container registry, which will deploy and store docker images and here, we will select Docker Hub as shown below:
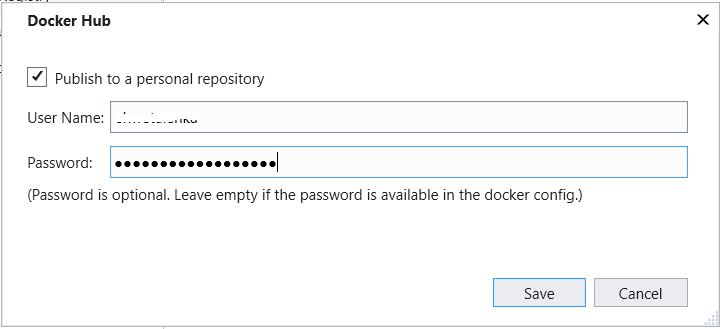
On clicking of Create Profile button, the below dialog will appear, in which you need to supply credentials to connect to Docker Hub.
If everything is done correctly, the below screen would appear:
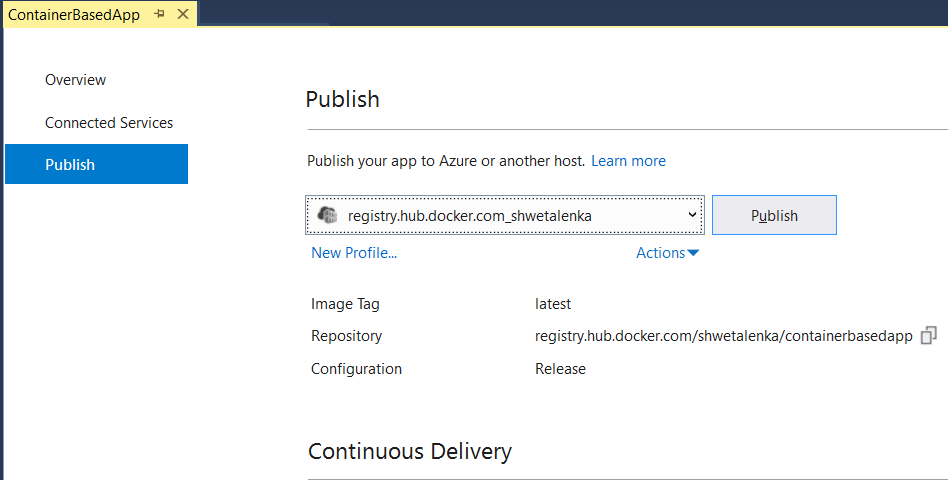
Now click on Publish button. It will launch Docker executable and execute each and every line written in Dockerfile.
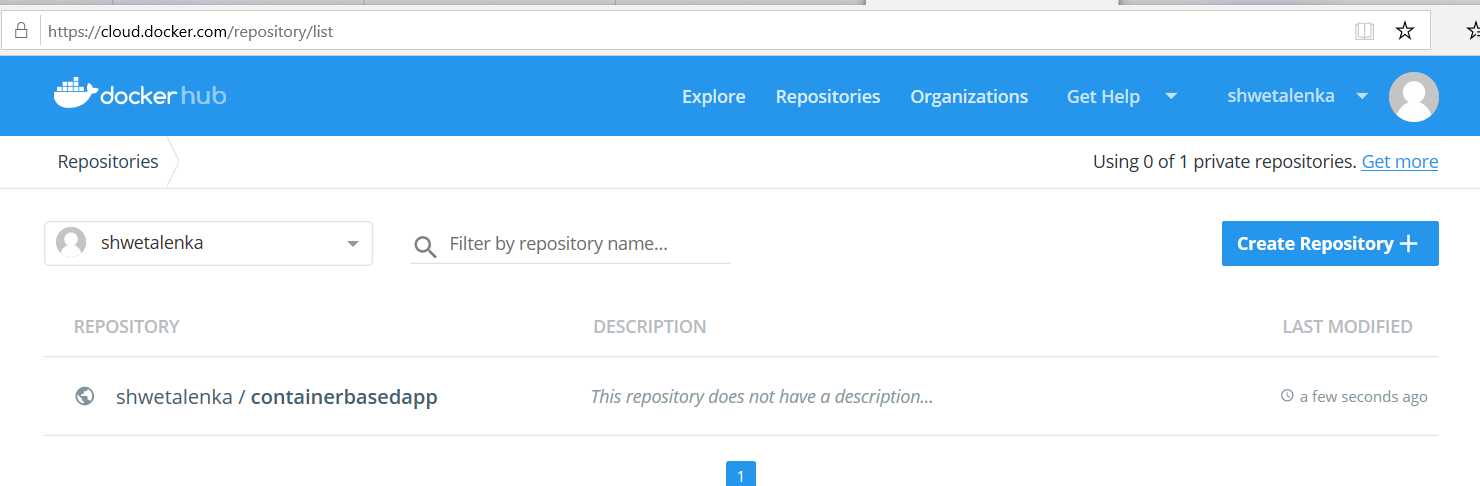
On successful publish, you will get a message ‘Successfully tagged containerbasedapp:latest‘ logged in Output window. But the same can also be verified in docker web site as shown below:
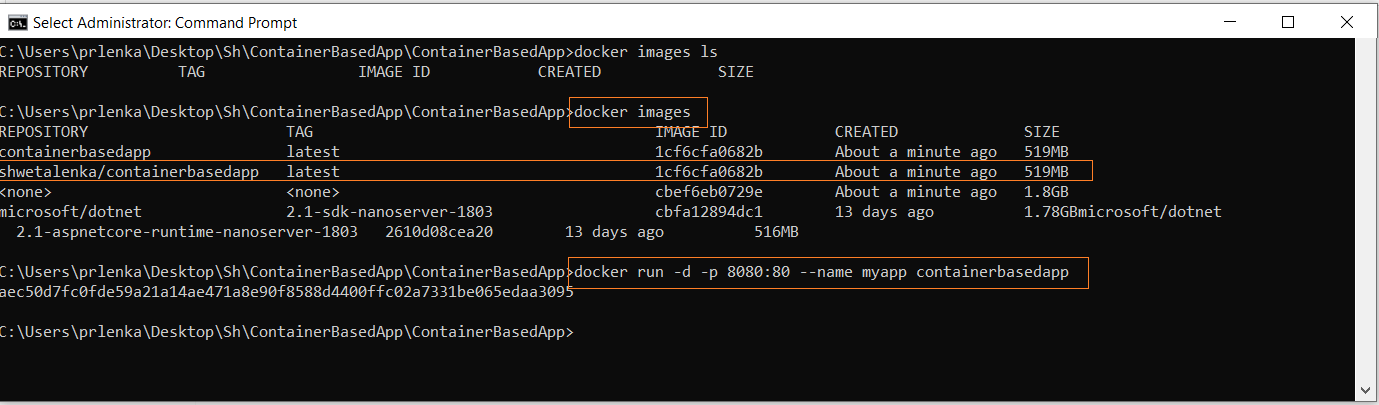
It can also be verified by command prompt:
Now it’s time to run the application and verify whether we can view our web page or not. For that, simply run the application from Visual Studio and you would be able to see your view. Here is what I can see from my sample application:

Here, you can see that your application is running inside a docker.
Containerizing Existing Multi-Tier Application
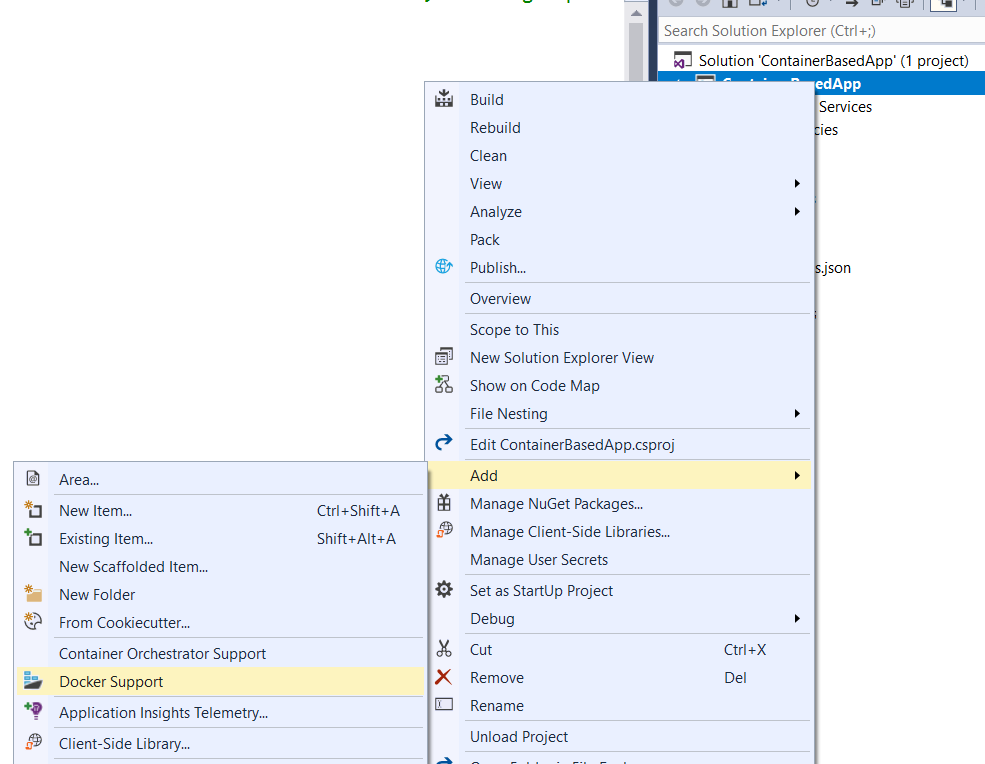
Based on the application structure, whether it is a single standalone application, or it has many services, containerization can be introduced. Based on the application, sometimes single container suffices and sometimes one container per service or component is required. To enable the docker deployment in an existing application, go to Solution Explorer, right click on the project, select Add and then select Docker Support as shown below:
Performing the above action will add the files required for Docker. I’m restricting this article at this point and will write more about docker-compose in my upcoming articles.
Key Takeaways
Containers provide an ability to package up complete an application with all the required dependencies, which means the application will run on any other machine regardless of any settings. In one statement, we can summarize everything as – Dockerfile is a deployment script, Image is a packaged application, Registry is an image store and Container is a virtual environment for running the application.


")


 bước triển khai BSC")


 CỦA OBJECTIVE (MỤC TIÊU)")
")