Though many easy-to-use resources are available to help with refactoring, you may not know about them. Check out these 10 tips to help you with efficient refactoring.
Something we can say with certainty is that where there is code creation, there will also be refactoring. After all, code written today is tomorrow’s legacy—especially when it comes to Microsoft technologies like .NET that receive several updates every year.
As developers, we must always be aware of the latest improvements made in the technology that we work in to make the most of them. Creating something that won’t be outdated in a few years or even months is impossible. Therefore, one more codebase becomes legacy and eligible for refactoring.
For us to be efficient in refactoring, several resources can help—some just restructuring the code, others through the Visual Studio IDE. Keep reading to learn 10 tips for helping you with efficient refactoring.
The Importance of Refactoring
Refactoring is a technique that basically consists of performing small transformations to the code in a way that does not change its behavior. Although small, these transformations make code easier to maintain and are intended to improve an application’s performance.
Refactoring is extremely important in a development team because it’s how programmers can demonstrate the real value of their performance in existing code. Plus, there are many short- and long-term benefits of refactoring code, such as:
- Agility: Well-written code makes it possible for developers to identify and resolve a problem in the code faster.
- User experience: With fewer crashes and better performance, the software becomes easier to use and brings a better experience to the end user.
- Modernization: Refactored code brings the possibility of modernizing libraries and putting the company that owns the code ahead of its competitors because it uses cutting-edge technologies already consolidated in the market.
Refactoring in C#
The C# programming language has always been in constant evolution and, lately, Microsoft’s effort to transform C# into a language with less ceremony and better performance is notable.
Regarding new systems, we’re free to use all the cutting-edge features made available by the latest versions of C#, but what about legacy code? That code was written when many of these features did not yet exist or were not used for some reason. In such cases, refactoring is necessary.
Unit Testing Legacy Applications
If you’re tired of reading articles about how to apply unit testing to new applications when most of your life is extending and enhancing legacy code, here’s a plan for (finally) exploiting automated testing when working with existing applications. It’s easier than you think, especially if you let Visual Studio and JustMock do the heavy lifting.
The following is a list of tips for refactoring code in C#. First, I’ll share poorly written code, then how it would be possible to create a better refactored version. Some examples also highlight tips on how to use Visual Studio features to perform refactoring faster.
You can access the source code with all the examples at this link.
1. Instead of Foreach, Use LINQ
Foreach is one of the most common methods programmers use to filter a list of values. However, although its execution is efficient, its syntax usually pollutes the code, because to find a certain value within the list it is necessary to resort to some condition operators such as if and else for example. To make the code more readable, a great approach is to use the resources available in LINQ, as can be seen in the example below.
- Before refactoring
var sellers = Seller.AllSellers();
var smallSellers = new List<Seller>();

foreach (var seller in sellers)
{
    if (seller.SmallSeller)
    {
        smallSellers.Add(seller);
    }
}- After refactoring
var sellers = Seller.AllSellers();
var smallSellers = (from seller in sellers where seller.SmallSeller select seller).ToList();
or
var sellers = Seller.AllSellers();
var smallSellers = (sellers.Where(seller => seller.SmallSeller)).ToList();
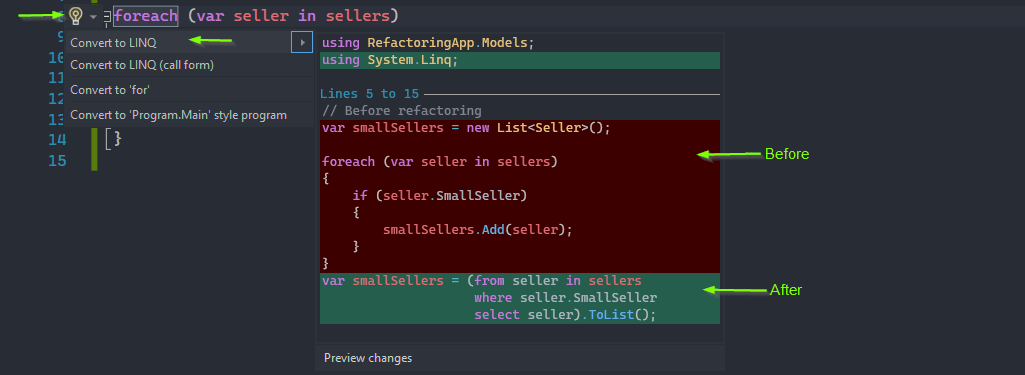
💡 If you are using Visual Studio, you can use a resource available that does the refactoring work for you. Just place your cursor over the foreach code and click on the lightbulb icon, and the option “Convert to LINQ” will appear. This makes it possible to preview the refactoring result, as seen in the image below:
2. Assign Methods a Single Responsibility
A very common problem encountered in refactorings is methods that have more than one responsibility—that is, they are used to perform several actions, which makes the code confusing and difficult to understand. When we create methods that have a single responsibility, we can organize the code and make it cleaner and easier to understand.
In the example below, we have a method responsible for doing several things in the first version.
First, a search is made to return all sellers. Then it checks if the mandatory fields of the new seller are filled in. If any of them is empty, an error message is returned. If not, it checks if this seller already exists in the list; if it already exists, an error message is returned, but if not, the new seller is added to the database.
// Before refactoring
    public string CreateSeller(Seller seller)
    {
        var sellers = _context.Sellers;

        string requiredFieldsMessage = string.Empty;

        if (string.IsNullOrEmpty(seller.Name))
        {
            requiredFieldsMessage += "Name is required";
        }
        if (string.IsNullOrEmpty(seller.ContactEmail))
        {
            requiredFieldsMessage += "Email is mandatory";
        }
        if (!string.IsNullOrEmpty(requiredFieldsMessage))
            return requiredFieldsMessage;

        if (sellers.Contains(seller))
            return "Seller already exists";

        _context.Add(seller);
        _context.SaveChanges();
        return "Success";
    }
Here is the opportunity to create separate methods, each with its own responsibility.
For this, we will create three new methods. We will also change the name of the main method to make it more suitable for its main function.
// After refactoring
public string CreateSellerProcess(Seller seller)
    {
        bool sellerAlreadyExists = SellerAlreadyExistsVerify(seller);

        if (sellerAlreadyExists)
            return "Seller already exists";

        string requiredFieldsMessage = ValidateFields(seller);

        if (!string.IsNullOrEmpty(requiredFieldsMessage))
            return requiredFieldsMessage;

        CreateNewSeller(seller);
        return "Success";
    }

    public bool SellerAlreadyExistsVerify(Seller seller)
    {
        var sellers = Seller.AllSellers();

        return sellers.Contains(seller);
    }

    public string ValidateFields(Seller seller)
    {
        string requiredFieldsMessage = string.Empty;

        if (string.IsNullOrEmpty(seller.Name))
        {
            requiredFieldsMessage += "Name is required";
        }
        if (string.IsNullOrEmpty(seller.ContactEmail))
        {
            requiredFieldsMessage += "Email is mandatory";
        }
        return requiredFieldsMessage;
    }

    public void CreateNewSeller(Seller seller)
    {
        _context.Add(seller);
        _context.SaveChanges();
    }
Note that in this new version, the responsibilities for each method were separated. We have a method to check if the seller already exists in the database and another method to validate the fields filled in. And, finally, we have a method to save the record if it has passed the previous validations. Thus, the code became much easier to understand and more cohesive through better-elaborated validations.
3. Move From Synchronous to Asynchronous
Asynchronous programming has a big advantage in that running long tasks in the background is possible while faster ones are being completed. One scenario that can often take a considerable amount of time is transactions in databases, so it is always advisable to use asynchronous functions.
In the example below, we first have an example of synchronously updating records in the database. If there are few records in the database, this execution will probably be fast. But if there are many records, it may take time, and in this case the other operations will have to wait for to be started. That’s not very performant.
// Sync example
public void UpdateSellers(Seller seller)
    {
        var sellerEntity = _context.Sellers.Find(seller.Id);

        _context.Entry(sellerEntity).CurrentValues.SetValues(seller);
    }
Below we can see the same method but done asynchronously. Note that we are using the ORM Entity Framework Core in this example, which has native asynchronous methods. In this way, persistence in the database becomes more performant because it does not lock other actions in the code.
// Async example
public async void UpdateSellersAsync(Seller seller)
{
    var sellerEntity = await _context.Sellers.FindAsync(seller.Id);
      _context.Entry(sellerEntity).CurrentValues.SetValues(seller);
      _context.SaveChangesAsync();
}
4. Generate Constructors To Simplify Classes and Values
Using constructors is considered a good practice. Through them, we manage to define default values, modify access and make more explicit the necessary values to instantiate a class—in addition to maintaining cleaner code when a class is called.
Notice in the example below how classes are instantiated with no constructors. The class with the constructor is simpler because we do not need to declare the fields, just pass the values by parameter.
public void OrderProcess()
    {
        var orderWithoutConstructor = new OrderWithoutConstructor()
        {
            CustomerId = "14797513080",
            ProductId = "p69887424099",
            Value = 100
        };

        var orderWithConstructor = new OrderWithConstructor("14797513080", "p69887424099", 100);
    }
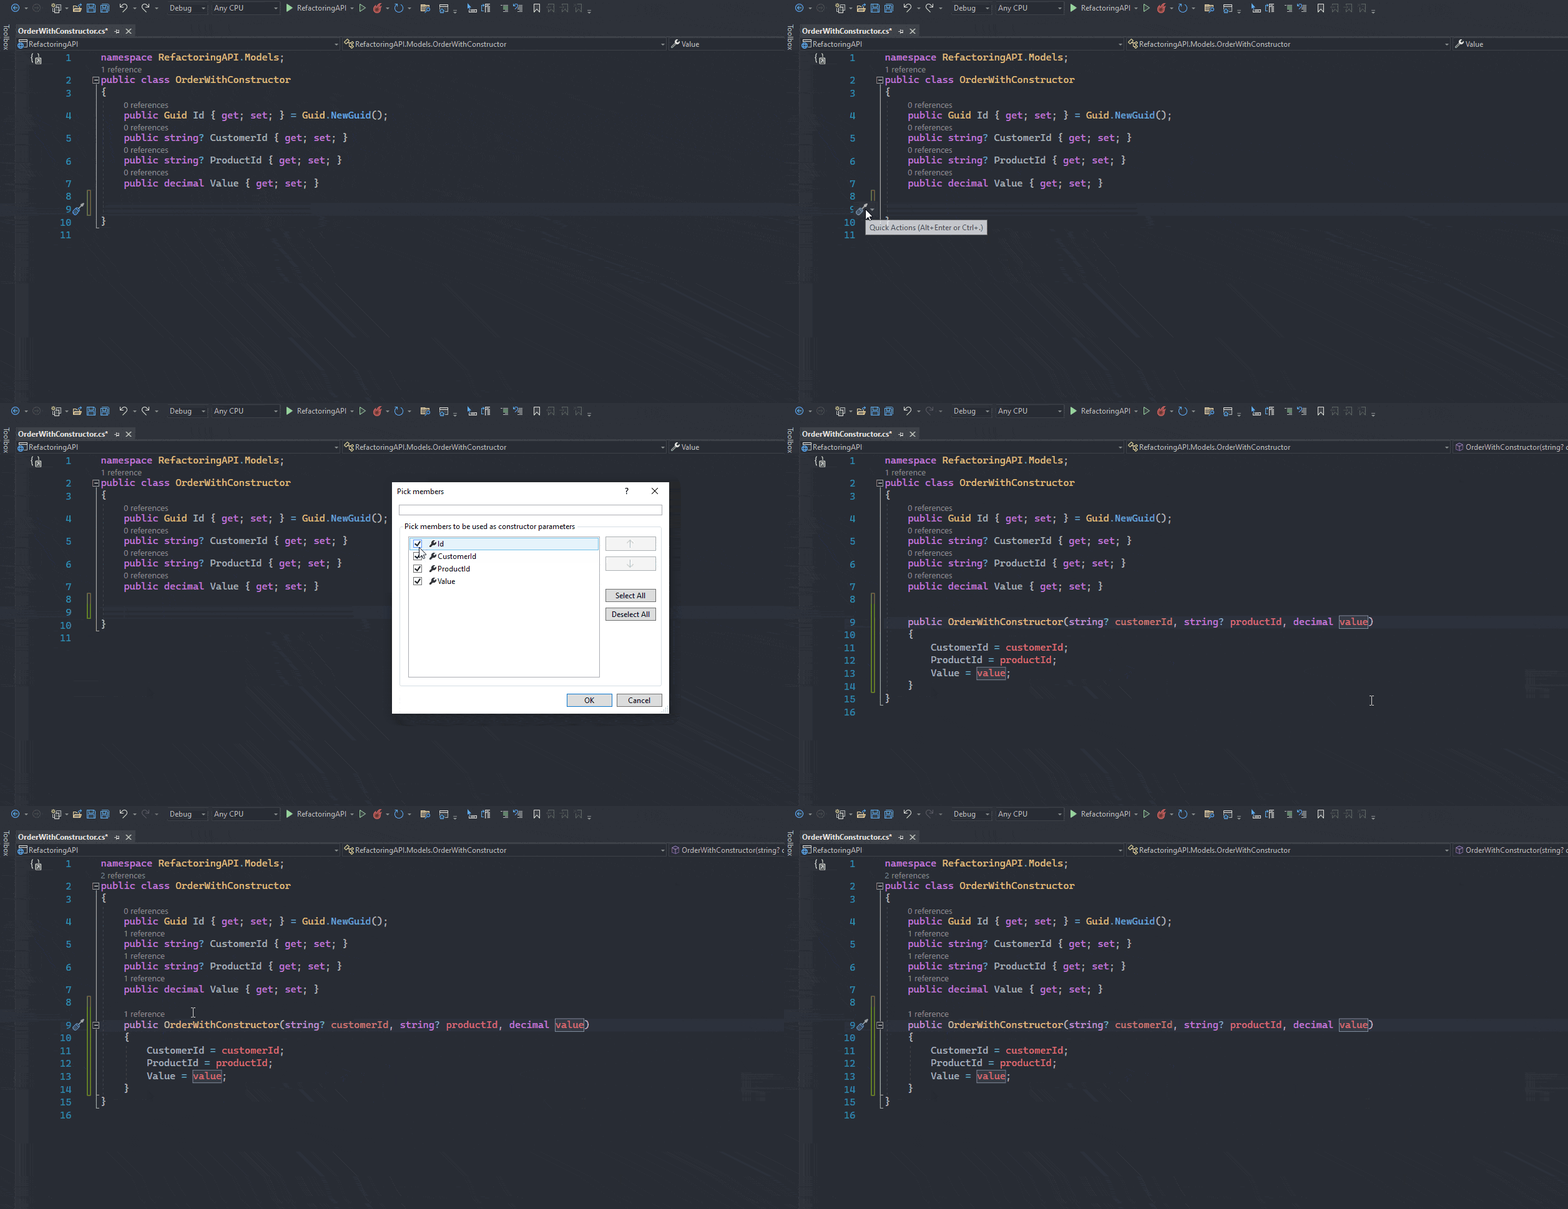
💡 If you are using Visual Studio, generating the builder through a Quick Action is possible, as shown in the GIF below.
5. Eliminate If/Else Chains
If and else chains are very common in refactorings, and, although they work, they make the code dirty and difficult to understand. To avoid this kind of problem, an alternative is to use the native C# function, switch.
With switch, we manage to obtain the same result as if, but in a more organized and easy-to-understand way. Below is the same example, first using the if conditions and second using the switch.
- Using
ifandelsechain
if (customer.Step == Steps.Start)
        {
            //Do something
        }
        if (customer.Step == Steps.InsertPhoneNumber)
        {
            //Do something
        }
        if (customer.Step == Steps.PhoneNumberOrEmailToVerify)
        {
            //Do something
        }
        if (customer.Step == Steps.VerifyToken)
        {
            //Do something
        }
        if (customer.Step == Steps.DownloadApp)
        {
            //Do something
        }
        if (customer.Step == Steps.WithLogin)
        {
            //Do something
        }
        if (customer.Step == Steps.Finished)
        {
            //Do something
}- Using
switch
switch (customer.Step)
        {
            case Steps.Start:
                //Do something
                break;
            case Steps.InsertPhoneNumber:
                //Do something
                break;
            case Steps.PhoneNumberOrEmailToVerify:
                //Do something
                break;
            case Steps.VerifyToken:
                //Do something
                break;
            case Steps.DownloadApp:
                //Do something
                break;
            case Steps.WithLogin:
                //Do something
                break;
            case Steps.Finished:
                //Do something
                break;
            default:
                //Do something
                break;
        }
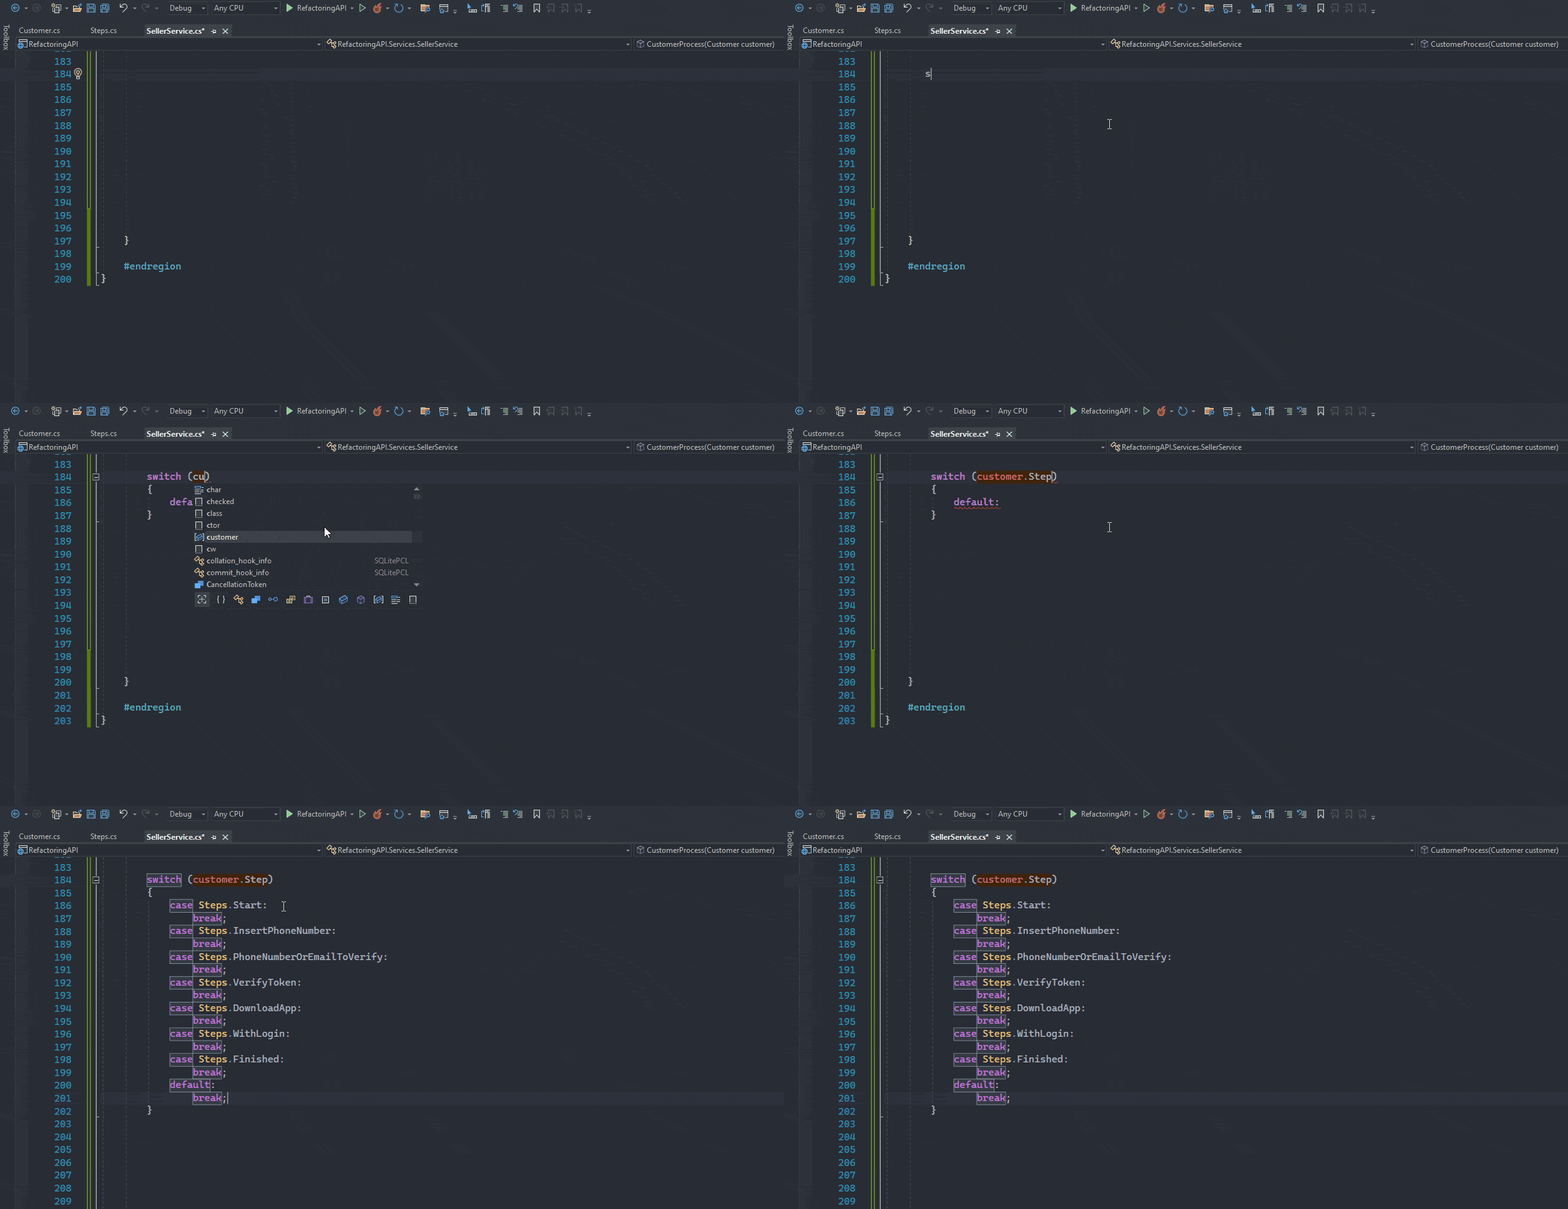
💡 In Visual Studio, it is possible to use a feature that automatically fills the entire switch structure. Just type the switch condition and click below, and the entire structure is created, as can be seen in the GIF below:
6. Generate Interfaces
Interfaces in C# are objects that represent contracts, guaranteeing that the behavior of the interface will be respected in the classes that implement them.
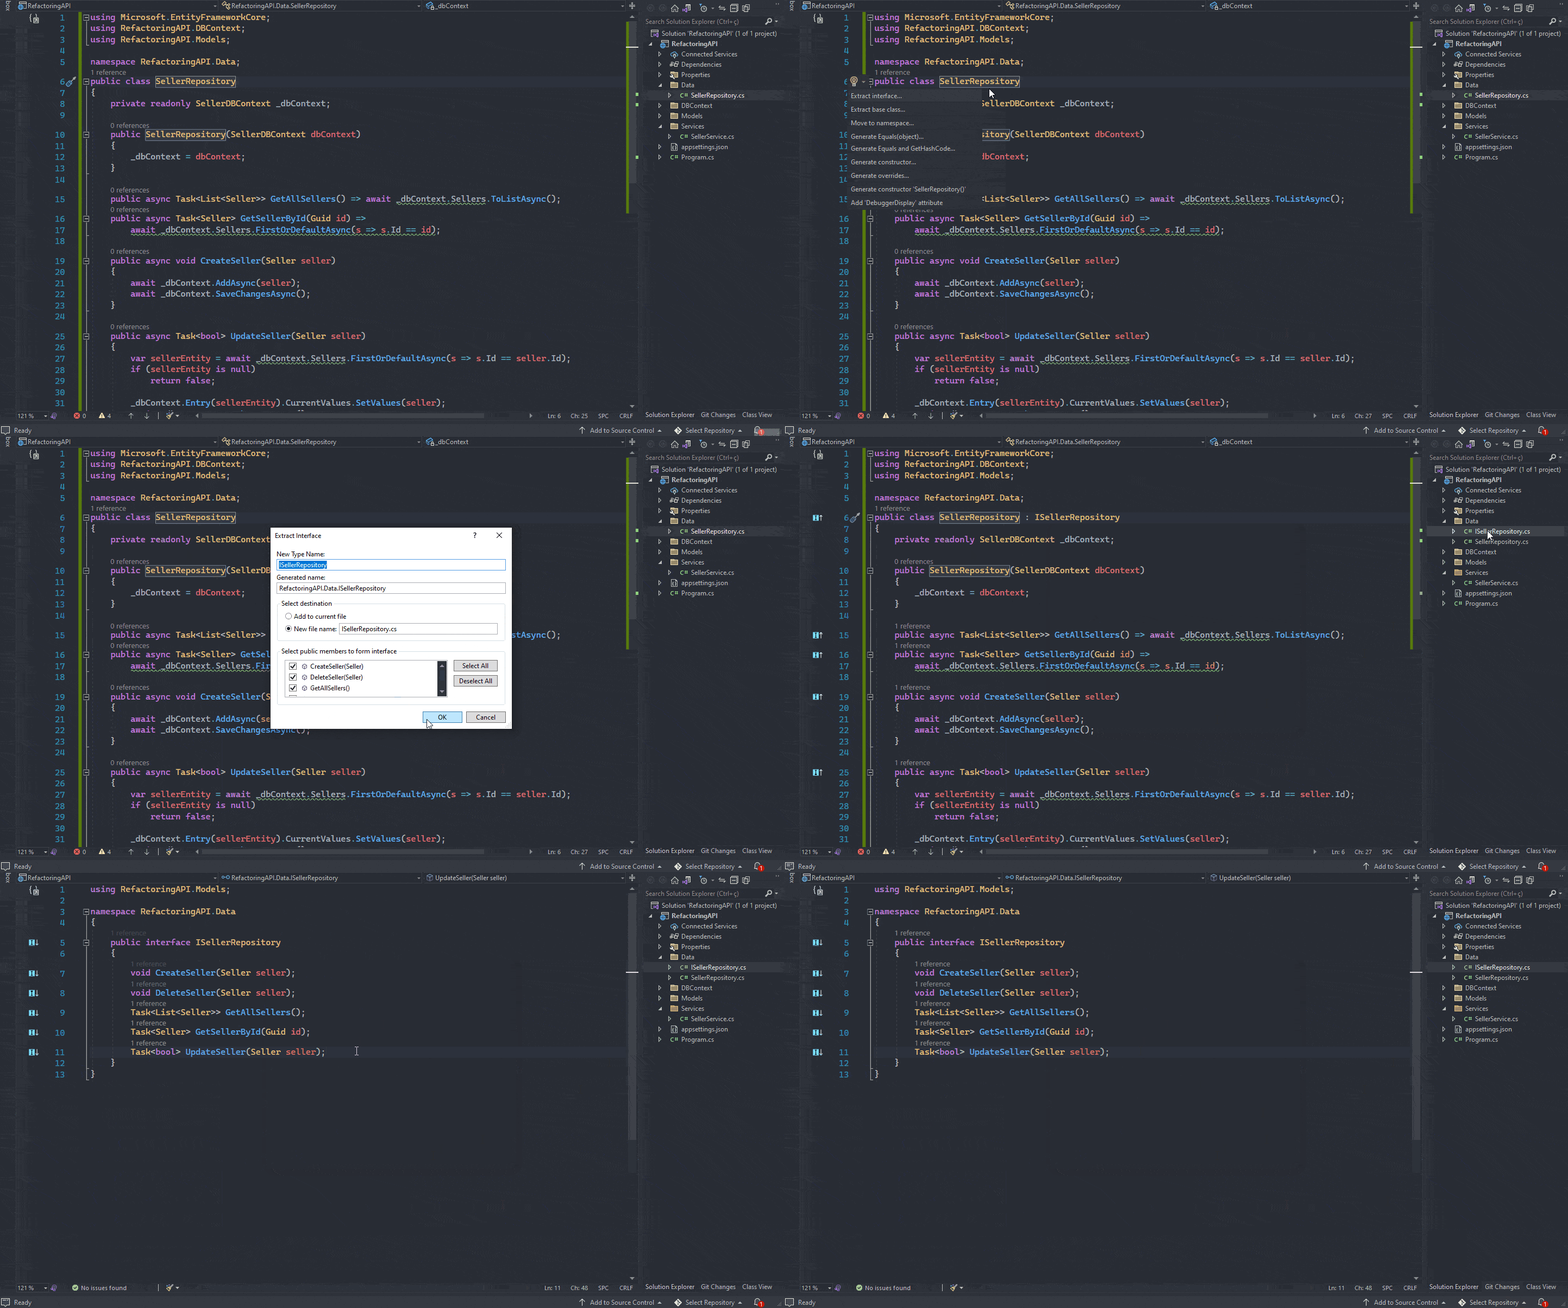
It is very common to find classes that do not implement interfaces in refactorings. To solve this problem, we can use a Visual Studio function called Extract Interface that automatically generates an interface based on the selected class, as shown in the example below:
7. Eliminate Unnecessary Variables
Despite being useful, variables are often unnecessary and pollute the code, making it more difficult to read.
Always consider if it is really necessary to use a variable—it is often possible to use the ternary operator (?) or some LINQ feature like the Any() method for example, as seen in the example below:
- Before refactoring
    public bool SmallSellerVerify(List<Seller> sellers)
    {
        var result = false;

        foreach (var seller in sellers)
        {
            if (seller.SmallSeller == true)
            {
                result = true;
            }
            else
            {
                result = false;
            }
        }
        return result;
}- After refactoring
//Using Any() and ternary operator (?)

public bool SmallSellerVerifyRefactored(List<Seller> sellers) => sellers.Any(s => s.SmallSeller) ? true : false;

//Using only Any()
public bool SmallSellerVerifyRefactoredTwo(List<Seller> sellers) => sellers.Any(s => s.SmallSeller);
8. Rename Efficiently
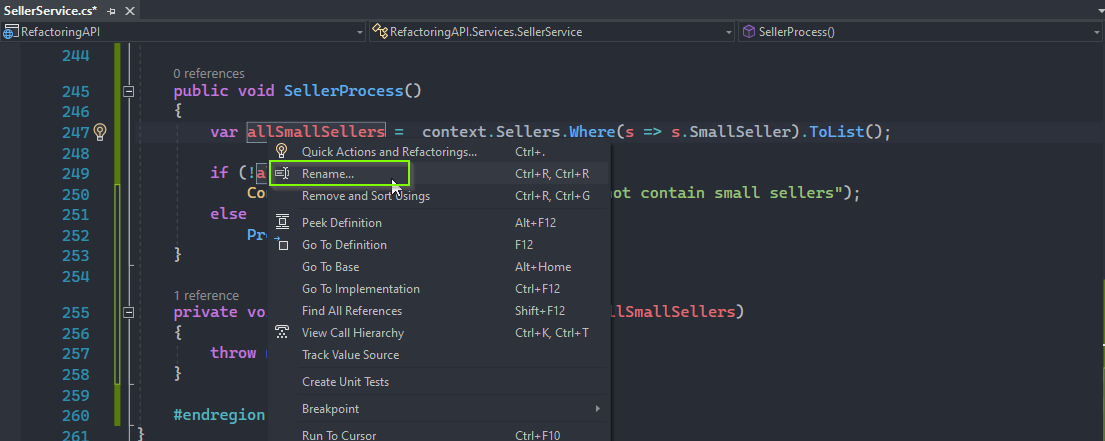
Renaming methods or variables can be time-consuming if you don’t know how to use the right resources. Imagine renaming a method that is used by dozens of classes. To streamline this task, a feature in Visual Studio will rename the object in all its references.
Just right-click on the name you want to rename and choose “Rename,” enter the new name and click “Apply.”

9. Remove Unnecessary Usings
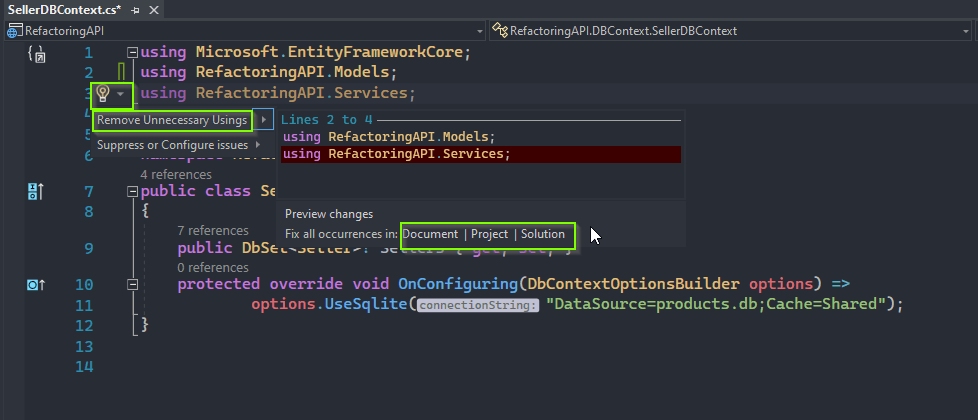
Removing unnecessary using instances is always a good practice in refactorings, as it leaves the code clean, with fewer lines.
Visual Studio has a feature to facilitate removal. Just position the cursor over a using that is not being used, click on the lightbulb icon, and choose the option “Remove unnecessary usings.” In the open window, you will have options for removal at the Document, Project or Solution level.
10. Generate Methods Automatically
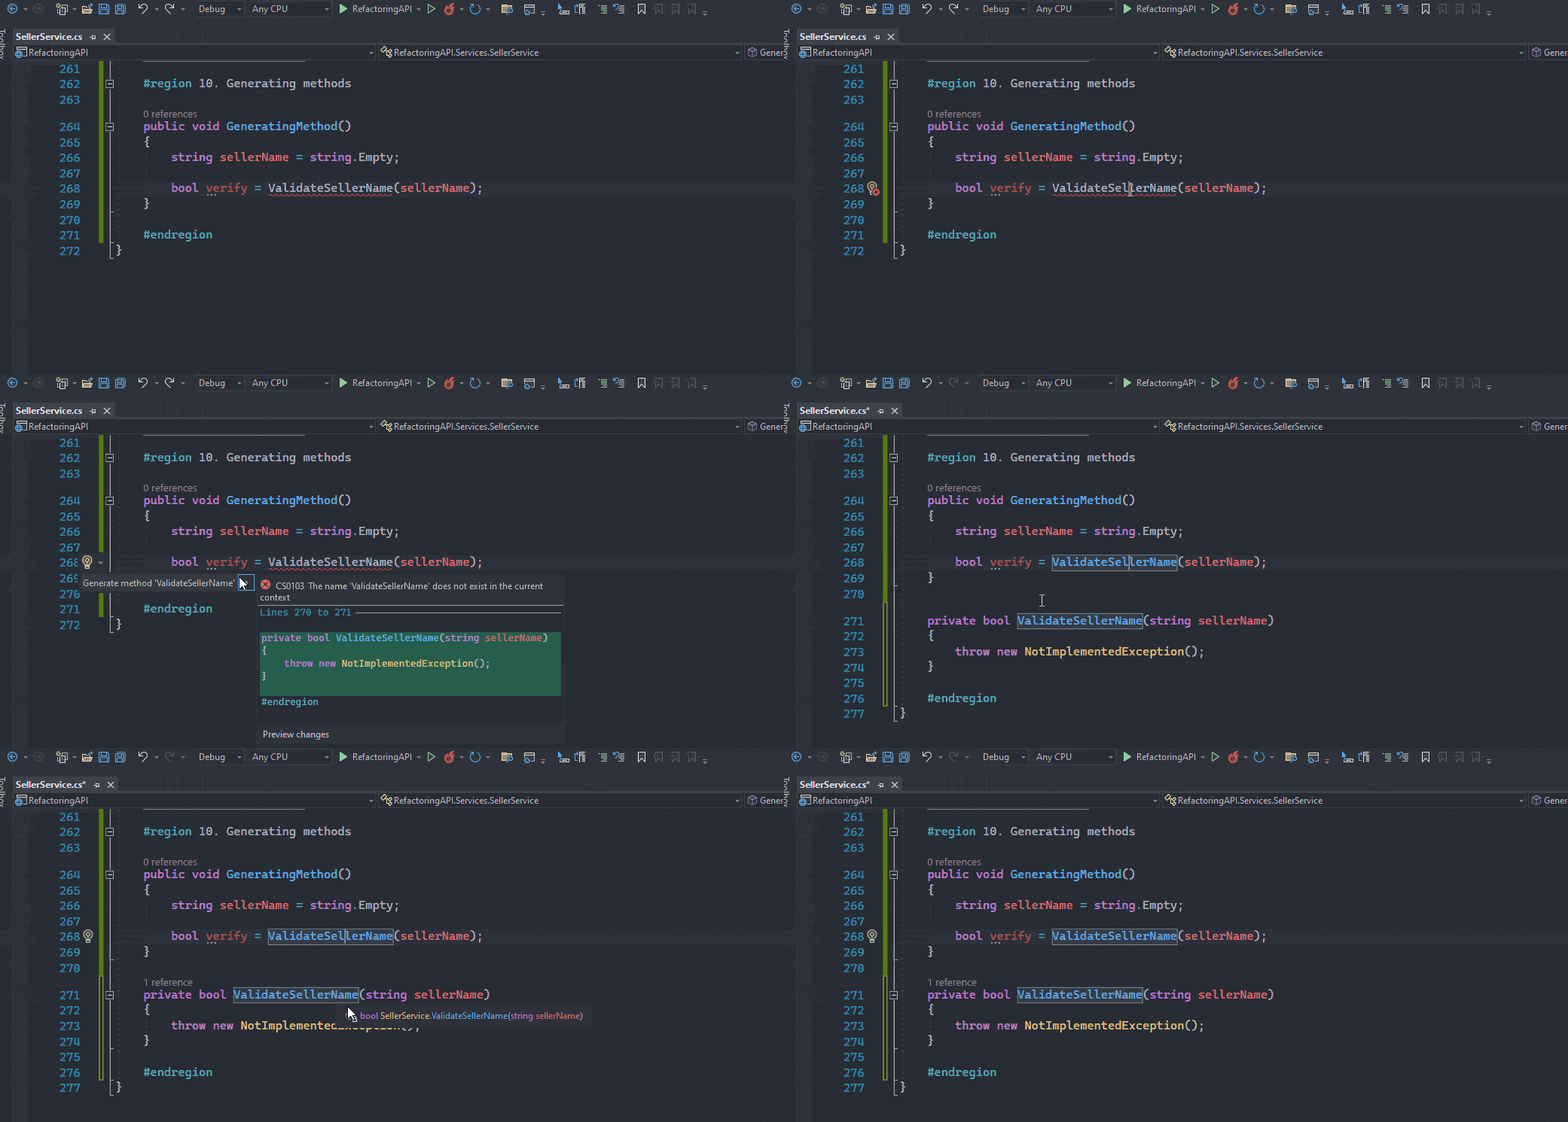
As developers, we often need to save time, and a very useful function in Visual Studio is that you can generate methods automatically. Just write your declaration and pass the input arguments, then click the lightbulb icon and choose the option “Generate Method,” as shown in the GIF below:
Conclusion
As seen in the article, refactoring is an ever-present task in the day of software development, and to make this work easier there are many resources—especially if you are using Visual Studio.
So, the next refactoring you do, don’t forget to review these tips and put them into practice.


